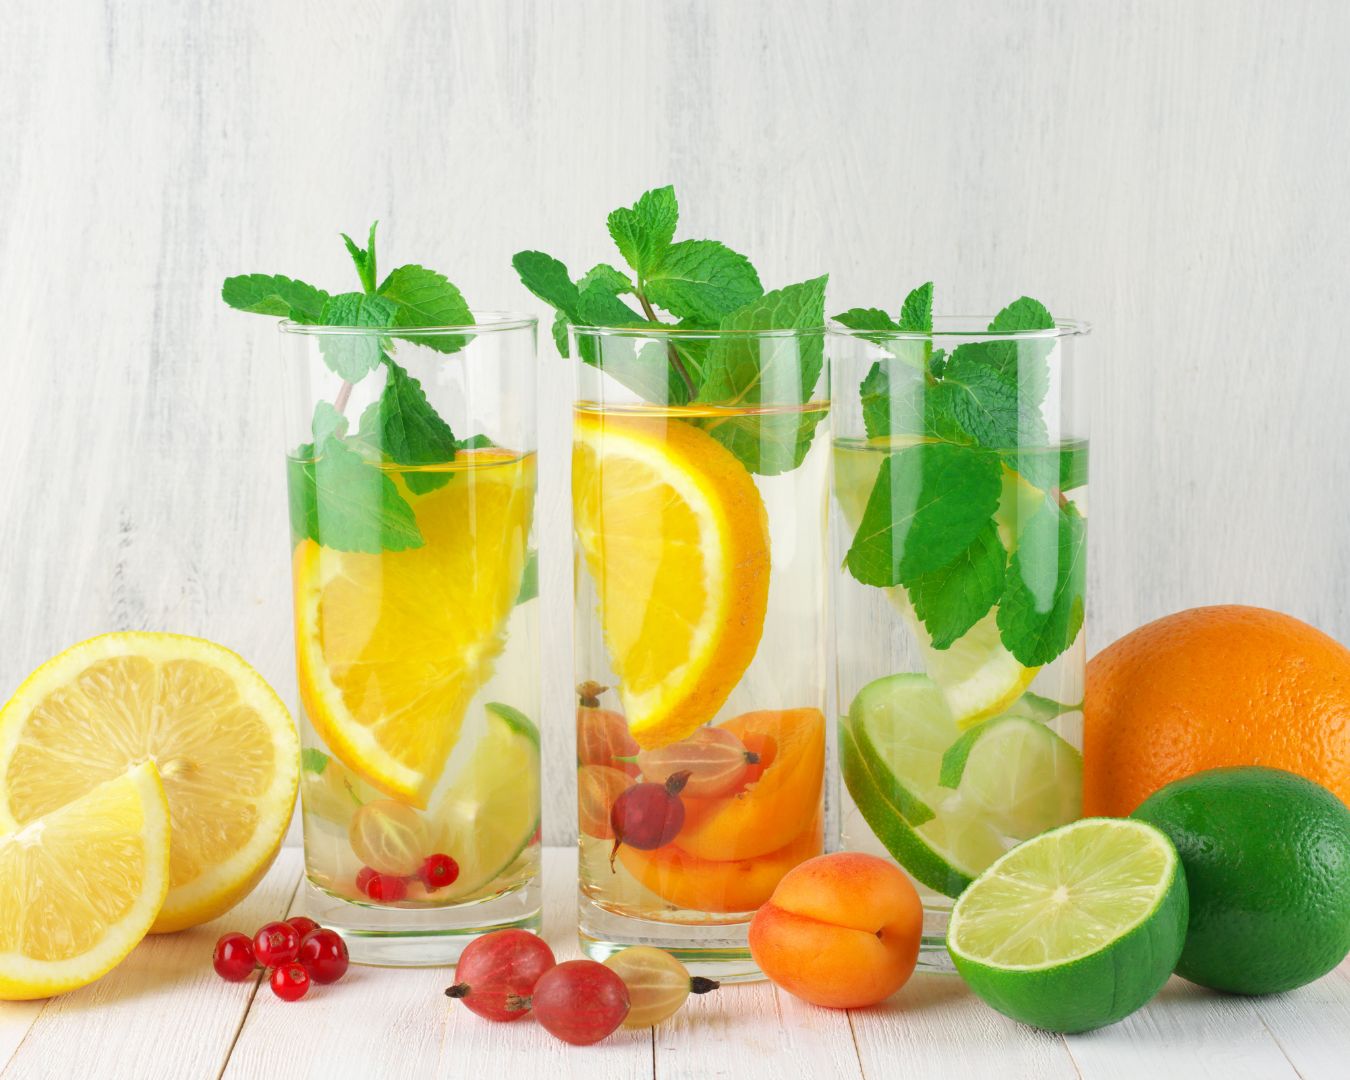
How-To

How to Get Lingering Smells Out of Bakeware

Silicone bakeware is naturally nonstick, making it easy and versatile in the kitchen. They are made of inert material, so storing is a breeze since they can be collapsed down to save space. A silicone cookware is only as good as its cleanliness. There’s nothing worse than having custom ice cubes taste like last week’s pesto bombs. They can leave behind a somewhat plastic-like taste and smell when they’re brand new. Here’s how to get any lingering smells out. What You’ll Need: An oven A sponge and dish soap A baking sheet Oven mitts Directions: Preheat your oven: Preheat your oven to 350 degrees. Wash your silicone bakeware: Give your bakeware a quick wash (with a sponge and warm, soapy water) to ensure there isn’t any lingering oil or bits of food left on your bakeware. “Bake” your bakeware: Put the pieces on a baking sheet (this will make things easier to get in and out of the oven) and bake your bakeware for one hour. Try the sniff test and let the pieces cool: Pull the baking sheet out of the oven and perform a careful sniff test. If you’re getting even the faintest whiff, return the sheet to the oven in increments of 20 minutes. Once they’re stink-free, let the pieces cool before you put them away. NOTE: Make sure your cookware is 100% silicone. Rubber could melt and fillers in your silicone could also pose a melting problem. Source: the Kitchn

How to Organize Your Kitchen After Moving

After a move, the kitchen should be the first priority to be unpacked so you can begin preparing meals. The space should be functional, organized and comfortable. If you’re moving into a new home, there’s a chance it hasn’t been properly cleaned. Before unpacking, take some time to clean especially where you’ll be putting dishes, cutlery, and glasses. Be sure to also clean your countertops and sinks. Next, go through the space and imagine how you’ll be doing your usual chores and activities. Where would you normally reach for supplies? You’ll get a better grasp of where items should go. Take Inventory. If you haven’t already labeled the contents of each box, go through to see what’s inside. Unwrap larger items and take stock of what you have to sort and organize. Do this first or you may place an item in one place, then have to move it to another later. Start Unpacking. Start with the areas that will be used the most, such as the stove and sink. The storage near these areas will be the most accessible. Anything stored above eye level will be difficult to reach. Start unpacking the essential items you’ll be using everyday in the most accessible spaces. For example, cutlery in the drawer immediately to the side of the sink. Arrange by Frequency. Apply the same method to the rest of your cupboard spaces. Place bowls, cups and plates you’ll be using every day on a shelf that is at eye level or lower. Pots and pans should be near the stove along with their lids. Put items you won’t be using as often in lower drawers such as baking sheets or roasting pans. Keep toxic items in hard-to-reach places especially if there are young children. Organize. Store canned goods and dry food in a pantry space that is separate from dishes. Spices can be closer to the stove since you’ll want those to cook. After you spend some time in your home, you’ll establish a routine for cooking, cleaning and eating. Adjust your items if they don’t work along your routine. Make your kitchen work well for you and your family. Source: the Spruce

Tips for Moving Appliances

Planning a move in the near future? Follow along this guide to ensure your kitchen appliances are properly prepared for the transition. Skip out on extra mover fees and avoid any malfunctioning appliances after the move. With all major appliances, it’s best to contact the dealer for specific move instructions or refer to the owner’s manual. What You’ll Need: Household cleaner Cleaning and/or work gloves Packing tape Screwdriver and/or wrench Refrigerator. Unplug your refrigerator at least 24 hours prior to the move. Dispose of all perishables and make sure it is cleaned thoroughly. Once the freezer has defrosted, clean and dry all surfaces and removable containers. This will prevent mildew and odors forming. Either remove or secure all racks so they don’t shift around during the move. If your refrigerator has an icemaker, disconnect the water line and make sure it’s completely drained. Stove. Thoroughly clean the inside and outside of the stove. Be sure to remove the racks or securely fasten them so they don’t shift around. If you have a gas stove contact your gas company or where the stove was purchased from to find out if you can move it without a professional. Make sure the gas is turned off before you start disconnecting the line with care. These lines can be fragile and require special handling. Tape down the knobs and elements to make sure nothing is lost during the move. Dishwasher. The dishwasher needs to be emptied and the utensil holder/rack removed and packed separately. Run a cycle then let the unit dry before you tape the door closed. Finishing Touches. Secure all power cords so they don’t dangle or come loose. Make sure all the doors, extra nuts or screws are taped and secured before moving. Source: the Spruce

Brewing a Better Cup of Coffee

If you’re trying to cut back on running to your typical coffee shop, we’ve got you covered on how to up your coffee brewing game. Whether it’s finding and storing beans, finding the right brewing method or how to add an extra boost of flavor, here’s what you should know to make a better cup of coffee. Learning What Kind of Coffee You Need We all have differing coffee tastes, what tastes good for one person might not be appealing to another. The trick is knowing how to find the best coffee based on your needs and how to properly store it when you get home. If you want complete control, buy whole beans. You’ll be able to grind and brew to your liking. If you want something quick and simple, try a pre-ground coffee instead. When buying whole beans, ask when the beans were roasted. You’ll want to know how fresh the beans are and the best method to brew them. Let your brewing method dictate the grind of the beans, as it’ll affect the final favor of your coffee. You should always store beans in an airtight container, preferably in a cool and dark place like a pantry or cupboard. Choosing a Brewing Method There are many options for brewing coffee. It all comes down to what method works best for you and the type of coffee you like. Here are a few examples. Aeropress. If you’re into gadgets and only planning to brew a cup or two at a time, the Aerporess could be the tool for you. It’s relatively inexpensive and easy to use. The trick is nailing the water temperature. French Press. It’s an easy and inexpensive way to brew a few cups of coffee. Don’t forget to transfer the coffee to a carafe after, or you run the risk of the coffee becoming bitter. Cold Brew. The better alternative to dropping ice cubes in a glass of hot coffee. These grounds are steeped overnight in cold water for an easy coffee fix. Latte. You actually don’t need a fancy espresso machine to enjoy a latte at home. All you need is an extra-strong cup of espresso blend and frothed milk made in a microwave. Upgrading Your Coffee Don’t stop after your coffee is brewed. There are many ways to upgrade your coffee further such as milk, cream or sweetener. Frothed milk is a fast and fancy way to take your coffee to the next level. All you need is milk, a clean jam jar and a microwave. You can also add some flavor with pantry staples like spices, a pat of butter, coconut milk or even ice cream. Don’t stop with just the ordinary cream and sugar! Source: the Kitchn

How to Pasteurize Eggs

For popular recipes such as mayonnaise, hollandaise and royal icing, raw and partially cooked eggs are a necessity. However, raw or partially-cooked chicken eggs can carry salmonella bacteria. You can still enjoy these recipes with peace of mind after pasteurizing eggs. The process of pasteurization brings eggs to a temperature that kills dangerous pathogens. How to Pasteurize Eggs on the Stove Start with room temperature eggs: Starting with eggs that aren’t cold ensures you pasteurize the entire egg, rather than just the parts closest to the shell. Use fresh eggs with no cracks and let them come to room temperature. Cover the eggs with 1 inch of water: Fill a small saucepan with cool water and gently put the eggs in the pan. Make sure they are covered by 1 inch of water. Heat the water slowly to 140° F and hold for 3.5 minutes: Put the pan on medium heat. Let the water slowly come to 140° F. Check the temperature of the water with an instant-read or candy thermometer. Hold that 140° temperature for 3.5 minutes for large eggs or 5 minutes for extra-large eggs (eggs between 64 and 70 grams).Keep an eye on the temperature this whole time, adjusting the burner or moving the pan as needed to maintain the correct temperature. Transfer eggs to a bowl of ice water to cool: Use a slotted spoon and gently transfer the eggs to a bowl of ice water to cool them down. Your eggs are now pasteurized! Mark and refrigerate: Use a permanent marker to mark your eggs so you know they’re pasteurized. Use them right away or refrigerate for up to 1 week. How to Pasteurize Just Egg Whites or Yolks Bring water to a boil and separate the eggs: Bring a large pan saucepan of water to a boil. While you wait, crack as many room-temperature eggs as you need into a heatproof bowl. If you only need to pasteurize egg yolks, you can do just the yolks. Conversely, if you only need to do the whites, just do the whites. Add water to the bowl of eggs: Add 2 tablespoons of tap water for each whole egg used, or for each single yolk or egg white.For example, if you used egg whites from two eggs, add four tablespoons of water to the bowl of egg whites. If your recipe calls for liquid such as milk, stock, or lemon juice, you may use that instead of water. Set the bowl over the pot of simmering water and scrape for 2-3 minutes: Set the bowl on top of the saucepan of simmering water and turn off the heat. Use a silicone spatula to constantly scrape the sides and bottom of the bowl. Don’t beat in air; this constant motion is to keep the eggs from scrambling and to maintain a constant temperature.Do this for 2-3 minutes, or until the water in the pan has cooled to lukewarm. Use immediately. Source: Simply Recipes

Tasting Chocolate Like a Pro

Most people will enjoy their chocolate without thinking much of the experience. But there are several tips and tricks to tasting chocolate like a pro. Use them to pick up on different flavors and textures your chocolate may contain. There’s also several ways you can determine the quality of the chocolate. Listen for a snap. There’s a scientific way to determine the quality of chocolate. A snap test allows you to determine if the chocolate is in temper. A tempered chocolate takes much skill and it’s one mark of quality. Break a piece and listen for a sound very much like when you snap your fingers. Dark chocolate will have a stronger snap than milk and white chocolate. The amount of cocoa butter will determine the sound of the snap. If the chocolate bends, it’s too warm or wasn’t stored properly. Smell a cut side. Just like any herb, chocolate has a residual smell that lingers even after cutting it. Much of what we associate to taste is actually smell. Smell an edge of the chocolate you just snapped off the main piece of the bar. You may notice aromas you didn’t notice before that are earthier or fruitier. Hold your nose. As the chocolate melts in your mouth, pinch your nose shut for a second or two, then release. This trick will allow you to smell much more intensely than before. It’s especially helpful if you’re trying chocolate and feel like you’re not getting much out of it. Let the chocolate melt in your mouth. Chew one or two times to break the solid piece up in your mouth, then let it melt inside your mouth. Breathe in and out as it melts. You’ll notice other aromas and flavors that were hiding at first. What may seem like just a dark chocolate, can actually reveal other nuttier flavors like cashew and even caramel. Palate Cleansers. A palate cleanser is a food or beverage that you can take while you’re tasting. This is similar to coffee beans at a perfume aisle. Chocolate tasters also take advantage of cleansers. Choose natural beverages and foods such as room-temperature lemon water or water crackers and wait until the flavor has completely left your mouth before tasting your next chocolate. Source: the Kitchn

How to Hang Floating Wall Shelves

If you’re looking for the minimal look in your home, try floating shelves. These shelves have no brackets giving them the appearance they’re floating on your walls. Installation isn’t as hard as you may think. Here’s how to hang them in six easy steps. Select Shelves. There are many types of floating shelves on the market. Each has their own signature mechanism, but they all have some sort of wall-mounted bracket which holds the shelves in place. This will remain hidden once installed. Select the Placement. Decide where you’d like the shelves to go. Be sure to measure, and then, using a level, hold the shelves in place while you draw a marking line on the wall. Trace Brackets. Place the shelf bracket up against the marking line as a guide. Trace the screw holes for the bracket. Attach Brackets. Using the traced marks as a guide, drill screws through the brackets and into the wall. Start with the middle screw and ensure it is level before you attach the other screws. Attach Shelves. Slide the shelves over the bracket and attach any remaining securing screws. Decorate your shelves with anything you’d like such as artwork, plants or books! Source: House Beautiful

Cleaning Your Silver

There’s no denying your silver jewelry, dishes and cutlery will naturally tarnish over time. No matter how well you take care of your silver, it’ll always require upkeep to maintain its original shine. Polishing is abrasive, so it’s best to limit the cleaning to a minimum, anywhere from two to six times a year. If you have a silver polish, you’ll start by putting a small amount on a clean cloth and dampen if necessary. Rub and polish in an up-and-down motion, not circular to avoid fine scratches. Turn the cloth frequently as you don’t want to deposit the tarnish back onto the item. Rinse in warm water and buff with a clean, dry cloth. If you’re out of the silver polish you can also try these homemade cleaners If the silver is dull and not yet discolored, mix a few drops of mild dish soap with warm water and dip in a soft cloth. Rub then rinse in cool water and buff until dry. For heavily tarnished silver, mix a paste of three parts baking soda to one part water. Wet the silver and apply the cleaner with a soft, lint-free cloth. Work it into the smaller crevices, turning the cloth as it gets gray. Rinse and buff dry. Source: Good Housekeeping

How to Make Your Home Smell Great

The smell of your home is unique. Although it may not always be smelling the best, there are some steps you can take to boost the overall aroma on a daily basis. Start here to deodorize your house instead of burning a fragrant candle for a quick fix. Garbage Disposal Start with your sink. Drop lemon-scented dish soap into the disposal and run the water, then turn it on. You can also put lemon or lime rinds through the disposal with plenty of water. If the smell persists pour ½ cup of baking soda into the garbage disposal while running warm water. Carpets and Rugs Carpets can absorb smells easily, especially with food spills. Sprinkle baking soda over the entire carpet and let it sit for a few hours before vacuuming. You can also try this method out on pet beds or mattresses. Trash Can Taking the trash out may be obvious, but it’s often the trash can itself that creates the worst smells. While deep cleaning your kitchen, sprinkle baking soda in your trash can or use a deodorizing pack or pod. Take it a step further by spraying everything down with disinfecting spray to kill any remaining bacteria. Simmer Herbs and Fruit Take citrus slices and herbs like lavender or mint and simmer with water in a small saucepan on your stove. The heat will permeate the scent throughout your house and can easily be customized based on your available ingredients. Add Plants Plants are a great decoration while also eliminating unpleasant smells. Try bringing in jasmine, eucalyptus, gardenias for pleasant fragrances in your home. Just be prepared for the proper care and maintenance these plants require. Source: Good Housekeeping

Grow Your Savings in 2021

2020 was tough. A massive economic fallout left many people with additional debt and economic anxiety. Increasing your savings in the new year can be easier with the right strategies. Try these effective ways to build up or replenish your savings account. Unsubscribe Start off by hitting unsubscribe from all those store email lists. Even if we have the intentions to save, seeing an email for 70 percent off at our favorite store will always be tempting. It’s better to eliminate all those risks. Next, unsubscribe from any phone apps and subscription services that are hardly in use. Check with your monthly bank statements to see what you’re paying for and track all your subscriptions. Take it a step further and set up automatic monthly transfers for the same amount of the subscriptions you’re cancelling. Even a $15 monthly streaming service can turn into a $180 for your savings account by the end of the year. The 50-30-20 Budget Take a new approach to your budget with the 50-30-20 rule. With this formula, take 50 percent of your take-home pay and use it for needs like housing, food, utilities and other must-haves. Use the thirty percent towards any wants, like meals out or monthly subscriptions. The final 20 percent goes towards savings and debt payments, prioritizing high-interest debt or emergency funds. Bulk Buying Next time you’re out shopping for groceries or essentials consider buying in bulk. This will ultimately reduce the cost per unit and limit the trips to the store. You’ll also cut back on any impulse purchases when out shopping. Sign Up Bonuses Many credit cards offer bonuses when signing up for the first few months. The key here is to take advantage while limiting actual spending with the card. If you do decide to spend, only use it for purchases you can afford at the moment and will be able to pay off by the end of the month. Source: Apartment Therapy