Year: 2021

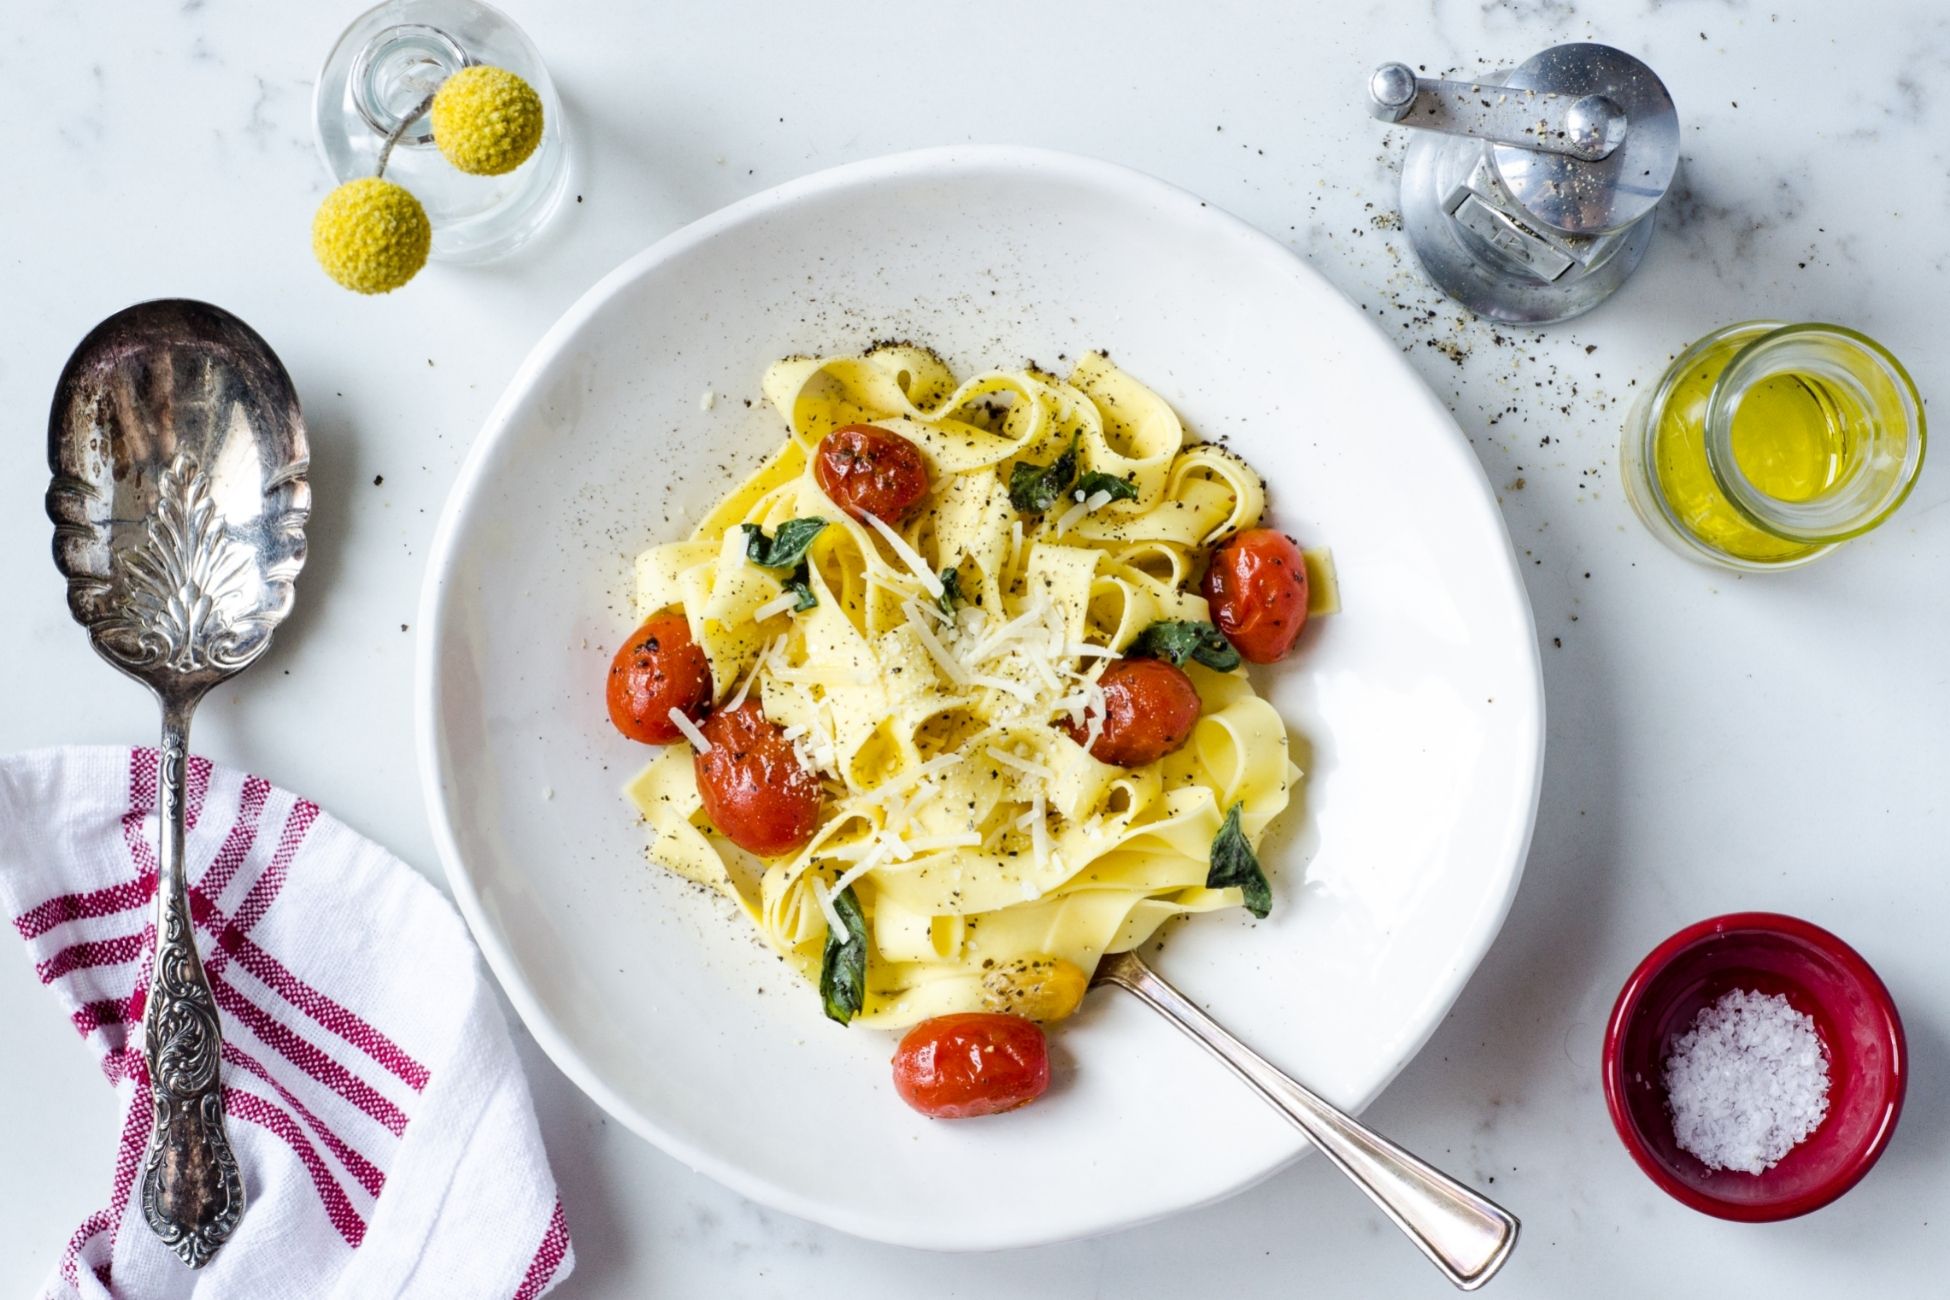
Pasta Carbonara Recipe

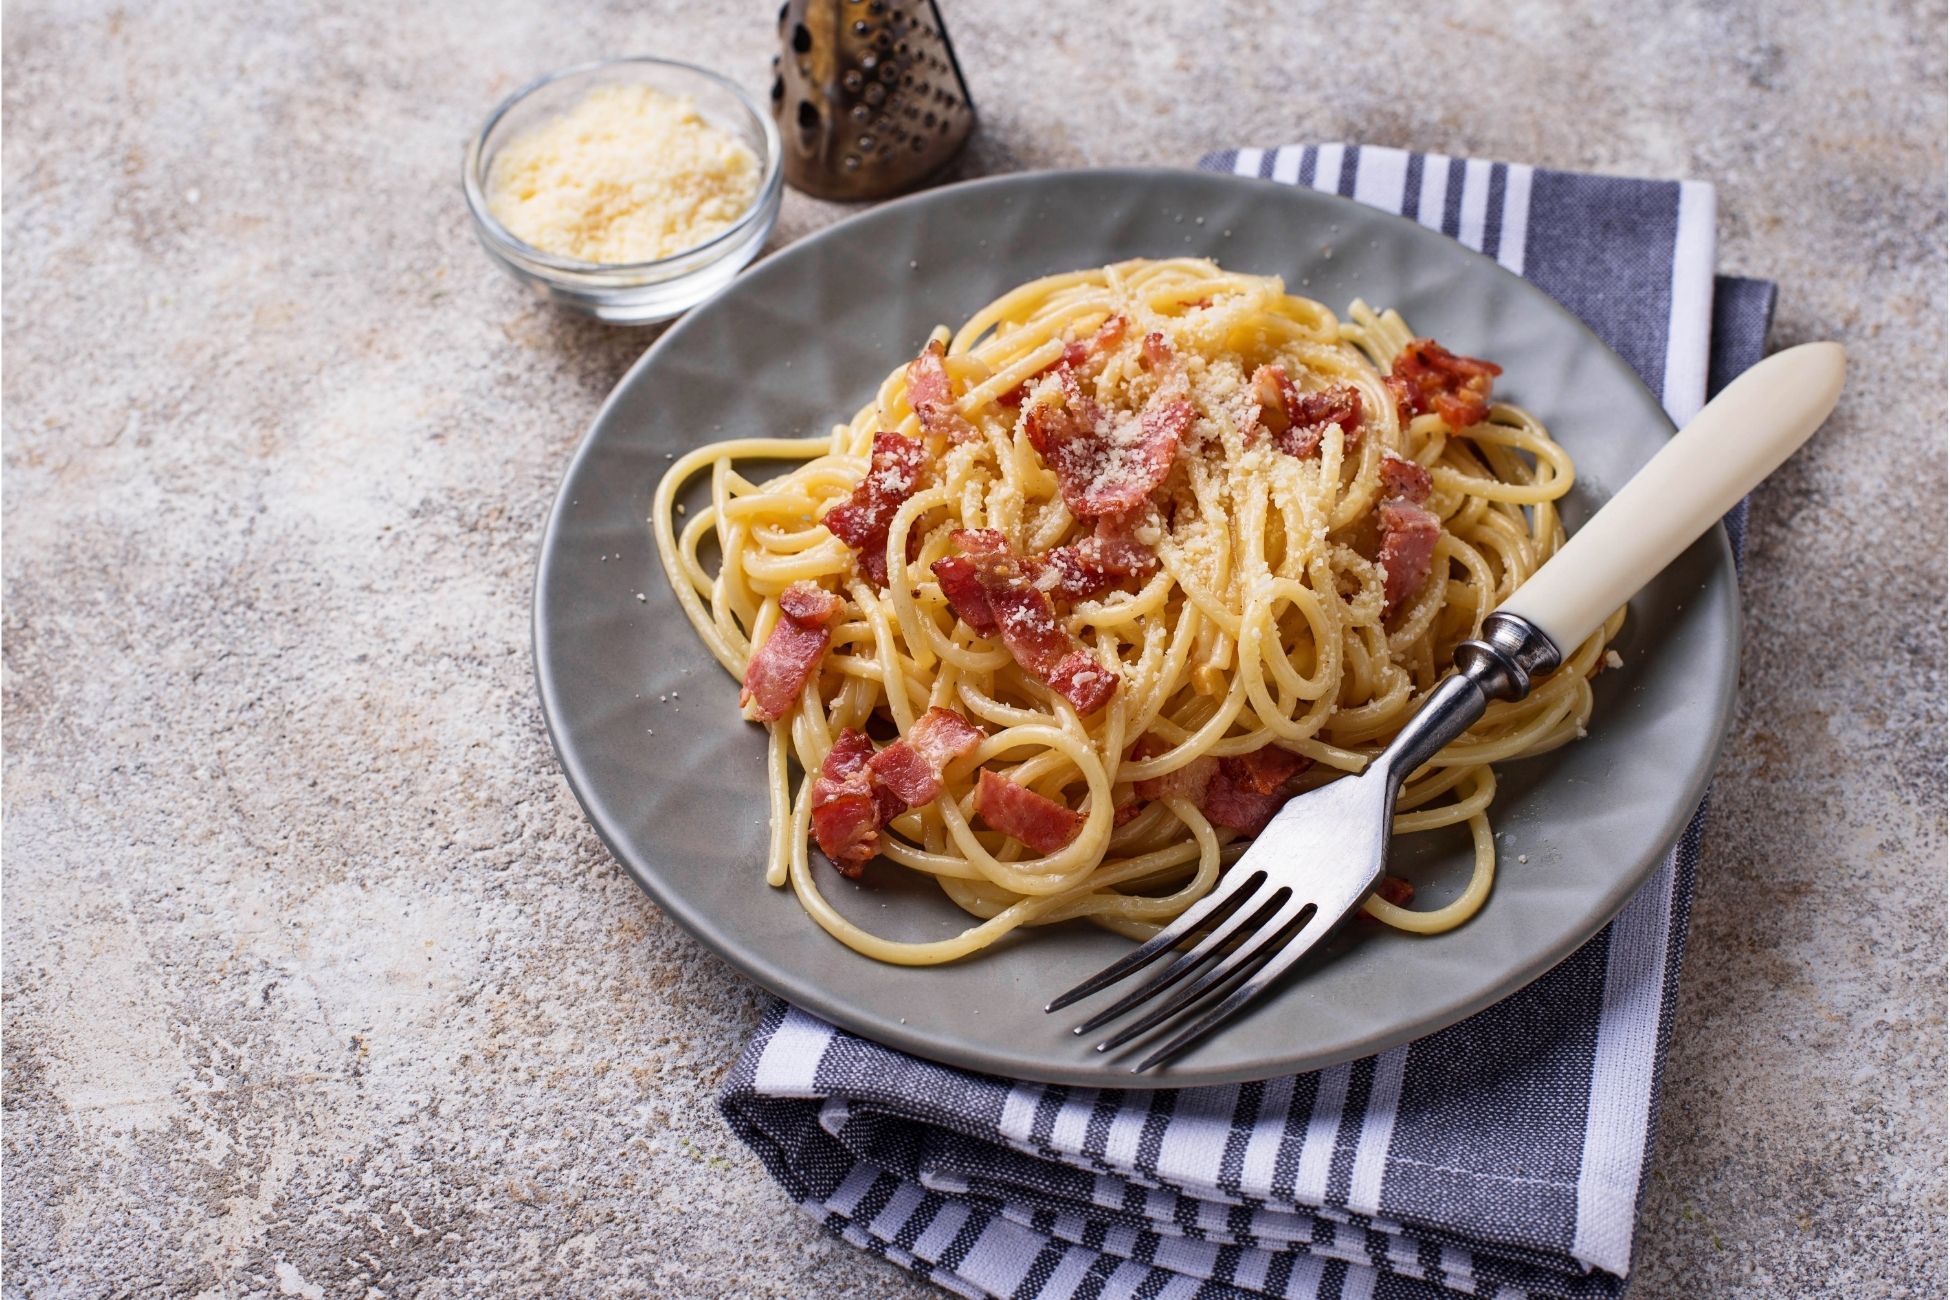
This luscious and wonderfully indulgent pasta is made with pancetta or bacon, eggs, Parmesan and little olive oil, salt and pepper. You can have this meal ready in just 30 minutes from start to finish. The trick to making a successful carbonara is stirring the egg mixture quickly into the pasta. If you’re looking for a cheese alternative, use pecorino or another hard cheese. Prep time: 10 mins Cook time: 20 mins Total time: 30 mins Servings: 4 to 6 servings Ingredients 1 tablespoon extra virgin olive oil or unsalted butter 1/2 pound pancetta or thick cut bacon, diced 1-2 garlic cloves, minced, about 1 teaspoon (optional) 3-4 whole eggs 1 cup grated Parmesan or pecorino cheese 1 pound spaghetti (or bucatini or fettuccine) Salt and black pepper to taste Directions Heat pasta water: Put a large pot of salted water on to boil (1 tablespoon salt for every 2 quarts of water.) Sauté pancetta/bacon and garlic: While the water is coming to a boil, heat the olive oil or butter in a large sauté pan over medium heat. Add the bacon or pancetta and cook slowly until crispy. Add the garlic (if using) and cook another minute, then turn off the heat and put the pancetta and garlic into a large bowl. Beat eggs and half of the cheese: In a small bowl, beat the eggs and mix in about half of the cheese. Cook pasta: Once the water has reached a rolling boil, add the dry pasta, and cook, uncovered, at a rolling boil. Toss pasta with pancetta/bacon: When the pasta is al dente (still a little firm, not mushy), use tongs to move it to the bowl with the bacon and garlic. Let it be dripping wet. Reserve some of the pasta water. Move the pasta from the pot to the bowl quickly, as you want the pasta to be hot. It’s the heat of the pasta that will heat the eggs sufficiently to create a creamy sauce. Toss everything to combine, allowing the pasta to cool just enough so that it doesn’t make the eggs curdle when you mix them in. (That’s the tricky part.) Add the beaten egg mixture: Add the beaten eggs with cheese and toss quickly to combine once more. Add salt to taste. Add some pasta water back to the pasta to keep it from drying out. Serve at once with the rest of the parmesan and freshly ground black pepper. If you want, sprinkle with a little fresh chopped parsley. Source: Simply Recipes

Selecting a Kitchen Faucet

Choosing a new kitchen faucet largely depends on existing plumbing. The process of changing a faucet is relatively easy when you have the proper tools. There’s three important details you should look out for when you begin shopping. Faucet Holes. Not every kitchen faucet and sink design is compatible with each other. Start by looking at your kitchen to determine the pre-drilled faucet mounting holes available. Even if you’re buying a completely new faucet and sink, you’ll still want to pay attention to the amount of holes. If there’s a mounting plate underneath your faucet, look under the sink to see how many holes the mounting plate covers. There’s usually one to four mounting holes, if there are three then two are for the handles and one for the spout. A fourth hole will be for an accessory such as a soap dispenser. Corner mounting holes may call for a longer spout to reach the opposite side of the basin. A pull-down spray nozzle is a great option for these kinds of sinks. Check Water Lines. Make sure your new faucet is compatible with the water supply lines. Note the size of the existing water line and shut-off valves under your sink. Most valves should have the size etched onto them. If you’re unsure of the water lines, measure them with a measuring tape. Many newer faucets come with 3/8-flex lines, if the water shut-off valves are 1/2-inch you’ll need to change the valves before installing the faucet. It’s usually a good idea to replace the shut-off valves when installing a faucet since an old valve may fail when you need to shut off the water for leaks or other repairs. Consider the Finish. An out of place plumbing fixture can break the entire aesthetic of a kitchen. Match the faucet with other accessories such as the dishwasher air gap, built-in soap dispenser and sink-hole covers. For example a shiny chrome finish will look out of place against a matte brushed nickel finish. Take it a step further and consider the other accessories in a kitchen such as cabinet drawer pulls and appliance finishes. Source: the Spruce

Air Fried Loaded Potato Skins Recipe

Turn a regular potato into the main entrée packed with cheese and seasoning. You can bake and prepare your potato with the help of your air fryer. Simply add a bit of water and let it do the work for you. Serve these on their own as your main dish or as a side to another meal. Ingredients: Potato Water Cream Cheese Cheddar Salt Garlic Italian Seasoning Directions: Fill your basket with some water and air fry a potato until soft (40-60 min) In a bowl mix equal parts cheddar and cream cheese. Season with salt, garlic and Italian seasoning Scoop out the potato halves and fill with the mix Air fry at 400°F for 10 minutes

Italian Grilled Cheese Sandwich Recipe

A classic Italian sub, while delicious, can be huge and overwhelming. Adapting it to a grilled cheese form is a lighter option with all the essential layers plus an added gooey cheese. It’s the best of both worlds. Use a mix of cured meats such as pepperoni, salami and prosciutto against a provolone cheese which has a mild flavor to complement the rest of the sandwich. You can serve this along with chips, salad, steamed veggies or a giardiniera. Prep time: 10 mins Cook time: 20 mins Total time: 30 mins Servings: 4 sandwiches Ingredients 8 slices sandwich bread 8 slices provolone cheese 4 ounces Genoa salami 4 ounces prosciutto 2 ounces pepperoni 1/2 cup fresh basil leaves, loosely packed 2 tablespoons butter Directions Prepare the sandwiches: Add a slice of provolone to a piece of bread. Top with a layer of salami, prosciutto, and pepperoni. Divide the meat evenly among the four sandwiches. Top meat with a handful of fresh basil leaves and a second piece of provolone cheese. Add second piece of bread and press down slightly to keep the sandwich together. Grill that cheese: Preheat a large skillet over medium-low heat. Once warm, add about 1/2 tablespoon of butter per sandwich you are cooking. Usually, I cook two at a time. When the butter has melted, add the sandwich and coat the bread with the melted butter, then flip and coat the second side as well. Let sandwiches cook over medium-low heat for about 3 to 4 minutes per side, making sure they don’t get too browned. After about 6 to 8 minutes total, the cheese in the sandwich should be well melted and the bread toasted. Done! Repeat the process for the last two sandwiches. You can keep the first two warm in a 200°F oven while you make the last two. Serve: Serve sandwiches with chips, salad, steamed veggies, and/or giardiniera. Source: Simply Recipes

Air Fried Jalapeno Poppers Recipe

Make a quick and easy appetizer with this jalapeno popper recipe. The combination of the cheeses with the bit of spice from the jalapenos makes a delicious balanced snack. You can conveniently place these in your air fryer to bake in just 10 minutes. Add this to your dinner meal as a side or appetizer. Ingredients: Jalapenos Cheese Cream Cheese 1 tsp. Salt 1 tbsp. Italian Seasoning 1 tbsp. Garlic Directions: Cut the jalapenos in half and pit the seeds In a bowl mix equal parts cheese and cream cheese. Season with 1 tsp. salt, 1 tbsp. Italian seasoning and 1 tbsp. garlic per 1/2 cup of mixture Stuff jalapenos with the mixture and air fry at 370°F for 10 minutes

Pasta with Roasted Tomatoes and Cashew Sauce Recipe

This simple recipe delivers on flavor and creaminess. The richness of the sauce makes for a satisfying dinner. Instead of using heavy cream, this recipe calls for cashew cream as a vegan alternative. The soft texture is similar to Alredo, and with a few fresh herbs the sauce is the forefront player in the recipe. Make this with roasted butternut squash or some fried asparagus. Prep time: 10 mins Cook time: 15 mins Total time: 25 mins Servings: 4 servings Ingredients 8 ounces spaghetti or fettuccine 3 tablespoons olive oil, divided 4 cups cherry tomatoes 1 recipe cashew cream sauce (about 1 cup) 3 tablespoons chopped basil 1 tablespoons minced chives 1 small clove garlic 1/4 teaspoon sea salt 1/4 teaspoon black pepper Directions Cook the pasta: Bring a pot of salted water to a boil. Add the pasta, reduce to a simmer, and cook until the pasta is al dente. Drain the pasta and set aside. Cook the tomatoes: In the same pot you cooked the pasta, add 1 tablespoon of olive oil over medium heat. Add the tomatoes and cook until them until they are hot and easily burst when pressed, 6 to 8 minutes. Make the sauce: Combine the cashew cream in a blender with the chopped basil, chives, garlic, 2 tablespoons olive oil, salt, and pepper. Blend until smooth. Assemble the pasta: Add the sauce to the pan with the tomatoes and pasta. Warm over low heat until the pasta sauce is hot. Add the pasta to the sauce and toss together to combine. Serve with an extra sprinkle of basil if desired. Source: Simply Recipes

How to Clean a Pan You Think Is Ruined

A burnt pot or pan is inevitable in a kitchen. There’s plenty of ways to deal with crusty and neglected pots. Here are the best ways to clean them, according to chefs. Wipe First. Remove any oil by going over it with a paper towel or scrubbie. This will improve things and keep fat and oil out of your pipes. For stuck-on bits use a spatula to scrape them off. Keep It Warm. If you’ve got a burnt pot on your hands, you’ll want to start cleaning it right away while it’s still hot. The longer you wait the harder it will be to clean. If you absolutely need to do it later, just warm it up beforehand by adding some hot water inside on medium heat. Take caution with this step and use dish gloves if available. Soak the Pan in Vinegar. Combine a few tablespoons of distilled white vinegar with water and boil it for a few minutes. This will take out almost everything. Heavy Duty Scrubber. A heavy duty scrubber is essential to cleaning a pan. Use a nonabrasive sponge to eliminate risk of steel or copper sponges contaminating food. You can also use a softer fabric sponge with texture similar to steel wool. Source: the Kitchn

Air Fried Pizza Roll Baked Pizza Recipe

Turn simple pizza rolls into a delicious entree. Baked pizza rolls take all the classic ingredients from pizza for a double layer of flavor. Be sure to use your favorite toppings and customize ingredients as you see fit. You’ll want to use a small baking pan that fits in your air fryer. Skip out on the mess of using an oven. It’s the perfect dinner meal for a night in. Ingredients: Pizza Rolls Pizza Sauce Mozzarella Pepperoni (optional) Directions: Air fry pizza rolls with the directions on the bag In a small pan layer pizza sauce, pizza rolls, mozzarella and pizza sauce. Finish with a second layer of pizza rolls, sauce and cheese Add favorite pizza toppings Air fry at 400°F for 5 to 6 minutes

Cinnamon Sugar Apple Muffins Recipe

These apple muffins are the perfect breakfast dessert to wake up to. The muffins are fluffy and lightly sweetened to balance out the tart apples. Granny Smith, Honeycrisp or Gala apples are the best choice due to their tangy and juicy sweetness. They also hold their shape well when baked. Enjoy these muffins with a cup of coffee or take it on the go. Yield: Serves 12 Prep time: 25 minutes Cook time: 20 minutes Ingredients Paper muffin liners or cooking spray 2 1/2 cups all-purpose flour 1/2 cup plus 4 teaspoons granulated sugar, divided 2 teaspoons baking powder 4 teaspoons ground cinnamon, divided 1/2 teaspoon kosher salt 1 1/4 cups whole or 2% milk 1/2 cup neutral oil, such as canola or grapeseed 1 large egg 1 teaspoon vanilla extract 2 medium tart apples (about 12 ounces total), such as Granny Smith or Honeycrisp Directions Arrange a rack in the middle of the oven and heat the oven to 375°F. Line a standard 12-well muffin pan with paper liners or coat the wells with cooking spray. Whisk 2 1/2 cups all-purpose flour, 1/2 cup of the granulated sugar, 2 teaspoons baking powder, 2 teaspoons of the ground cinnamon, and 1/2 teaspoon kosher salt together in a large bowl. Stir the remaining 4 teaspoons granulated sugar and 2 teaspoons ground cinnamon together in a small bowl and set aside for the topping. Place 1 1/4 cups whole or 2% milk, 1/2 cup neutral oil, 1 large egg, and 1 teaspoon vanilla extract together in a medium bowl and whisk until combined. Core and dice 2 medium apples (peel first if desired, about 2 1/2 cups). Pour the milk mixture into the flour mixture and mix with a wooden spoon or rubber spatula until just combined. Some lumps are fine. Gently fold in the diced apple. Divide the batter between the muffin wells, about 1/3 cup of batter per well. Sprinkle each muffin with 1/2 teaspoon cinnamon-sugar. Bake until the muffins are golden-brown and a toothpick inserted into the center of a muffin comes out clean, about 20 minutes. Let cool for 5 minutes before removing the muffins from the pan. Source: the Kitchn

Tips for Saving Money on a Kitchen Remodel

A kitchen remodel is one of the most expensive projects for your home due to the material and labor costs. However, keeping costs down is possible even while working with contractors, designers and suppliers. Here are four tips to lower the cost of your kitchen remodel. Refresh Rather Than Replace. Kitchen cabinets are generally a tear-out-and-replace project, making it one of the most expensive. Custom cabinets will only drive the price higher to fit specific spaces. There are a couple ways you can refresh your current cabinets to remain cost-effective. Painting. A classic method to update your kitchen cabinets. The process can be time-consuming for bigger kitchens but can achieve dramatic results. Refacing. More expensive than painting, refacing adds a new veneer to the outside of cabinet boxes and replaces doors and drawer fronts. It is more difficult since you’ll need tools and expertise. Hardware. One of the cheaper alternatives, new hardware can easily update cabinets to feel brand new. Refurbished Appliances. Appliances used to be discarded in landfills, however this has changed in recent times. There are many services and information available to fix kitchen appliances or purchase refurbished ones, rather than paying for something new. The ability to repair appliances will depend on your skill level, but it’s usually worth the attempt before shelling out a larger amount of money. Keeping the Same Layout. Redesigning a kitchen’s layout by moving plumbing or electrical lines will drive up a remodel budget. Maintaining the same kitchen layout while updating the elements within that framework is the most cost-effective. A galley-style or corridor kitchen is often nearly impossible to change without major home structure alterations. DIY Projects. Bring down labor costs by executing simpler projects such as painting, tiling, flooring installation and baseboards. Local hardware stores often have classes and demonstrations for how to perform these common projects. An important factor to consider here is time. If you are on a strict time frame, typically hiring a team of professionals will yield the best results. Source: the Spruce