Cosmo air fryer recipes

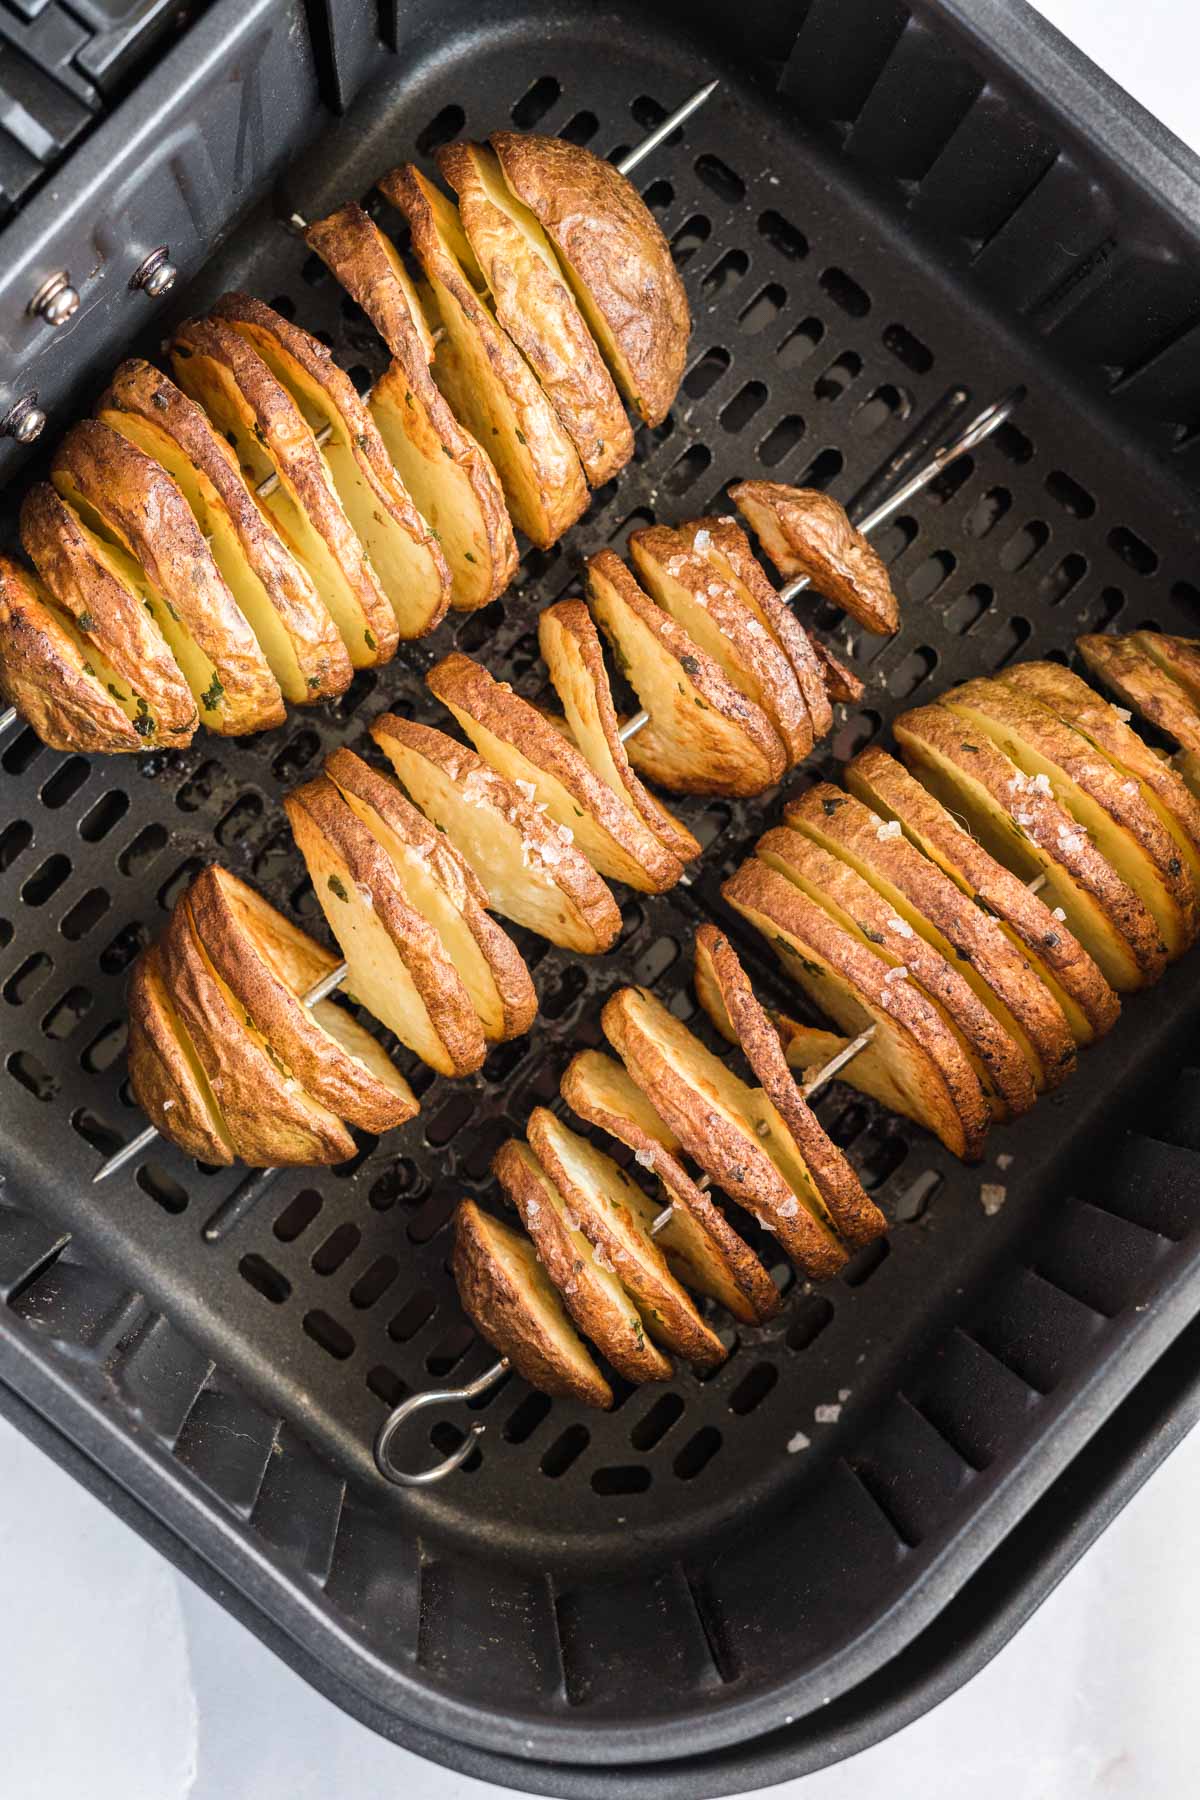
Air Fryer Spiral Potatoes: Crispy, Seasoned Perfection in 30 Minutes

Spiral potatoes have taken social media by storm, and for good reason – they’re visually stunning, incredibly crispy, and surprisingly easy to make at home. These air fryer spiral potatoes transform ordinary potatoes into accordion-style treats with maximum surface area for seasoning and crisping. With just a skewer, some basic seasonings, and your Cosmo air fryer, you can create restaurant-quality spiral potatoes that are crispy on the outside and tender on the inside. What makes this recipe so appealing is the dramatic presentation combined with simple execution. The spiral cut creates tons of crispy edges while keeping the potato interior soft and fluffy. The two-step cooking process ensures the potato cooks through completely before getting that final blast of high heat for ultimate crispiness. Why Air Fryer Spiral Potatoes Work So Well Air fryer technology revolutionizes how these spiral potatoes cook by circulating hot air around every exposed surface. The spiral shape creates maximum surface area, allowing the air fryer to crisp every edge while the interior steams to fluffy perfection. Even cooking results from the air fryer’s consistent temperature and circulation that reaches all sides of the spiral potato. Unlike oven baking where only the top and bottom get direct heat, air frying ensures every curve and crevice gets properly crisped. Reduced oil consumption makes air frying appealing compared to deep frying spiral potatoes. You get all the crispy texture with just a light coating of oil or butter, cutting calories while maintaining satisfying crunch. Quick cooking time of just 30 minutes total makes these spiral potatoes perfect for weeknight sides or impressive appetizers. The air fryer preheats quickly and cooks efficiently, getting crispy potatoes on the table faster than conventional oven methods. Minimal cleanup represents a major advantage since you’re not dealing with pots of oil or multiple baking sheets. The air fryer basket needs only a quick wash after use. Versatile seasoning options mean you can customize these potatoes with any flavor profile you prefer, from classic garlic and herbs to spicy cajun or cheesy Italian variations. Choosing the Right Ingredients Simple ingredients make these spiral potatoes accessible, but making smart choices about each component significantly improves your results while accommodating different preferences. Potato Selection: Medium-sized russet or Yukon gold potatoes work best for spiral cutting. They should be firm, uniform in shape, and free of blemishes. Potatoes that are too large become difficult to eat, while very small ones don’t create enough spirals. Skewer Choice: Wooden or metal skewers both work, though metal skewers can get very hot in the air fryer. Choose skewers long enough to extend beyond both ends of the potato for easy handling. Oil or Butter: Both work excellently for coating the spiral potatoes. Butter provides richer flavor while oil (vegetable, olive, or avocado) offers a neutral base that lets seasonings shine. Melted butter brushes on easily and helps seasonings adhere. Seasoning Components: The basic seasoning blend uses cornstarch for extra crispiness, garlic salt for savory flavor, Italian seasoning for herbs, and panko breadcrumbs for added crunch. Each component serves a specific purpose in creating the perfect texture and taste. Quality Ingredients: Fresh seasonings provide better flavor than old spices. Panko breadcrumbs create lighter, crispier coating than regular breadcrumbs. Real butter tastes noticeably better than margarine. Ingredients You’ll Need Main Ingredients: Seasoning Blend: Optional Additions: Step-by-Step Preparation Technique Success with spiral potatoes comes from proper cutting technique and understanding the two-stage cooking process that ensures both tender interiors and crispy exteriors. Potato Preparation: Wash and scrub potatoes thoroughly to remove any dirt. Pat dry completely – excess moisture prevents proper crisping. Leave the skin on for added texture and nutrients. Creating the Spiral: Insert a skewer lengthwise through the center of the potato, pushing it all the way through. Hold a sharp knife at a slight angle and slowly rotate the potato while cutting in a continuous spiral motion. The goal is to create thin, even spirals that remain connected. Spiral Cutting Technique: Start at one end and cut at approximately a 45-degree angle, rotating the potato slowly while maintaining consistent knife pressure. The cuts should go almost to the skewer but not completely through, keeping the spiral connected. Practice makes perfect – your first attempt might not be flawless, but the potato will still taste great. Expanding the Spiral: Once cut, gently pull and stretch the spiral along the skewer to create spacing between each layer. This spacing is crucial for allowing hot air to circulate and for seasonings to coat every surface. Seasoning Blend Preparation: In a small bowl, mix cornstarch, garlic salt, Italian seasoning, and panko breadcrumbs until well combined. The cornstarch helps create extra crispy edges while the panko adds crunch. Coating the Potato: Brush the spiral potato generously with melted butter or oil, making sure to get between all the spirals. The fat helps conduct heat and carries flavors while promoting browning. Applying Seasonings: Sprinkle the seasoning blend over the buttered potato, working it into all the crevices and spirals. Don’t be shy – generous seasoning creates maximum flavor since there’s significant surface area to cover. First Cooking Stage: Preheat your Cosmo air fryer to 300°F. Place the seasoned spiral potato in the air fryer basket. Cook at 300°F for 25 minutes. This lower temperature cooks the potato through completely without burning the seasonings. Second Cooking Stage: After 25 minutes, increase the temperature to 400°F and cook for an additional 5 minutes. This high-heat blast crisps up all the edges and creates that irresistible golden-brown exterior. Cooling: Remove the spiral potato carefully – both the skewer and potato will be very hot. Let rest for 2-3 minutes before handling. The potato firms up slightly as it cools, making it easier to handle and eat. Recipe Variations and Flavor Combinations The basic spiral potato recipe serves as an excellent foundation for numerous variations that accommodate different tastes and dietary preferences while maintaining the simple preparation method. Loaded Baked Potato Style: After cooking, top with shredded cheddar cheese,

Cheesy Pizza Egg Rolls: The Ultimate Air Fryer Snack

Egg rolls meet pizza in this genius air fryer creation that delivers all the flavors you love in a crispy, handheld package. These cheesy pizza egg rolls combine marinara sauce, melted mozzarella, and pepperoni wrapped in a golden, crunchy egg roll wrapper. Ready in just 10 minutes, they’re perfect for game day snacks, quick lunches, or whenever pizza cravings hit but you want something different. What makes these pizza egg rolls so appealing is their versatility and convenience. You can customize the fillings to match your favorite pizza toppings, make them ahead for easy entertaining, and cook them in your air fryer without the mess and calories of deep frying. The crispy exterior and gooey, cheesy interior create the perfect texture contrast that makes these impossible to stop eating. Why Air Fryer Pizza Egg Rolls Work So Well Air fryers revolutionize egg roll preparation by creating incredibly crispy wrappers without submerging them in oil. The rapid hot air circulation crisps every surface evenly, delivering results that rival deep frying while being significantly healthier and cleaner. The compact cooking chamber maintains consistent high heat that crisps the egg roll wrapper while melting the cheese inside perfectly. You get that satisfying crunch on the outside with hot, gooey cheese inside without any greasiness. Quick cooking time of just 5 minutes per side means you go from craving to eating in about 10 minutes total. The air fryer preheats quickly and cooks efficiently, making these egg rolls perfect for satisfying sudden snack attacks. Easy cleanup represents a major advantage over traditional frying which requires dealing with large amounts of hot oil. Air fryers need only a quick wipe-down after use, making the whole process more appealing for frequent cooking. Consistent results come from the air fryer’s controlled temperature and even heat distribution. Once you find the right timing for your specific air fryer, you can expect perfect pizza egg rolls every time. Healthier preparation uses minimal oil while achieving maximum crispiness. These egg rolls contain a fraction of the fat and calories of deep-fried versions without sacrificing texture or flavor. Choosing the Right Ingredients Simple ingredients make these pizza egg rolls accessible while allowing for endless customization based on your preferences and what’s in your kitchen. Egg Roll Wrappers: Use standard egg roll wrappers found in the refrigerated section of most grocery stores. Spring roll wrappers work too but create a different, more delicate texture. Keep wrappers covered with a damp towel while working to prevent them from drying out and cracking. Marinara Sauce: Any pizza or marinara sauce works well, but thicker sauces prevent soggy wrappers. If your sauce is thin, simmer it for a few minutes to reduce and thicken before using. Avoid using too much sauce, which can make wrappers soggy and difficult to seal. Mozzarella Cheese: Shredded mozzarella melts beautifully and provides that classic pizza cheese pull. Fresh mozzarella works but contains more moisture that can make wrappers soggy, so pat it dry before using. Pre-shredded cheese contains anti-caking agents that can affect melting, but it’s more convenient and works fine for these egg rolls. Pepperoni: Mini pepperoni or diced regular pepperoni distributes evenly throughout the filling. Turkey pepperoni offers a leaner option while maintaining that classic pizza flavor. You can also use salami, ham, or leave meat out entirely for vegetarian versions. Italian Seasoning: A sprinkle of Italian herbs enhances the pizza flavor. Dried oregano, basil, or garlic powder all work well. Fresh herbs contain too much moisture for this application. Oil for Brushing: A light coating of oil helps achieve golden, crispy wrappers. Use olive oil spray, vegetable oil, or even melted butter brushed on before air frying. Ingredients You’ll Need For the Egg Rolls: Optional Add-ins: For Serving: Step-by-Step Preparation Technique Success with these pizza egg rolls comes from proper assembly technique and understanding how the air fryer environment affects cooking. Following these steps ensures crispy, sealed egg rolls with perfectly melted fillings. Wrapper Preparation: Lay out egg roll wrappers on a clean work surface with one corner pointing toward you, creating a diamond shape. Keep unused wrappers covered with a damp towel to prevent drying and cracking. Filling Assembly: Place about 1-2 tablespoons of marinara sauce in the center of each wrapper, spreading it slightly but leaving plenty of border space. Add a small handful of shredded mozzarella cheese on top of the sauce, then arrange pepperoni pieces over the cheese. Sprinkle with a pinch of Italian seasoning. Avoid Overfilling: The biggest mistake is adding too much filling, which prevents proper sealing and causes leakage during cooking. Less is more – you want enough filling for flavor but not so much that wrappers can’t seal completely. Sealing Technique: Dip your finger in water and run it along all four edges of the wrapper to create a seal. Fold the bottom corner up over the filling, then fold in the left and right corners. Roll tightly toward the top corner, ensuring no gaps where filling could escape. Press the final corner firmly to seal completely. Check for Gaps: Hold each completed egg roll up to the light to check for any openings in the wrapper where filling might leak. If you spot gaps, use a dab of water on your finger to seal them before cooking. Oil Application: Lightly brush or spray each egg roll with oil on all sides. This step is crucial for achieving golden, crispy wrappers. Don’t skip it or your egg rolls will be pale and less crispy. Air Fryer Preparation: Preheat your Cosmo air fryer to 360°F. Proper preheating ensures immediate cooking when egg rolls are added, helping achieve crispy exteriors while melting the cheese inside perfectly. Arrangement: Place egg rolls in the air fryer basket in a single layer with space between each one. Don’t let them touch or overlap, which prevents even crisping. You’ll likely need to cook in batches depending on your air fryer size. First Side Cooking: Air fry at 360°F for 5 minutes on the

Easy Air Fryer Pumpkin Cookies: Fall Baking Made Simple

Fall baking doesn’t have to heat up your entire kitchen or take hours of your time. These air fryer pumpkin cookies deliver all the warm spices and soft texture you love about pumpkin treats without turning on your oven. Ready in under 15 minutes from start to finish, this recipe proves that air fryers aren’t just for savory foods – they’re secret weapons for quick, delicious baking projects. The beauty of air fryer baking lies in its speed and efficiency. Your air fryer preheats in minutes, bakes faster than a conventional oven, and keeps your kitchen cooler during those early fall days when you’re craving pumpkin flavor but don’t want the heat. These cookies come out soft, flavorful, and perfectly spiced every single time. Why Air Fryer Cookies Work So Well Air fryers circulate hot air around food rapidly, creating an environment similar to a convection oven but in a much smaller space. This concentrated heat means faster baking times and often more consistent results, especially for smaller batches of cookies. The compact cooking chamber of an air fryer maintains temperature more consistently than large ovens that can have hot and cold spots. Your cookies bake evenly without needing to rotate pans halfway through, simplifying the entire process. Energy efficiency becomes a real benefit when you’re baking small batches. Heating a full-size oven for a dozen cookies wastes energy, while an air fryer uses significantly less power and heats only the space needed for your batch. Temperature control in modern air fryers has improved dramatically, allowing for precise baking temperatures that rival conventional ovens. The 350°F setting works perfectly for these cookies, providing gentle heat that bakes them through without burning the edges. Quick preheating means you can go from cookie craving to finished cookies in about 15 minutes total. No waiting 10-15 minutes for your oven to reach temperature – most air fryers are ready in 2-3 minutes. Choosing the Right Ingredients Simple ingredients make these pumpkin cookies accessible to everyone, but making smart choices about each component can significantly improve your results while accommodating different preferences and dietary needs. Flour Selection: All-purpose flour provides the structure for these cookies. Measure accurately using the spoon-and-level method rather than scooping directly from the bag, which can compact flour and lead to dry cookies. Leavening Agents: Both baking soda and baking powder work together to create the perfect texture. Baking soda reacts with the acidity in brown sugar and pumpkin, while baking powder provides additional lift for soft, tender cookies. Spice Quality: Fresh spices make a noticeable difference in flavor. Cinnamon and ginger lose potency over time, so replace spices that have been sitting in your pantry for over a year for the best flavor. Pumpkin Puree: Use plain pumpkin puree, not pumpkin pie filling which contains added sugar and spices. Check the ingredient list – it should say only “pumpkin” with no other additives. Brown Sugar: Packed brown sugar provides moisture and deep, caramel-like sweetness that complements pumpkin beautifully. Light or dark brown sugar both work, with dark providing slightly more molasses flavor. Butter Quality: Real butter creates better flavor and texture than margarine or spreads. Softened butter should be pliable but not melted – leave it at room temperature for about an hour before baking. Ingredients You’ll Need Dry Ingredients: Wet Ingredients: Optional Toppings: Step-by-Step Preparation Technique Success with these cookies comes from proper mixing technique and understanding how the air fryer environment affects baking. Following these steps ensures soft, flavorful cookies every time. Dough Preparation: In a large mixing bowl, whisk together all dry ingredients until well combined. This distributes the leavening agents and spices evenly, preventing pockets of baking soda or concentrated spice in your finished cookies. Creaming Butter and Sugar: In a separate bowl, cream the softened butter and brown sugar together for 2-3 minutes until light and fluffy. This process incorporates air that helps create tender cookies with better texture. Adding Wet Ingredients: Beat in the egg until fully incorporated, then add pumpkin puree and vanilla extract. Mix until smooth and well combined. The mixture may look slightly separated – this is normal and will come together when you add the flour. Combining Wet and Dry: Add the dry ingredients to the wet ingredients gradually, mixing just until the flour disappears. Avoid overmixing, which develops gluten and creates tough cookies instead of soft, tender ones. Portioning: Use a cookie scoop or spoon to portion dough into balls about 1-2 tablespoons each. Smaller cookies work better in air fryers because they cook more evenly in the compact space. Chilling: Place portioned dough on a plate and refrigerate for 10-15 minutes. Chilled dough holds its shape better during baking and prevents excessive spreading. Air Fryer Preparation: Preheat your Cosmo air fryer to 350°F. Line the basket with parchment paper cut to size, or use perforated parchment designed for air fryers to prevent sticking. Arrangement: Place 4-6 cookies in the air fryer basket depending on size, leaving at least 1 inch between each for proper air circulation. Overcrowding prevents even cooking and browning. Baking: Air fry at 350°F for 10-12 minutes until edges are set but centers still look slightly soft. Check at 10 minutes – they’ll firm up as they cool. Cooling: Transfer cookies to a cooling rack immediately using a spatula. Handle gently as they’ll be soft when hot. Let cool at least 5 minutes before frosting. Recipe Variations and Flavor Combinations The basic pumpkin cookie recipe serves as an excellent foundation for numerous variations that can accommodate different tastes and dietary preferences while maintaining the simple preparation method. Chocolate Chip Addition: Fold 0.5-1 cup chocolate chips into the dough for extra sweetness and texture contrast. Semi-sweet or white chocolate chips both work beautifully with pumpkin spice flavors. Nutty Enhancement: Add 0.5 cup chopped pecans or walnuts for crunch and flavor depth. Toast the nuts first for even better taste and texture that complements the soft cookie base. Spice Adjustments: Increase cinnamon to 1 tablespoon