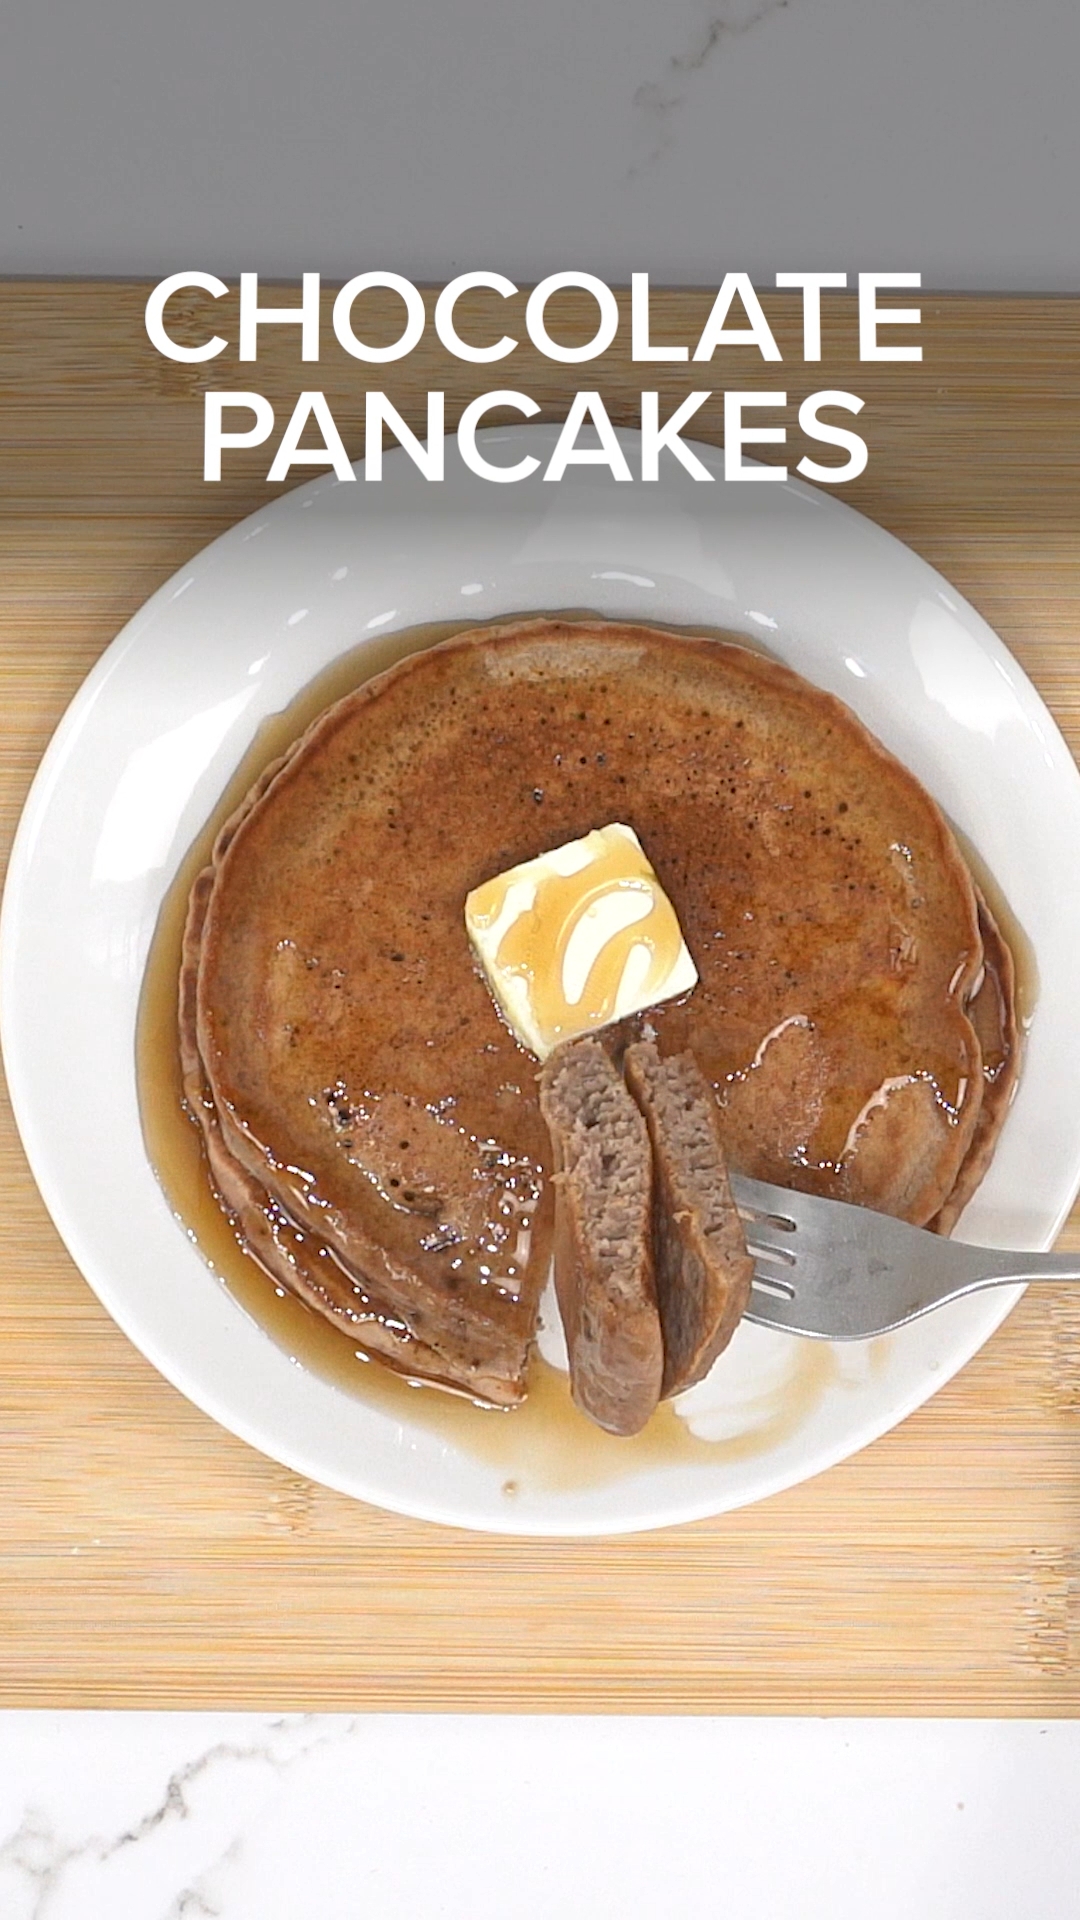
weekend breakfast

French Toast Lollipops: A Fun Twist on Breakfast Classics

French Toast Lollipops: A Fun Twist on Breakfast Classics Sometimes the most delightful breakfast treats come from reimagining familiar favorites in creative new ways. These French toast lollipops transform ordinary bread into handheld breakfast treats that are as fun to make as they are to eat. Perfect for weekend breakfast adventures, special occasions, or whenever you want to surprise your family with something unexpectedly delightful, these lollipops prove that breakfast can be both delicious and playful. The genius of French toast lollipops lies in their presentation and portability. By rolling bread into spirals and coating them in a cinnamon-sugar mixture before air frying, you create individual treats that capture all the flavors of classic French toast in a convenient, mess-free format that kids and adults alike will love. Why This Recipe Works So Well French toast lollipops succeed because they concentrate all the best elements of traditional French toast into bite-sized portions while adding the excitement of eating food on a stick. Understanding the technique helps you achieve perfect results every time. The spiral rolling technique creates multiple layers of bread that absorb the egg mixture while maintaining structural integrity. This method ensures each bite contains the custardy interior and crispy exterior that makes French toast so appealing. Individual portion control makes these treats perfect for parties, family breakfasts, or meal prep since each lollipop provides just the right amount of sweetness without overwhelming portion sizes. Air frying technology creates the perfect crispy exterior while maintaining tender, custardy interiors without the need for large amounts of oil or constant monitoring that stovetop cooking requires. The cinnamon-sugar coating adds textural interest and concentrated flavor that complements the vanilla-scented bread while creating an attractive appearance that makes these treats visually appealing. Stick presentation transforms ordinary breakfast into an interactive experience that encourages slower, more mindful eating while making the treats perfect for on-the-go consumption or party serving. Choosing the Right Ingredients Success with French toast lollipops starts with selecting appropriate ingredients that work together to create the perfect texture and flavor balance. Bread selection significantly affects the final result. Day-old bread works better than fresh because it absorbs the egg mixture without becoming too soggy, while maintaining enough structure to roll and hold together during cooking. White sandwich bread or brioche provide the best texture for rolling, as they’re soft enough to manipulate without tearing while having enough substance to create satisfying spirals that hold together. Fresh eggs create the custard base that transforms plain bread into French toast. Room temperature eggs mix more easily and create smoother custard that penetrates bread evenly. Pure vanilla extract provides the classic French toast flavor that makes these treats taste familiar despite their unique presentation. Quality vanilla makes a noticeable difference in the final flavor. Brown sugar and cinnamon create the signature coating that provides sweetness, spice, and textural contrast. The combination of these warm spices evokes comfort and familiarity. Lollipop sticks should be food-safe and appropriately sized for the bread spirals. Wooden craft sticks or actual lollipop sticks work well for this application. Step-by-Step Technique for Perfect Results Creating perfect French toast lollipops requires attention to technique during each step of the process to ensure attractive presentation and optimal texture. Bread Preparation: Remove crusts from bread slices and use a rolling pin to flatten each slice until it’s thin enough to roll easily without cracking. This step is crucial for creating tight spirals that hold together. Rolling Technique: Starting from one edge, roll each flattened bread slice tightly into a spiral, ensuring the roll stays compact and even. The tighter the roll, the better it will hold together during cooking. Stick Insertion: Carefully insert the lollipop stick through the center of each spiral, ensuring it’s secure but not protruding too far from either end. The stick should provide stability without interfering with cooking. Custard Mixture: Whisk eggs and vanilla extract thoroughly until completely combined. The mixture should be smooth and well-blended to ensure even coating and flavor distribution. Dipping Process: Dip each bread spiral into the egg mixture, ensuring all surfaces are coated but not oversaturated. Allow excess mixture to drip off to prevent soggy results. Coating Application: Roll the dipped spirals in the brown sugar and cinnamon mixture, ensuring complete coverage that will create the crispy, flavorful exterior during cooking. Air Frying Setup: Preheat your air fryer to 360°F and arrange the coated spirals with adequate spacing to allow proper air circulation around each lollipop. Cooking Process: Air fry for 4 minutes on each side, monitoring for golden-brown color and crispy texture. The timing may vary slightly based on your specific air fryer model and bread thickness. Final Presentation: Allow the lollipops to cool slightly before serving to prevent burns while ensuring they’re still warm enough to provide the optimal eating experience. Recipe Variations and Customizations The basic French toast lollipop recipe provides an excellent foundation for creative variations that accommodate different tastes and dietary preferences. Flavor Variations: Add different extracts like almond or maple to the egg mixture for unique flavor profiles. Orange zest can provide citrus brightness, while a pinch of nutmeg adds warmth and complexity. Coating Alternatives: Try different sugar and spice combinations such as maple sugar with cardamom, coconut sugar with ginger, or even a savory parmesan and herb coating for unexpected flavor profiles. Filling Options: Spread thin layers of cream cheese, Nutella, or fruit preserves on the bread before rolling to create filled lollipops with surprise centers that add richness and flavor complexity. Bread Substitutions: Experiment with different bread types like cinnamon swirl bread, challah, or even croissants for varying textures and flavors that change the character of the final product. Healthy Modifications: Use whole grain bread, reduce sugar content, or substitute egg whites for whole eggs to create lighter versions that maintain the fun factor while supporting dietary goals. Seasonal Adaptations: Incorporate seasonal spices like pumpkin pie spice in fall, or add dried fruit pieces and warm spices for holiday versions that celebrate specific times of

Perfect Cinnamon Rolls Recipe: Fill Your Kitchen with Comfort and Warmth

Few things can transform your home into a cozy sanctuary quite like the aroma of fresh cinnamon rolls baking in the oven. This simple cinnamon roll recipe proves that you don’t need complicated techniques or hours of preparation to create bakery-quality treats that fill your kitchen with the perfect scent of comfort and warmth. Using convenient tube cinnamon rolls as a shortcut means you can have golden, gooey cinnamon rolls ready in under 20 minutes from start to finish. The beauty of this recipe lies in its simplicity and reliability. Whether you’re creating a special weekend breakfast, need a quick dessert for unexpected guests, or want to treat your family to something delicious on a regular weekday, these cinnamon rolls deliver consistent results that everyone will love. The combination of convenience and homemade taste makes this recipe perfect for busy families who still want to enjoy fresh-baked treats. Why This Simple Approach Works So Well Sometimes the best results come from the simplest methods. This cinnamon roll recipe succeeds because it focuses on proper technique and optimal baking conditions rather than complicated steps or exotic ingredients. Understanding why this approach works helps you achieve perfect results every time. Store-bought tube cinnamon rolls provide consistent quality and convenience while allowing you to focus on proper baking technique. These products are specifically formulated to rise and bake evenly, ensuring reliable results that taste homemade. Proper oven temperature at 400°F creates the ideal baking environment for achieving golden-brown exteriors while ensuring the centers cook through completely. This temperature balance produces the perfect texture contrast between crispy outside and soft, gooey inside. Close spacing on the baking sheet allows the rolls to support each other during rising and baking, creating taller, more tender rolls with soft sides. This technique mimics bakery methods while ensuring even heating. Non-stick preparation prevents sticking while ensuring easy removal of the finished rolls. Proper pan preparation protects the rolls’ appearance while making cleanup simple. Timing precision ensures optimal texture and appearance. Proper preheating and accurate baking time produce rolls that are perfectly done without being over-baked or under-cooked. The icing application technique at the end allows the warm rolls to slightly melt the icing, creating the perfect glaze consistency that soaks into the rolls while maintaining visual appeal. Choosing and Handling Tube Cinnamon Rolls While this recipe uses convenient tube cinnamon rolls, understanding how to select and handle them properly ensures the best possible results from this shortcut approach. Refrigerator temperature affects how easily the tube opens and how well the rolls separate. Allow tubes that have been very cold to come to room temperature for a few minutes before opening to prevent tearing. Tube opening technique involves following package directions carefully while being gentle to prevent damaging the pre-formed rolls. Most tubes pop open with gentle pressure on the seam. Roll separation should be done carefully to maintain the spiral shape that creates the characteristic cinnamon roll appearance. Gentle handling preserves the layers that create texture. Quality indicators include checking expiration dates and ensuring tubes haven’t been damaged during storage. Fresh products produce better rising and more attractive finished rolls. Storage considerations before baking suggest using tube rolls promptly after opening, as they’re formulated for immediate use rather than extended storage once exposed to air. Perfecting Your Baking Technique Success with cinnamon rolls depends on proper baking technique that ensures even cooking, optimal rising, and attractive appearance. These details make the difference between good and exceptional results. Pan Preparation: Use adequate cooking spray coverage to ensure easy release while avoiding excess that could make rolls greasy. Even coverage prevents sticking without affecting texture. Roll Placement: Position rolls close together but not touching initially, allowing space for rising during baking. The rolls will expand and touch during baking, creating soft sides. Oven Preheating: Ensure your Cosmo 965AGFC oven reaches 400°F before placing rolls inside. Proper preheating ensures immediate rising and browning when baking begins. Positioning: Place the baking sheet in the center of the oven for even heat circulation around the rolls. Center positioning prevents uneven browning or cooking. Timing Monitoring: Begin checking for doneness at 12 minutes, looking for golden-brown color and firm texture. Avoid over-baking, which can make rolls dry. Steam Release: Open the oven door briefly after baking to release excess steam, preventing rolls from becoming soggy from condensation. Achieving Perfect Texture and Appearance The goal is cinnamon rolls with golden-brown exteriors, soft centers, and appealing visual presentation that looks as good as it tastes. Golden brown color indicates proper baking without over-cooking. The rolls should have rich color while maintaining soft texture inside. Even rising across all rolls suggests proper spacing and oven temperature. All rolls should appear similar in size and height when finished. Soft centers can be tested by gently pressing the center of one roll. It should feel set but still slightly soft, indicating proper doneness. Clean release from the baking sheet indicates adequate non-stick preparation without excess oil that could affect texture or appearance. Proper icing consistency results from applying it to warm but not hot rolls, allowing slight melting without complete liquefaction. Icing Application for Best Results The icing application technique significantly affects both appearance and taste of the finished cinnamon rolls. Proper timing and method create the perfect glaze. Temperature timing matters for icing application. Apply icing when rolls are warm but not steaming hot to achieve the right consistency and absorption. Even distribution ensures all rolls receive adequate icing while maintaining attractive appearance. Pour or drizzle icing to cover all rolls evenly. Absorption benefits occur when warm rolls slightly melt the icing, allowing it to soak into the surface layers while maintaining surface glaze. Visual appeal improves with thoughtful icing application that creates attractive patterns while ensuring complete coverage. Serving timing affects icing consistency. Serve while icing is still slightly warm and glossy for optimal texture and appearance. Serving Suggestions and Presentation These cinnamon rolls work beautifully for various serving occasions, from casual family breakfasts to more