comfort food recipes

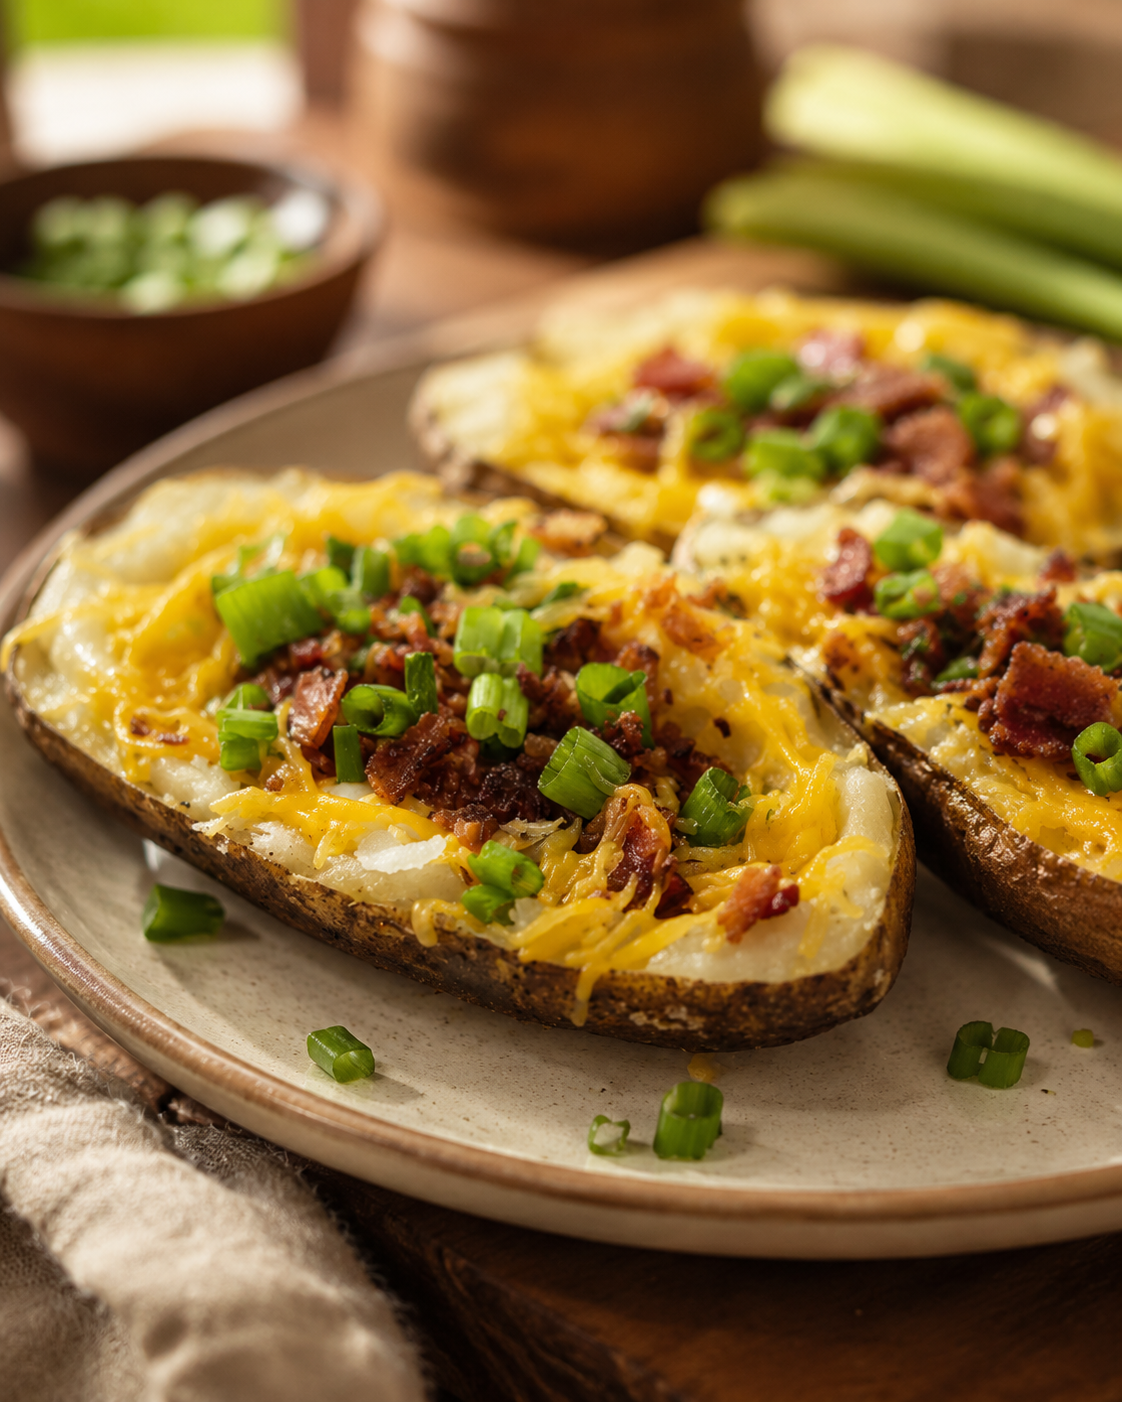
Loaded Potato Skins: Crispy Air Fryer Potato Skins with Bacon, Cheddar, and Sour Cream

Potato skins occupy a specific place in comfort food that nothing else quite fills. The combination of a crispy, seasoned shell, a thin layer of fluffy potato, melted cheddar, crispy bacon, and cool sour cream hits every texture and temperature contrast simultaneously in a way that makes them disappear from a plate faster than almost anything else you can put in front of people. Made properly, with potatoes cooked until genuinely tender, skins that have real structure, and toppings added in the right sequence, loaded potato skins are as satisfying coming out of your own kitchen as any version you’d order at a restaurant. The air fryer handles both the potatoes and the bacon in this recipe, and using it for both components isn’t just about convenience. Air-frying whole potatoes creates skins with better texture than oven-baking, the circulating heat dries the exterior during cooking, producing a shell that holds its shape when halved and scooped rather than collapsing under toppings. The bacon crisps in the same unit while the potatoes finish their last stretch, making smart use of the cooking time without requiring a separate pan. Everything from raw potatoes to fully loaded skins takes under an hour, most of which requires no active attention at all. Why This Recipe Works So Well The combination of techniques and ingredient choices here produces loaded potato skins that consistently beat shortcuts and approximations. Starting with jumbo potatoes matters more than it seems. Large potatoes create substantial skins with enough interior to scoop while still leaving a meaningful layer of potato against the skin. Smaller potatoes produce thin skins that either tear during scooping or leave so little potato inside that they lose the textural contrast between crispy exterior and soft interior that makes potato skins worth eating. Jumbo russeting potatoes have the thick skins and starchy interiors that hold up through the air frying process and maintain structure when halved and loaded. The olive oil and seasoning step before wrapping is doing real work. Coating the exterior with olive oil before foil-wrapping keeps the skin from drying out during the long cook, ensuring it stays pliable enough to scoop without cracking. The salt and pepper season the skin itself, not just the toppings, so every bite of the shell carries flavor rather than relying entirely on what goes on top. Butter and garlic paste applied directly to the scooped interior before any other topping goes on creates a flavor base that soaks into the remaining potato layer. Cheese and bacon placed on top of this base rather than directly on dry potato flesh produces a different result — the butter fat helps the cheese melt more evenly and the garlic flavors the entire interior rather than sitting as a separate topping. Sour cream added last, after everything else, maintains its cool temperature and clean tang against the warm toppings. Mixing it in or applying it before other toppings buries it and loses the temperature contrast that makes it work. Choosing the Right Ingredients Every component in loaded potato skins is simple, but small choices within each category affect the finished result enough to be worth considering. Potatoes: Jumbo russet potatoes are the right choice here — their thick skins and high starch content produce the best texture after air frying. Waxy potatoes like Yukon Golds have thinner skins and denser flesh that doesn’t scoop as cleanly or crisp as effectively. Size matters practically too: jumbo potatoes produce halves substantial enough to hold toppings without bending under the weight. Avoid any potato with soft spots, green patches, or significant bruising. Bacon: Standard cut bacon crisps more predictably in the air fryer than thick-cut, which can remain chewy in the center while the edges over-cook. Three strips provides enough bacon for two loaded potatoes — four halves total — without overwhelming the other toppings. Cook until genuinely crispy rather than just done: crispy bacon crumbles into every bite rather than pulling out as a single strip when you eat the skin. Cheddar Cheese: Shredded sharp cheddar melts cleanly on warm potato skins and has enough flavor to hold up against the other strong components. Pre-shredded cheddar works fine here — the added starches in commercial pre-shredded cheese actually help it melt more smoothly on the potato rather than pooling into a greasy layer. Extra sharp cheddar adds more flavor presence if you prefer it. Garlic Paste: Garlic paste incorporates into the butter more evenly than minced fresh garlic, distributing flavor across the entire interior surface rather than concentrating in spots. Store-bought garlic paste works well. If you only have fresh garlic, mince it as finely as possible or crush it to a paste with the flat of a knife and salt before using. Green Onions and Chives: Both bring freshness and mild onion flavor that cuts through the richness of butter, cheese, and bacon. Green onions add slightly more punch and textural presence. Chives are more delicate in both flavor and texture. Using both creates more complexity than either alone — the combination appears consistently in good potato skin recipes for this reason. Sour Cream: Full-fat sour cream has better body and tang than reduced-fat versions, which can seem watery. A generous spoonful per half is the right quantity — enough to contribute its cool, creamy contrast without drowning the other toppings. Ingredients Serves 2-4 Step-by-Step Instructions Step 1 — Prep the Potatoes and Bacon Wash and dry the potatoes thoroughly — any moisture on the skin before oiling creates steam during cooking rather than allowing the exterior to dry properly. Rub each potato all over with olive oil, making sure the entire surface is coated. Season generously with salt and pepper, pressing lightly so the seasoning adheres to the oiled skin. Wrap each potato individually in aluminum foil and place them on a cooking tray. While the potatoes are prepping, chop the green onions and chives and combine them in a bowl. Set aside. Lay 3 strips of bacon flat on

Perfect Cinnamon Rolls Recipe: Fill Your Kitchen with Comfort and Warmth

Few things can transform your home into a cozy sanctuary quite like the aroma of fresh cinnamon rolls baking in the oven. This simple cinnamon roll recipe proves that you don’t need complicated techniques or hours of preparation to create bakery-quality treats that fill your kitchen with the perfect scent of comfort and warmth. Using convenient tube cinnamon rolls as a shortcut means you can have golden, gooey cinnamon rolls ready in under 20 minutes from start to finish. The beauty of this recipe lies in its simplicity and reliability. Whether you’re creating a special weekend breakfast, need a quick dessert for unexpected guests, or want to treat your family to something delicious on a regular weekday, these cinnamon rolls deliver consistent results that everyone will love. The combination of convenience and homemade taste makes this recipe perfect for busy families who still want to enjoy fresh-baked treats. Why This Simple Approach Works So Well Sometimes the best results come from the simplest methods. This cinnamon roll recipe succeeds because it focuses on proper technique and optimal baking conditions rather than complicated steps or exotic ingredients. Understanding why this approach works helps you achieve perfect results every time. Store-bought tube cinnamon rolls provide consistent quality and convenience while allowing you to focus on proper baking technique. These products are specifically formulated to rise and bake evenly, ensuring reliable results that taste homemade. Proper oven temperature at 400°F creates the ideal baking environment for achieving golden-brown exteriors while ensuring the centers cook through completely. This temperature balance produces the perfect texture contrast between crispy outside and soft, gooey inside. Close spacing on the baking sheet allows the rolls to support each other during rising and baking, creating taller, more tender rolls with soft sides. This technique mimics bakery methods while ensuring even heating. Non-stick preparation prevents sticking while ensuring easy removal of the finished rolls. Proper pan preparation protects the rolls’ appearance while making cleanup simple. Timing precision ensures optimal texture and appearance. Proper preheating and accurate baking time produce rolls that are perfectly done without being over-baked or under-cooked. The icing application technique at the end allows the warm rolls to slightly melt the icing, creating the perfect glaze consistency that soaks into the rolls while maintaining visual appeal. Choosing and Handling Tube Cinnamon Rolls While this recipe uses convenient tube cinnamon rolls, understanding how to select and handle them properly ensures the best possible results from this shortcut approach. Refrigerator temperature affects how easily the tube opens and how well the rolls separate. Allow tubes that have been very cold to come to room temperature for a few minutes before opening to prevent tearing. Tube opening technique involves following package directions carefully while being gentle to prevent damaging the pre-formed rolls. Most tubes pop open with gentle pressure on the seam. Roll separation should be done carefully to maintain the spiral shape that creates the characteristic cinnamon roll appearance. Gentle handling preserves the layers that create texture. Quality indicators include checking expiration dates and ensuring tubes haven’t been damaged during storage. Fresh products produce better rising and more attractive finished rolls. Storage considerations before baking suggest using tube rolls promptly after opening, as they’re formulated for immediate use rather than extended storage once exposed to air. Perfecting Your Baking Technique Success with cinnamon rolls depends on proper baking technique that ensures even cooking, optimal rising, and attractive appearance. These details make the difference between good and exceptional results. Pan Preparation: Use adequate cooking spray coverage to ensure easy release while avoiding excess that could make rolls greasy. Even coverage prevents sticking without affecting texture. Roll Placement: Position rolls close together but not touching initially, allowing space for rising during baking. The rolls will expand and touch during baking, creating soft sides. Oven Preheating: Ensure your Cosmo 965AGFC oven reaches 400°F before placing rolls inside. Proper preheating ensures immediate rising and browning when baking begins. Positioning: Place the baking sheet in the center of the oven for even heat circulation around the rolls. Center positioning prevents uneven browning or cooking. Timing Monitoring: Begin checking for doneness at 12 minutes, looking for golden-brown color and firm texture. Avoid over-baking, which can make rolls dry. Steam Release: Open the oven door briefly after baking to release excess steam, preventing rolls from becoming soggy from condensation. Achieving Perfect Texture and Appearance The goal is cinnamon rolls with golden-brown exteriors, soft centers, and appealing visual presentation that looks as good as it tastes. Golden brown color indicates proper baking without over-cooking. The rolls should have rich color while maintaining soft texture inside. Even rising across all rolls suggests proper spacing and oven temperature. All rolls should appear similar in size and height when finished. Soft centers can be tested by gently pressing the center of one roll. It should feel set but still slightly soft, indicating proper doneness. Clean release from the baking sheet indicates adequate non-stick preparation without excess oil that could affect texture or appearance. Proper icing consistency results from applying it to warm but not hot rolls, allowing slight melting without complete liquefaction. Icing Application for Best Results The icing application technique significantly affects both appearance and taste of the finished cinnamon rolls. Proper timing and method create the perfect glaze. Temperature timing matters for icing application. Apply icing when rolls are warm but not steaming hot to achieve the right consistency and absorption. Even distribution ensures all rolls receive adequate icing while maintaining attractive appearance. Pour or drizzle icing to cover all rolls evenly. Absorption benefits occur when warm rolls slightly melt the icing, allowing it to soak into the surface layers while maintaining surface glaze. Visual appeal improves with thoughtful icing application that creates attractive patterns while ensuring complete coverage. Serving timing affects icing consistency. Serve while icing is still slightly warm and glossy for optimal texture and appearance. Serving Suggestions and Presentation These cinnamon rolls work beautifully for various serving occasions, from casual family breakfasts to more

Chorizo Burrito Recipe: Protein-Packed Satisfaction for Any Time of Day

Sometimes you need a meal that delivers serious flavor and lasting satisfaction without complicated ingredients or lengthy preparation. This chorizo burrito recipe does exactly that, combining the rich, spicy flavors of chorizo with fluffy scrambled eggs wrapped in a warm tortilla. With just four simple ingredients and about 10 minutes of cooking time, you can create a hearty meal that works equally well for breakfast, lunch, or dinner. The beauty of this recipe lies in its simplicity and versatility. Chorizo provides bold flavor and protein that makes this burrito incredibly satisfying, while eggs add creaminess and additional protein that keeps you full for hours. Whether you’re fueling up for a busy day or need a quick dinner solution, this chorizo burrito delivers the comfort and nutrition you’re craving. Why This Chorizo Burrito Recipe Works So Well The combination of chorizo and eggs creates a perfect balance of flavors and textures that make this burrito both satisfying and delicious. Understanding why these ingredients work together helps you achieve the best results while building confidence to customize the recipe to your preferences. Chorizo releases flavorful oils as it cooks, creating a natural base for scrambling eggs that infuses them with rich, spicy flavor. This integration means every bite contains the bold chorizo taste rather than having separate components that don’t complement each other. High-protein content from both chorizo and eggs provides lasting satiation that keeps you satisfied much longer than carbohydrate-heavy meals. This protein combination makes the burrito an excellent choice for active days or when you need sustained energy. Quick cooking time makes this recipe perfect for busy schedules or when hunger strikes and you need something satisfying immediately. The entire cooking process takes less than 10 minutes from start to finish. Simple ingredients mean you can keep the components on hand for whenever the craving hits. Chorizo keeps well refrigerated, eggs are a staple, and tortillas store easily, making this a reliable go-to meal. Versatile timing allows you to enjoy this burrito any time of day. The combination works as well for breakfast as it does for lunch or dinner, providing flexibility for various meal needs. One-pan cooking minimizes cleanup while maximizing flavor development. Cooking everything together allows the ingredients to meld perfectly while reducing the number of dishes you need to wash. Choosing the Right Chorizo for Best Results The type and quality of chorizo you choose significantly affects both flavor and cooking results. Understanding your options helps you select the best chorizo for your taste preferences and cooking style. Mexican chorizo typically comes raw and needs full cooking, providing bold, spicy flavor with a crumbly texture that works perfectly for this recipe. The raw chorizo breaks apart easily during cooking while releasing flavorful oils. Spanish chorizo comes pre-cooked and has a firmer texture with different spicing. While it can work in this recipe, it requires different handling and provides a different flavor profile than traditional Mexican chorizo. Fresh chorizo from butcher shops or Mexican markets often provides superior flavor compared to mass-produced versions. The higher quality ingredients and traditional spicing create more complex, satisfying taste. Spice level varies significantly between different chorizo brands and types. Start with milder varieties if you’re sensitive to heat, or choose spicier versions if you enjoy bold flavors. Fat content affects both flavor and cooking characteristics. Higher-fat chorizo releases more oils for cooking eggs, while leaner versions may require additional cooking fat for optimal results. Storage considerations include keeping chorizo refrigerated and using within recommended timeframes. Fresh chorizo typically keeps for several days refrigerated, while some varieties can be frozen for longer storage. Step-by-Step Technique for Perfect Results Success with this chorizo burrito depends on proper cooking technique and timing. Following these detailed steps ensures the chorizo cooks properly while the eggs achieve the perfect creamy texture. Egg Preparation: Crack four eggs into a bowl and whisk thoroughly until whites and yolks are completely combined. Proper whisking creates the smooth texture that makes scrambled eggs creamy rather than lumpy. Pan Setup: Heat your pan on the Cosmo GRP486G range using medium heat. Add a small amount of oil or butter to prevent sticking and provide additional richness to the final dish. Chorizo Preparation: Cut the chorizo roll in half using a sharp knife, then place the pieces in the heated pan. The chorizo will begin releasing oils immediately as it heats. Breaking Apart Chorizo: Use a spatula to break the chorizo into smaller pieces as it cooks. Continue breaking it apart until you achieve a crumbly texture with no large chunks remaining. Cooking Chorizo Completely: Cook the chorizo until it’s fully broken apart and no pink color remains. This typically takes 3-4 minutes, depending on the size of the pieces and heat level. Adding Eggs: Pour the whisked eggs directly into the pan with the cooked chorizo. The eggs will begin cooking immediately upon contact with the hot pan and chorizo oils. Mixing Thoroughly: Stir the eggs and chorizo together constantly to ensure even cooking and flavor distribution. The eggs should cook quickly while absorbing the chorizo flavors and oils. Recognizing Doneness: The mixture is ready when the eggs look solid and set rather than liquid or runny. They should be creamy but not wet, with the chorizo evenly distributed throughout. Tortilla Warming: Heat your tortilla using your preferred method – directly over a gas flame, in a dry pan, or wrapped in damp paper towels in the microwave for a few seconds. Assembly: Place the warm tortilla on a plate, add your desired amount of the chorizo and egg mixture, then roll or fold according to your preference. Recipe Variations and Customizations This basic chorizo burrito recipe provides an excellent foundation for numerous variations that can accommodate different tastes, dietary needs, and available ingredients. Cheese Additions: Shredded cheese added to the eggs during the last minute of cooking creates extra richness and helps bind the ingredients together. Cheddar, Monterey Jack, or Mexican cheese blends work particularly well. Vegetable Enhancements: Diced onions,

Cheese Stuffed Biscuit Balls Recipe: Crispy Outside, Gooey Cheese Inside

Sometimes the best comfort food comes from the simplest ideas. These cheese stuffed biscuit balls prove that you don’t need complicated ingredients or techniques to create something absolutely delicious. With just a tube of biscuit dough, shredded cheese, and a few basic steps, you can create golden, crispy treats that are perfectly gooey on the inside and irresistibly crunchy on the outside. Perfect for game day snacks, party appetizers, or whenever you’re craving something warm and cheesy, these biscuit balls deliver maximum satisfaction with minimal effort. The beauty of this recipe lies in its simplicity – using store-bought biscuit dough as a shortcut means you can have fresh, homemade-tasting treats ready in under 20 minutes from start to finish. Why This Recipe Works So Well The magic of cheese stuffed biscuit balls comes from the contrast between textures and the way simple ingredients transform during baking. Understanding why this recipe succeeds helps you achieve perfect results every time while building confidence to experiment with variations. Store-bought biscuit dough provides the perfect base because it’s specifically formulated to rise and brown beautifully while maintaining enough structure to hold melted cheese. The dough’s consistency makes it easy to work with while ensuring reliable results. Sealed cheese pockets create the signature gooey center that makes these treats so satisfying. Properly sealing the dough prevents cheese from leaking out during baking while ensuring every bite contains that perfect cheese pull. High-temperature baking at 400°F creates the crispy exterior while melting the cheese inside to perfect gooeyness. This temperature balance ensures the outside browns and crisps while the inside becomes molten and delicious. Butter brushing enhances browning while adding rich flavor that complements both the biscuit dough and cheese. The butter creates an attractive golden color while contributing to the overall taste and texture. Simple ingredients mean you can make these treats anytime without special shopping or planning. Most families keep biscuit dough, cheese, and butter on hand, making this recipe perfect for spontaneous cravings or unexpected guests. Choosing the Right Ingredients While this recipe uses simple ingredients, making smart choices about each component can significantly improve your results. Quality ingredients matter even in simple recipes, and understanding your options helps you customize the treats to your preferences. Biscuit dough varieties each provide slightly different results. Regular refrigerated biscuit dough works perfectly, while buttermilk versions add tangy flavor that complements cheese beautifully. Flaky layer biscuits create interesting texture variations as they bake. Cheese selection dramatically affects both flavor and melting properties. Sharp cheddar provides bold flavor and good melting characteristics, while mozzarella creates amazing cheese pulls. Combining different cheeses can provide complex flavors and optimal melting. Pre-shredded versus fresh-grated cheese each offer advantages. Pre-shredded cheese is convenient and coated to prevent clumping, while freshly grated cheese often melts more smoothly and provides better flavor. Butter quality affects both taste and browning results. Real butter provides superior flavor and browning compared to margarine, while salted butter adds subtle flavor enhancement that complements the cheese. Room temperature ingredients work together more easily during preparation. Allowing biscuit dough to come to room temperature makes it more pliable, while room temperature butter spreads more evenly. Step-by-Step Technique for Perfect Results Success with cheese stuffed biscuit balls depends on proper technique during preparation and baking. Following these detailed steps ensures consistent results that showcase the contrast between crispy exterior and gooey interior. Dough Preparation: Remove four biscuits from the tube and separate them carefully to avoid tearing. Handle the dough gently to maintain its structure while making it workable for stuffing. Flattening Technique: Gently flatten each biscuit with your hands or a rolling pin to create a circle large enough to hold cheese and seal properly. Avoid making the dough too thin, which could cause tearing or uneven cooking. Cheese Portioning: Use approximately 1-2 tablespoons of shredded cheese per biscuit ball, depending on size preference. Too much cheese can cause leakage, while too little won’t provide the satisfying gooey center. Sealing Method: Place cheese in the center of flattened dough, then gather edges around the cheese and pinch firmly to seal. Ensure complete sealing to prevent cheese from escaping during baking. Ball Formation: Gently roll sealed dough between your palms to create smooth, round balls. This shaping helps ensure even cooking while creating attractive presentation. Butter Application: Melt butter completely and brush evenly over all surfaces of each biscuit ball. This step enhances browning while adding flavor and moisture. Baking Setup: Grease your baking sheet thoroughly or use parchment paper to prevent sticking. Space biscuit balls evenly to allow proper air circulation during baking. Oven Preparation: Preheat your Cosmo GRP486G oven to 400°F before placing biscuit balls inside. Proper preheating ensures immediate browning and rise when baking begins. Baking Process: Bake for 12-15 minutes until golden brown and crispy. Avoid opening the oven door frequently, which can cause temperature fluctuations that affect rising and browning. Cooling Period: Allow biscuit balls to cool for a few minutes before serving to prevent burns from molten cheese while ensuring they’re still warm and gooey inside. Recipe Variations and Customizations The basic cheese stuffed biscuit ball recipe serves as an excellent foundation for numerous variations that can accommodate different tastes, dietary needs, and occasion requirements. Cheese Combinations: Mix different cheese types for complex flavors and optimal melting. Cheddar and mozzarella combine sharp flavor with excellent stretch, while cream cheese adds richness and smooth texture. Herb Additions: Fresh or dried herbs can be mixed into the cheese filling or sprinkled on the buttered exterior. Chives, oregano, garlic powder, or Italian seasoning complement cheese flavors beautifully. Meat Inclusions: Small pieces of cooked bacon, ham, or pepperoni can be added with the cheese for protein and additional flavor. Pre-cook meat completely and chop finely to ensure even distribution. Spice Variations: Add heat with diced jalapeños, red pepper flakes, or hot sauce mixed into the cheese. Start with small amounts and adjust to taste preferences. Sweet Adaptations: Create dessert versions using sweet biscuit dough with cream cheese