Month: July 2021

Air Fried Mango Fries

Try something new with these air fried mango fries. All you need is some flour, cinnamon and of course mangoes. You can substitute the cinnamon with tajin if you prefer a more spicy snack. These can be quickly prepared in an air fryer in as little as 15 minutes. Serve these as an appetizer to tonight’s dinner or a snack to enjoy for a weekend night in. Ingredients: Mango Flour Cinnamon or Tajin Non-stick Cooking Spray Directions: Peel and slice mango into fry-sized bites Coat fries in a bowl of flour Spray cooking spray on the air fryer pan. Load the fries. Cook at 350°F for 15 minutes or until golden brown. Flip as needed Sprinkle with cinnamon or tajin

Scallion Pancakes Recipe

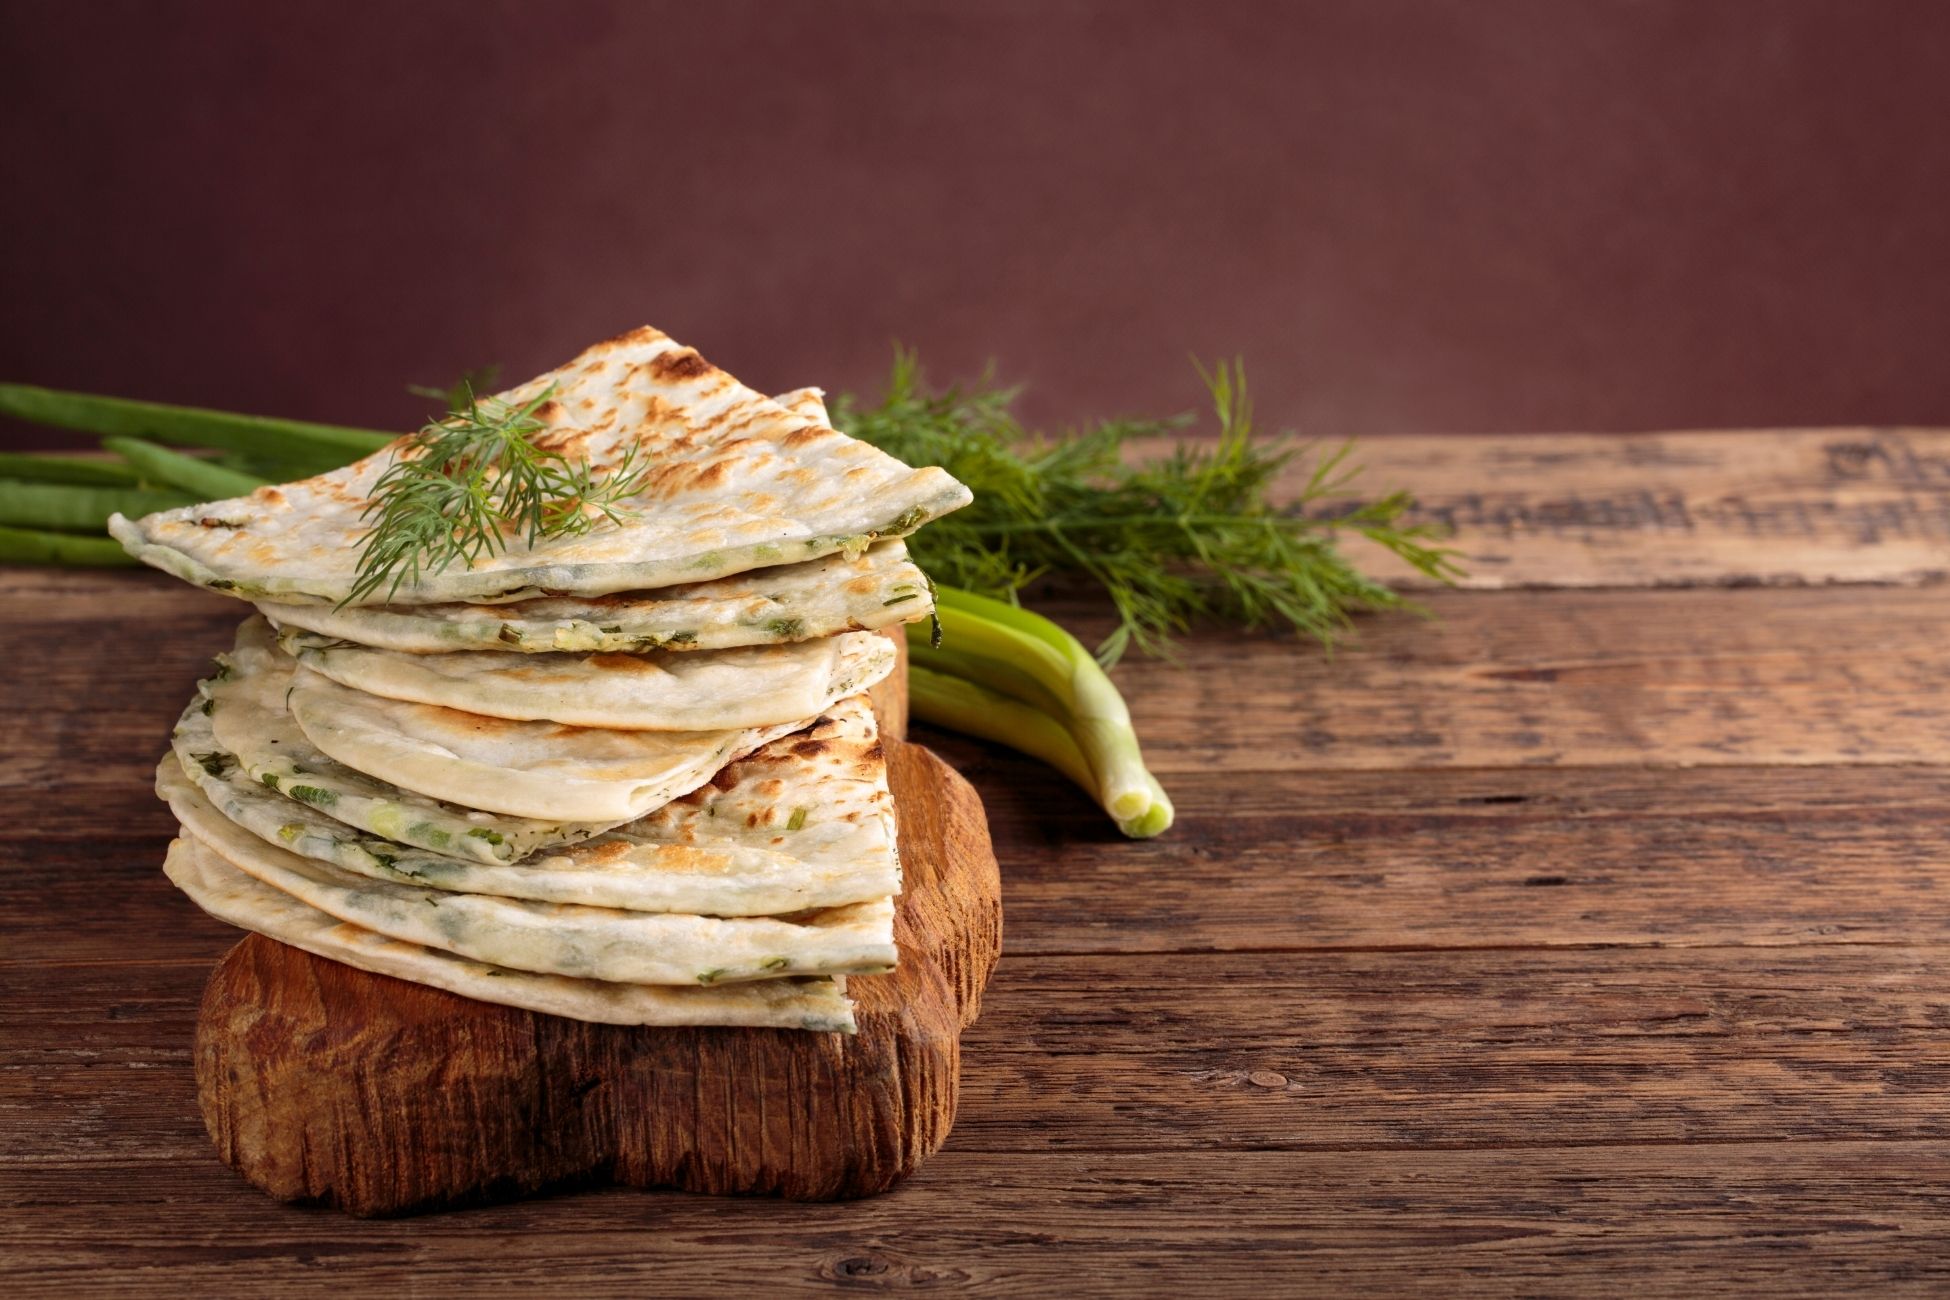
These thin, round pancakes are crispy on the outside and chewy on the inside. They’re surprisingly easy to cook at home. You’ll only need four basic ingredients: flour, hot water, scallions and salt. The pancakes can be served on their own, or along a soy sauce and vinegar based dipping sauce. Serve these immediately from the griddle while they’re still warm and crispy. Prep time: 25 mins Cook time: 25 mins Resting time: 30 mins Total time: 80 mins Servings: 4 to 6 servings Ingredients: For the scallion pancakes: 2 cups all-purpose flour 1 teaspoon salt 1/2 teaspoon garlic powder, optional 3/4 cup hot (just boiling) water, plus a few more tablespoons, if necessary 1/4 cup canola oil 3 to 4 scallions, thinly sliced For the dipping sauce: 2 tablespoons soy sauce 2 1/2 tablespoons rice vinegar 1/2 teaspoon toasted sesame oil Pinch red pepper flakes, optional Directions: Mix the dough: Add flour, salt and garlic powder to a medium bowl. Stir to combine. Add 3/4 cup of hot water to the flour and stir with a wooden spoon. Continue stirring until all the water has been absorbed by the flour. Don’t worry if the dough has not formed completely yet. Knead the dough: Knead all the bits of dough together with your hands inside the bowl. If your dough is still very dry, add a splash of hot water, about 1 to 2 tablespoons, until it comes together and all the flour is absorbed. Continue kneading the dough for about 2 more minutes. The dough will feel moist but it should not stick to your hands too much. Rest the dough: Shape the dough into a round ball. Cover the bowl with plastic wrap and let the dough rest for 30 minutes. Roll out the pancakes: Sprinkle flour on top of a work surface. Divide the dough into 4 pieces of equal size. Work with one piece at a time, leaving the remaining pieces in the bowl. Shape piece of dough into a small ball. Use a rolling pin to roll out the dough into a thin circle, about 7 to 8 inches in diameter. Add the scallions: Brush a thin layer of canola oil on top of the dough, making sure not to miss the edges. Sprinkle sliced scallions all over the dough. Roll and flatten the pancake: Starting on one end, roll the circle of dough into a log. Take one end of the rolled up dough and curl it toward the center, like a snail’s shell. Tuck the end of the dough underneath the spiral. Use the palm of your hand to flatten the dough into a thick circle. Roll it out again with your rolling pin. Try to roll it out as thinly as possible. A few slices of scallions may pop out during the process, and that’s perfectly normal. Transfer rolled out scallion pancake to a plate. Repeat steps 4 through 6 with the remaining dough pieces. Cook the pancakes: Heat about 2 teaspoons of canola oil in a small nonstick or cast iron skillet over medium heat. Place one of the pancakes in the middle of the pan and pan fry each side for about 2 to 3 minutes, until golden brown. Transfer to a plate and repeat with the 3 remaining scallion pancakes, adding more oil to the pan as needed. Prepare the dipping sauce: Mix all the sauce ingredients in a small bowl. Adjust the seasonings to your liking, adding more soy sauce or vinegar, if you like. Add any leftover scallions to the dipping sauce, and add a pinch of red pepper flakes if you would like a bit of spice. Serve the hot pancakes: Cut the scallion pancakes into small wedges and serve while hot with the dipping sauce. (The pancakes are still good when cooled, but will no longer be crispy.) Source: Simply Recipes

How to Pasteurize Eggs

For popular recipes such as mayonnaise, hollandaise and royal icing, raw and partially cooked eggs are a necessity. However, raw or partially-cooked chicken eggs can carry salmonella bacteria. You can still enjoy these recipes with peace of mind after pasteurizing eggs. The process of pasteurization brings eggs to a temperature that kills dangerous pathogens. How to Pasteurize Eggs on the Stove Start with room temperature eggs: Starting with eggs that aren’t cold ensures you pasteurize the entire egg, rather than just the parts closest to the shell. Use fresh eggs with no cracks and let them come to room temperature. Cover the eggs with 1 inch of water: Fill a small saucepan with cool water and gently put the eggs in the pan. Make sure they are covered by 1 inch of water. Heat the water slowly to 140° F and hold for 3.5 minutes: Put the pan on medium heat. Let the water slowly come to 140° F. Check the temperature of the water with an instant-read or candy thermometer. Hold that 140° temperature for 3.5 minutes for large eggs or 5 minutes for extra-large eggs (eggs between 64 and 70 grams).Keep an eye on the temperature this whole time, adjusting the burner or moving the pan as needed to maintain the correct temperature. Transfer eggs to a bowl of ice water to cool: Use a slotted spoon and gently transfer the eggs to a bowl of ice water to cool them down. Your eggs are now pasteurized! Mark and refrigerate: Use a permanent marker to mark your eggs so you know they’re pasteurized. Use them right away or refrigerate for up to 1 week. How to Pasteurize Just Egg Whites or Yolks Bring water to a boil and separate the eggs: Bring a large pan saucepan of water to a boil. While you wait, crack as many room-temperature eggs as you need into a heatproof bowl. If you only need to pasteurize egg yolks, you can do just the yolks. Conversely, if you only need to do the whites, just do the whites. Add water to the bowl of eggs: Add 2 tablespoons of tap water for each whole egg used, or for each single yolk or egg white.For example, if you used egg whites from two eggs, add four tablespoons of water to the bowl of egg whites. If your recipe calls for liquid such as milk, stock, or lemon juice, you may use that instead of water. Set the bowl over the pot of simmering water and scrape for 2-3 minutes: Set the bowl on top of the saucepan of simmering water and turn off the heat. Use a silicone spatula to constantly scrape the sides and bottom of the bowl. Don’t beat in air; this constant motion is to keep the eggs from scrambling and to maintain a constant temperature.Do this for 2-3 minutes, or until the water in the pan has cooled to lukewarm. Use immediately. Source: Simply Recipes

Cinnamon French Toast Recipe

Prepare an easy yet delicious breakfast this weekend. French toast is simple to make with only a few ingredients commonly found in your pantry. Be sure to top these with strawberries and powdered sugar for the finishing touch. Ingredients: 2 Eggs 1 Tbsp Milk (or heavy cream) 1 Tbsp Vanilla Extract 2 Tbsp Powdered Sugar Cooking Olive Oil Spray Bread Directions: Crack eggs in a bowl and add milk, vanilla extract and powdered sugar. Mix thoroughly Coat both sides of bread with mix and coat in cinnamon Spray olive oil on air fryer pan Cook at 400°F for 5 to 6 minutes

Choosing Glass Tile for Backsplashes

If you’re looking to update your kitchen backsplash, glass tile installs just like ceramic tiles but with a more luminous and colorful aesthetic. It’s widely available at many retailers, making it an easy DIY project. Glass vs. Ceramic Ceramic tile is the traditional material for backsplashes. If it’s a glazed ceramic, the tile has a glass-like surface and is just as washable, durable and stain-resistant as glass tile would be. The grout in a ceramic tile backsplash has to be sealed and regularly maintained for stain-resistance. As for aesthetics, a ceramic tile will be more opaque with all of it’s color on the surface. Glass on the other hand is translucent and light penetrates the entire tile. This light will reflect off the tile and the wall behind it. It will give it more visual depth and overall a water shine or glow. Types of Glass You can obtain glass tiles in just about any color you can think of. They’re also created in many interesting shapes beyond the popular subway tile pattern. You can achieve a more luxurious feel with long, slender tiles, or a vintage look with round and octagonal mosaic tiles. Glass tiles can feature intricate surface designs and be either sheen or matte. Pair these with other tiles made of stone, porcelain or other materials for endless visual possibilities. Tips for Glass Backsplashes Choose the backsplash color after you’ve selected the other room finishes. You can then incorporate shades that complement your wall color or countertop. Lighter tiles work better in smaller areas. The reflected light will make the space feel larger. Mosaic glass tiles are mounted on mesh backing, making them easier to install. Buy extra tiles in case you need to fix any broken ones later on. Source: the Spruce

Pink Lemonade Recipe

The Fourth of July is approaching, the perfect time for a cool refreshing drink during the hot summer day! All you need to do to add the pink to this lemonade recipe is cranberry juice. It’s tart just like unsweetened lemon juice. When dissolved with a simple syrup it makes for the ultimate refresher. Prep time: 10 minsCook time: 15 minsTotal time: 25 minsServings: 6 servings Ingredients: 1 to 1 1/4 cup sugar 4 cups water, divided 1 cup cranberry juice 1 cup freshly squeezed lemon juice Directions: Make the simple syrup: Heat sugar (use 1 1/4 cups of sugar if you’ll be using unsweetened cranberry juice) and 1 cup of the water in a small saucepan until the sugar is completely dissolved. Remove the simple syrup from the heat and let it cool. Stir together the lemonade: Combine the remaining water, cranberry juice, lemon juice, and simple syrup in a pitcher. Make adjustments to taste. If the lemonade is a little sweet for your taste, add a little more straight lemon juice to it. Chill, then serve: Chill in the refrigerator for about an hour, or add in ice to cool the lemonade. Source: Simply Recipes  

Installing Cosmo Recirculating Filters for Ductless Range Hoods

Select Cosmo Range Hoods can be used in one of two ways, ducted or ductless. A ducted range hood will carry the ventilated air through ductwork and ultimately outdoors. On the other hand, a ductless range hood will filter the air and recirculate it back into the kitchen. In order for a Cosmo ductless range hood to operate, it will need a charcoal carbon filter to effectively clean the air. Before beginning, check your range hood model and serial number to correctly match the appropriate charcoal filter kit. Installation will slightly differ depending on the model. Here is how to install the CFK1-TM filter kit to convert to ductless operation. How to Install CFK1-TM Filters: Remove the ARC-FLOW Baffle Filters Locate the motor and align one of the filters with the right side of the motor Twist and lock the filter into place Repeat Steps 2-3 on the left side of the motor Reinstall the ARC-FLOW Baffle Filters back into place NOTE: For wall mounted hoods, chimney vent holes must be open and visible for the filtered air to recirculate. Download Quick Start Guide PDF