Year: 2021

Air Fried Taquito Recipe

Try this air fried taquito recipe for tonight’s dinner! The surprisingly easy dish only requires four ingredients that you most likely already have! If you have a smaller air fryer you can cut the taquitos in half to accommodate for the basket. Ingredients: Chicken breast ¼ cup mozzarella cheese 2 tbsp cream cheese Tortillas Non-stick cooking spray Directions: Shred chicken breast into bowl Add mozzarella cheese and cream cheese. Mix together Warm tortilla in air fryer Roll mix into the tortilla. Cut in half if air fryer is smaller Spray air fryer pan and taquito with cooking spray and load into air fryer Cook at 350 degrees F for 8 to 10 minutes.

Gluten Free Chocolate Cake Donuts Recipe

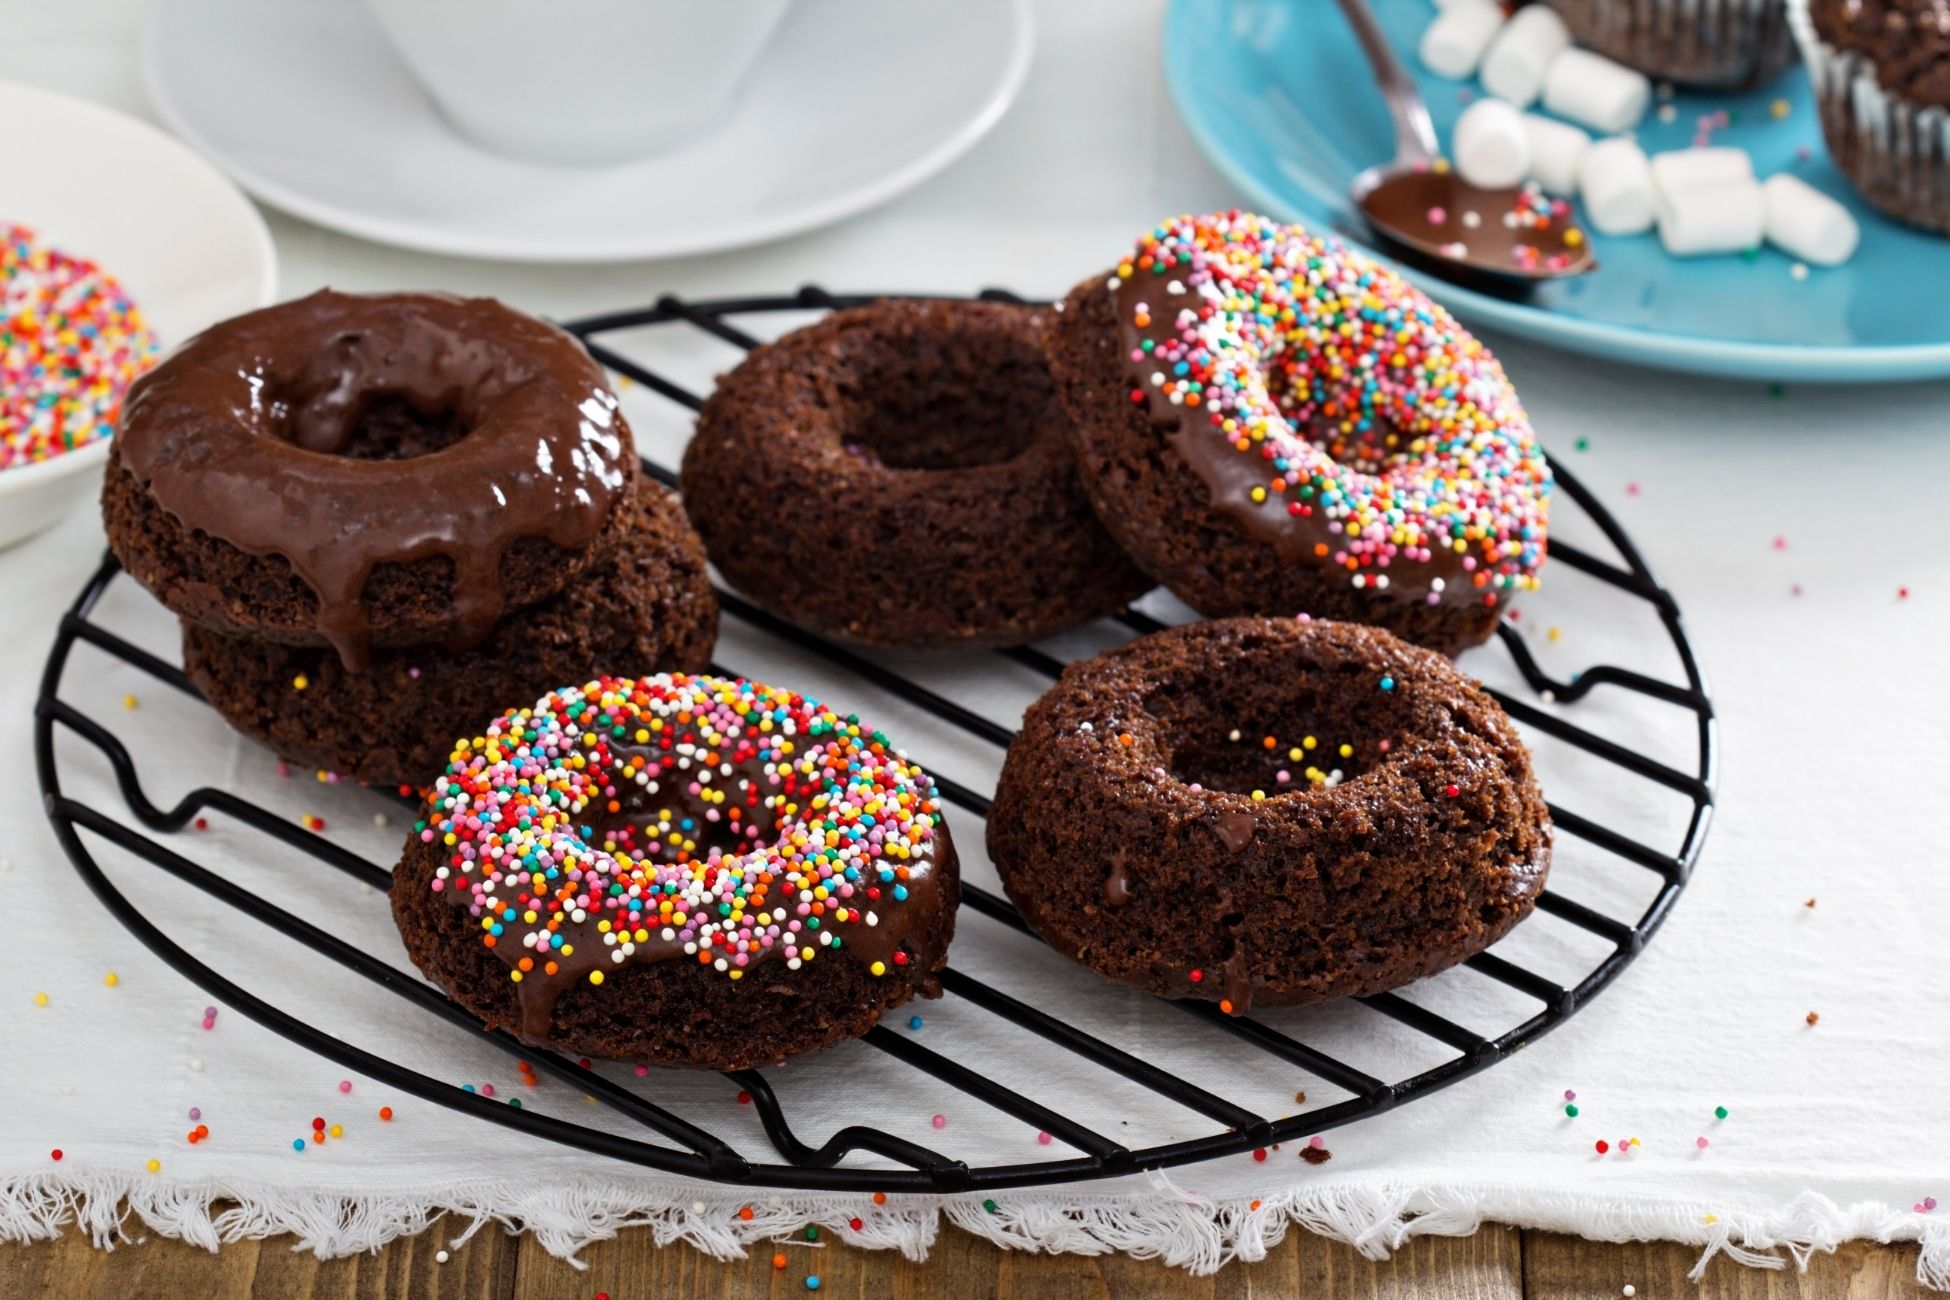
These donuts are perfect for breakfast! They’re vegan and gluten-free so everyone can enjoy them. Since these donuts are baked instead of fried, you will need a donut pan. These are best eaten the same day they’re made, so make sure to have a big appetite. The donuts have a light texture and are glazed with a punch of chocolate flavor. Prep time: 20 mins Cook time: 10 mins Cooling: 25 mins Total time: 55 mins Servings: 10 donuts Ingredients: For the donuts: 1 tablespoon flax meal 1 1/2 cup plus 1 tablespoon (215g) gluten-free flour blend 1/2 cup (100g) granulated sugar 1/3 cup plus 1 tablespoon (30g) unsweetened dairy-free cocoa powder 1 teaspoon baking powder 1/2 teaspoon baking soda 1/4 teaspoon cream of tartar 1/2 teaspoon kosher salt 1/4 cup coconut oil, melted and liquid, but slightly cooled 1 teaspoon vanilla extract 1 tablespoon apple cider vinegar 3/4 cup plus 2 tablespoons warm non-dairy milk, such as soy milk or oat milk For the glaze: 1 cup (115g) powdered sugar (make sure it’s gluten-free) 3 tablespoons unsweetened dairy-free cocoa powder 2 to 4 tablespoons non-dairy milk, such as soy milk or oat milk Rainbow sprinkles, to top Directions: Prepare the flax “egg”: Combine the flax meal with 2 1/2 tablespoons of water in a small bowl. Let stand for 7 to 10 minutes to thicken. (This will be used as an egg replacer in this recipe.) Preheat the oven and prepare pans: Preheat the oven to 375°F. Lightly spray two full-sized donut baking pans with nonstick cooking spray, and set them aside. Mix dry ingredients: In a medium bowl, whisk together the flour, sugar, cocoa powder, baking powder, baking soda, cream of tartar, and salt until smooth. Mix wet ingredients: In a separate medium bowl, whisk together the oil, flax egg, vanilla, vinegar, and non-dairy milk until smooth. Combine dry and wet ingredients: Pour the dry ingredients into the wet ingredients and stir to combine, making sure all the dry bits are incorporated. Fill the donut pan: Use a kitchen spoon to scoop the dough into the wells of the donut pan, stopping when each is almost full (these donuts don’t rise a ton, so fill the indents almost to the top). The dough will be thick and sticky, so use your fingers or the back of a spoon to gently press it into the indentation. Bake: Bake donuts for 9 to 10 minutes, or until they spring back to the touch and a toothpick inserted into the center comes out clean. Cool: Allow donuts to cool in pan for 5 minutes, then remove from the pan and transfer to a wire rack to cool completely. Make the glaze: In a small bowl, whisk together the powdered sugar and cocoa powder. Be sure there aren’t any clumps, and if there are, sift the ingredients so your glaze will be smooth. Add 2 tablespoons of non-dairy milk and whisk well. You’re looking for a smooth, pourable glaze. If your glaze is too thick, add additional non-dairy milk one tablespoon at a time until you reach the desired consistency. Glaze the donuts: Cut a piece of parchment paper the same size (or slightly larger) as your wire cooling rack and place under your cooling rack to catch drips. Dip one side of each doughnut in the glaze and place glaze-side up on the cooling rack. Allow any excess to drip off. Sprinkle and serve: While the glaze is still wet, sprinkle the tops of each donut with colorful sprinkles. Let the donuts set at room temperature for at least 25 minutes to allow the glaze to firm up. Serve immediately, or cover leftovers and store at room temperature for up to 1 day. Source: Simply Recipes

Decluttering Tips for An Organized Kitchen

Paying a professional organizer is expensive, but having a tidy kitchen is the key to achieving a picture perfect finish. Here are a few tips professional organizers offer their clients when it comes to decluttering a kitchen. Apply these to your home to keep your kitchen in pristine shape year-round! Sort Through Items. The most common issue is an excess of items. In a kitchen, all sorts of items can pile up such as food, dish sets, and utensils. The challenge is to sort through everything and decide whether it should be kept, tossed or donated. Always check for expired food as this is an obvious item to get rid of. Don’t forget to review all your spices too! Pull out all the rarely used appliances to see if they’re still working. Relocate Items. Often, a kitchen can be a landing ground for many items that don’t belong in a kitchen. Go through these items to see if they can be relocated to another part of your home. If it needs to absolutely stay, designate a single neat and tidy drawer to house all these items. The One-In-One-Out-Rule. This rule is a pro tip you can apply to further declutter your kitchen. Whenever you purchase a new item, throw an old item away. It will help keep your kitchen organized while preventing a pile up. Labels. Once everything has been sorted, edited and organized, it’s time to properly label everything. This will help you keep track of what goes where and make sure items don’t end up in the wrong spot again. Source: Apartment Therapy

TikTok Wrap Hack Quesadilla Recipe

Try this TikTok Quesadilla trend! The delicious stacked layers of cheesy goodness makes for a fun snack. You can easily prepare these in an air fryer, so no burning yourself trying to melt the cheese! Add your favorite spicy sauce or opt for spicy mayo instead. Ingredients: Chicken Spicy mayo or hot sauce Mozzarella cheese Non-stick cooking spray Directions: From the center make one cut to the edge of the tortilla Add chicken to one of the four corners Add spicy mayo or hot sauce to another and fill the final two with cheese Fold each corner on itself until you get a triangle Spray air fryer pan with cooking spray and load the quesadilla Cook at 350 degrees F for 5 minutes. Flip and repeat.

Pepperoni Calzones Recipe

Try these delicious home-made calzones for an easy dinner, or if you ever want an alternative to pizza! Calzones are a great way to use up any leftover pasta sauce at the back of your fridge. With the no-knead pizza dough you can easily stuff it with pepperoni, creamy ricotta and mozzarella. An egg wash ensures they are sealed and prepared for baking. Prep time: 20 minsCook time: 35 minsInactive time: 3 hrsTotal time: 3 hrs 55 minsServings: 4 to 6 servingsYield: 4 to 6 calzones Ingredients: 2 pounds prepared pizza dough 4-6 tablespoons marinara sauce, plus more for dipping 8 ounces ricotta cheese 4 ounces pepperoni, sliced 8 ounces grated mozzarella cheese 2 tablespoons chopped fresh oregano For the egg wash: 1 large egg wash 1 tablespoon water Directions: Preheat the oven to 375°F Divide the dough: Using the prepared pizza dough, split the dough into 4 evenly sized balls for large calzones or 6 for smaller ones. Work with one dough ball at a time and keep the remaining dough balls covered so they don’t dry out. Roll out the dough: Transfer dough ball to a lightly floured surface. Using a rolling pin roll it out until you have a circle that is 6-8 inches in diameter, again depending on size you are looking for. If you are making four larger calzones, I would shoot for around 8 inches in diameter. If making the smaller version go for 6-inches.Roll out all the dough balls, so you can have an assembly line when it comes to time to fill the calzones. In the end you should have what looks like 4 to 6 mini pizza crusts waiting to be filled. Fill the calzones: Leave a 1/2-inch boarder around the edge the dough so you can seal it later. Add about a tablespoon of marinara sauce on one half of the dough circle. Top the sauce with about two tablespoons of ricotta and spread it out over half of the dough, remembering to leave the boarder. Repeat with all remaining dough circles. Divide the diced pepperoni, mozzarella, and fresh oregano evenly among the calzones. Seal the calzones: Once you have added the filling, dip your finger in some water and run it lightly around the edge of the calzone. Then take the unfilled side of the dough and fold it over the filling. Pinch the edges closed. Create steam vents: Use a serrated knife to cut three slits in the top of each calzone to allow for steam to escape as it bakes. Brush with egg wash: Once your calzones are sealed, make the egg wash. Add the egg and 1 tablespoon of water in small bowl and beat with a fork until combined. Use a pastry brush to brush the egg wash over the top of the calzones.Bake the calzones: Line a baking sheet with parchment paper. Place the calzones in the oven and bake for 35 to 40 minutes until the calzones are a deep golden brown all around. To Serve: Serve the calzones while warm with extra marinara for dipping. Source: Simply Recipes

Strawberry Cream Cheese Air Fryer Donuts

Bake your own donuts with the help of your air fryer. Try this delicious strawberry cream cheese recipe for tonight’s dessert. You can have these ready quickly without any complicated baking or dough prep. Make these with your family for a fun night in. Ingredients: Pillsbury Biscuits Strawberry Cream Cheese Cream Cheese Frosting Non-stick cooking spray Directions: Use a bottle cap to cut out donut holes into Pillsbury biscuits Spray air fryer pan with cooking spray and bake at 350 degrees F for 6 to 8 minutes Cut donuts in half and fill with strawberry cream cheese Frost with cream cheese frosting

Breakfast Chilaquiles Recipe

Make these for your next breakfast. Chilaquiles are corn tortilla pieces that are fried, cooked in salsa, and sprinkled with cheese. You can serve these along with eggs and a side of beans. There are two ways to prepare these chilaquiles, with red chile sauce or salsa verde. Top the chilaquiles, cilantro and red onion. Cook time: 15 minsTotal time: 15 minsServings: 4 servings Ingredients: 12 corn tortillas, preferably stale, or left out overnight to dry out a bit, quartered or cut into 6 wedges Corn oil Salt 1 1/2 to 2 cups red chile sauce or salsa verde, store-bought or homemade (see end of recipe for homemade versions) A few sprigs of epazote, optional Garnishes Cotija cheese or queso fresco Crema Mexicana or creme fraiche Cilantro, chopped 1 red onion, chopped Avocado, sliced or roughly chopped Directions: Fry the tortillas: In a large sauté pan, coat pan generously with corn oil, (1/8 inch), heat on medium high to high. When the oil is quite hot, add the tortillas, fry until golden brown.Remove tortillas to a paper towel lined plate to soak up excess oil. Sprinkle a little salt on the tortillas.Wipe pan clean of any browned bits of tortillas. Heat the salsa: Add 2 tablespoons of oil to pan, bring to high heat again. Add the salsa and let salsa cook for several minutes. If you have a few sprigs of epazote, add them to the salsa. Add fried tortillas to the salsa: Add the fried tortilla quarters to the salsa. Gently turn over the pieces of tortilla until they are all well coated with salsa. Let cook for a few minutes more.Remove from heat. Serve chilaquiles with garnishes and fried eggs and beans or nopalitos. Red chile sauce: Take 4 dried ancho chiles, remove seeds, stems, and veins. Heat chiles lightly on a skillet on medium heat to draw out their flavor. Put chilies in a saucepan, pour boiling hot water over to cover. Let sit for 15 minutes. Add chiles, 2 garlic cloves, 1/2 teaspoon of salt, and 1 1/2 cups of chile soaking liquid to a blender. Hold down lid of blender tightly while blending, blend until completely puréed. Strain through a mesh sieve into a frying pan to make the chilaquiles. Salsa verde: Put 1 pound tomatillos, husks removed, into a saucepan, cover with water by an inch. Add 1 jalapeno, stems and seeds removed. Add 2 cloves garlic. Bring to a boil. Cook for 5 minutes until tomatillos have changed color and are cooked through. Use slotted spoon to remove tomatillos, jalapeno and garlic to a blender. Add a cup of the cooking liquid. Blend until completely puréed. Add salt to taste. Source: Simply Recipes

Chocolate Covered Pretzels Recipe

You can enjoy chocolate covered pretzels year long with this recipe. These are the perfect balance of sweet and salty. Making chocolate covered pretzels is a fun activity the whole family can enjoy, rather than purchasing them from the store. You can use any pretzel shape you’d like, but the mini twists are a great option. Dress them up with drizzled chocolate or even candy sprinkles and cookout flakes. Prep time: 15 minsCook time: 5 minsChill: 60 minsTotal time: 80 minsServings: 72 pretzels Ingredients: 12 ounces semi-sweet chocolate chips 12 ounces white chocolate chips (see headnote above) 4 ounces (72 individual) mini pretzel twists Directions: Line a baking sheet with parchment paper or onto a silicone baking sheet Melt the semi-sweet chocolate: Place the semi-sweet chocolate in a microwave-safe bowl. Microwave for 1 minute and 30 seconds at 50% power.Stir the chips. Microwave for 30 seconds at 100% power. Stir until chocolate is melted and smooth.If the chocolate still has lumps, microwave in 15-second intervals at 100% power, stirring between each interval until smooth. Dip half the pretzels in semi-sweet chocolate: Place a mini pretzel in the semi-sweet chocolate and push it below the surface with a fork to coat. Remove the excess chocolate: Use a fork to remove the pretzel from the chocolate. Then tap it gently against the sides of the bowl until most of the chocolate has dripped off.Wipe the bottom of the fork on the edge of the bowl to remove any excess chocolate then slide the pretzel onto the lined baking sheet (use a second fork if needed). Repeat until you have coated half the pretzels. You should still have a little melted chocolate left.Repeat with the white chocolate: Repeat the process for melting the chocolate using the white chocolate chips in a clean bowl. Repeat the coating process with the remaining pretzels in the white chocolate. Drizzle the pretzels using the remaining chocolate: Dip a fork in the remaining semi-sweet chocolate and drizzle it over the white chocolate-coated pretzels; repeat with the remaining white chocolate.If you want more control over the drizzle, scoop the chocolate into a quart size freezer re-sealable bag. Snip a very small corner of the bag (1/16-inch) to make a tiny hole. Squeeze the bag to drizzle the chocolate in a more controlled manner. Refrigerate all the pretzels until the chocolate is hard: Then remove from the pan and store in an air-tight container in the fridge. The pretzels will keep for 7 to 10 days. Source: Simply Recipes

Air Fried Strawberry Cream Cheese Wontons

Wontons with a strawberry twist. Try out this delicious recipe for tonight’s appetizer. You can have these ready in just 10 minutes with little to no mess thanks to your air fryer. The strawberry cream cheese really makes a statement in these wontons. Ingredients: Wonton Wrappers 1 tbsp. Strawberry Cream Cheese Water Non-stick cooking spray Directions: Add strawberry cream cheese to center of wonton wrapper Wet edges with water and fold closed Spray air fryer pan with cooking spray and load wontons Cook at 300 degrees F for 7 to 10 minutes

The Compact COS-244ECC Ceramic Cooktop

A compact kitchen shouldn’t require you to sacrifice high performance. The ECC Cooktop Series is getting a new 24” model to fit in more kitchens! Equipped with the same ceramic glass cooktop panels with enormous heat resistance and stability. Cook like a professional chef with 4 surface burners and a dual-zone element for cookware flexibility. Enjoy an easier clean-up thanks to the smooth flat surface. Available soon where Cosmo Appliances are sold. Previous Next Features: 4 Electric Surface Burners Built with SCHOTT CERAN ® cooktop panels — combines the sleekness of ceramic glass with enormous heat resistance and stability Knobs provide easy control of burner temperature settings Hot Surface Indicator Light will glow to alert any surface area is too hot to touch Dual Zone Element offer flexibility for a variety of cookware sizes Compatible with aluminum, cast iron, ceramic, copper, earthenware, porcelain and stainless steel cookware Easy clean-up with the cooktop’s smooth glass surface 5 Year Limited Warranty Electrical Requirements: 3-Wire or 4-Wire, 240V/60Hz