Year: 2021

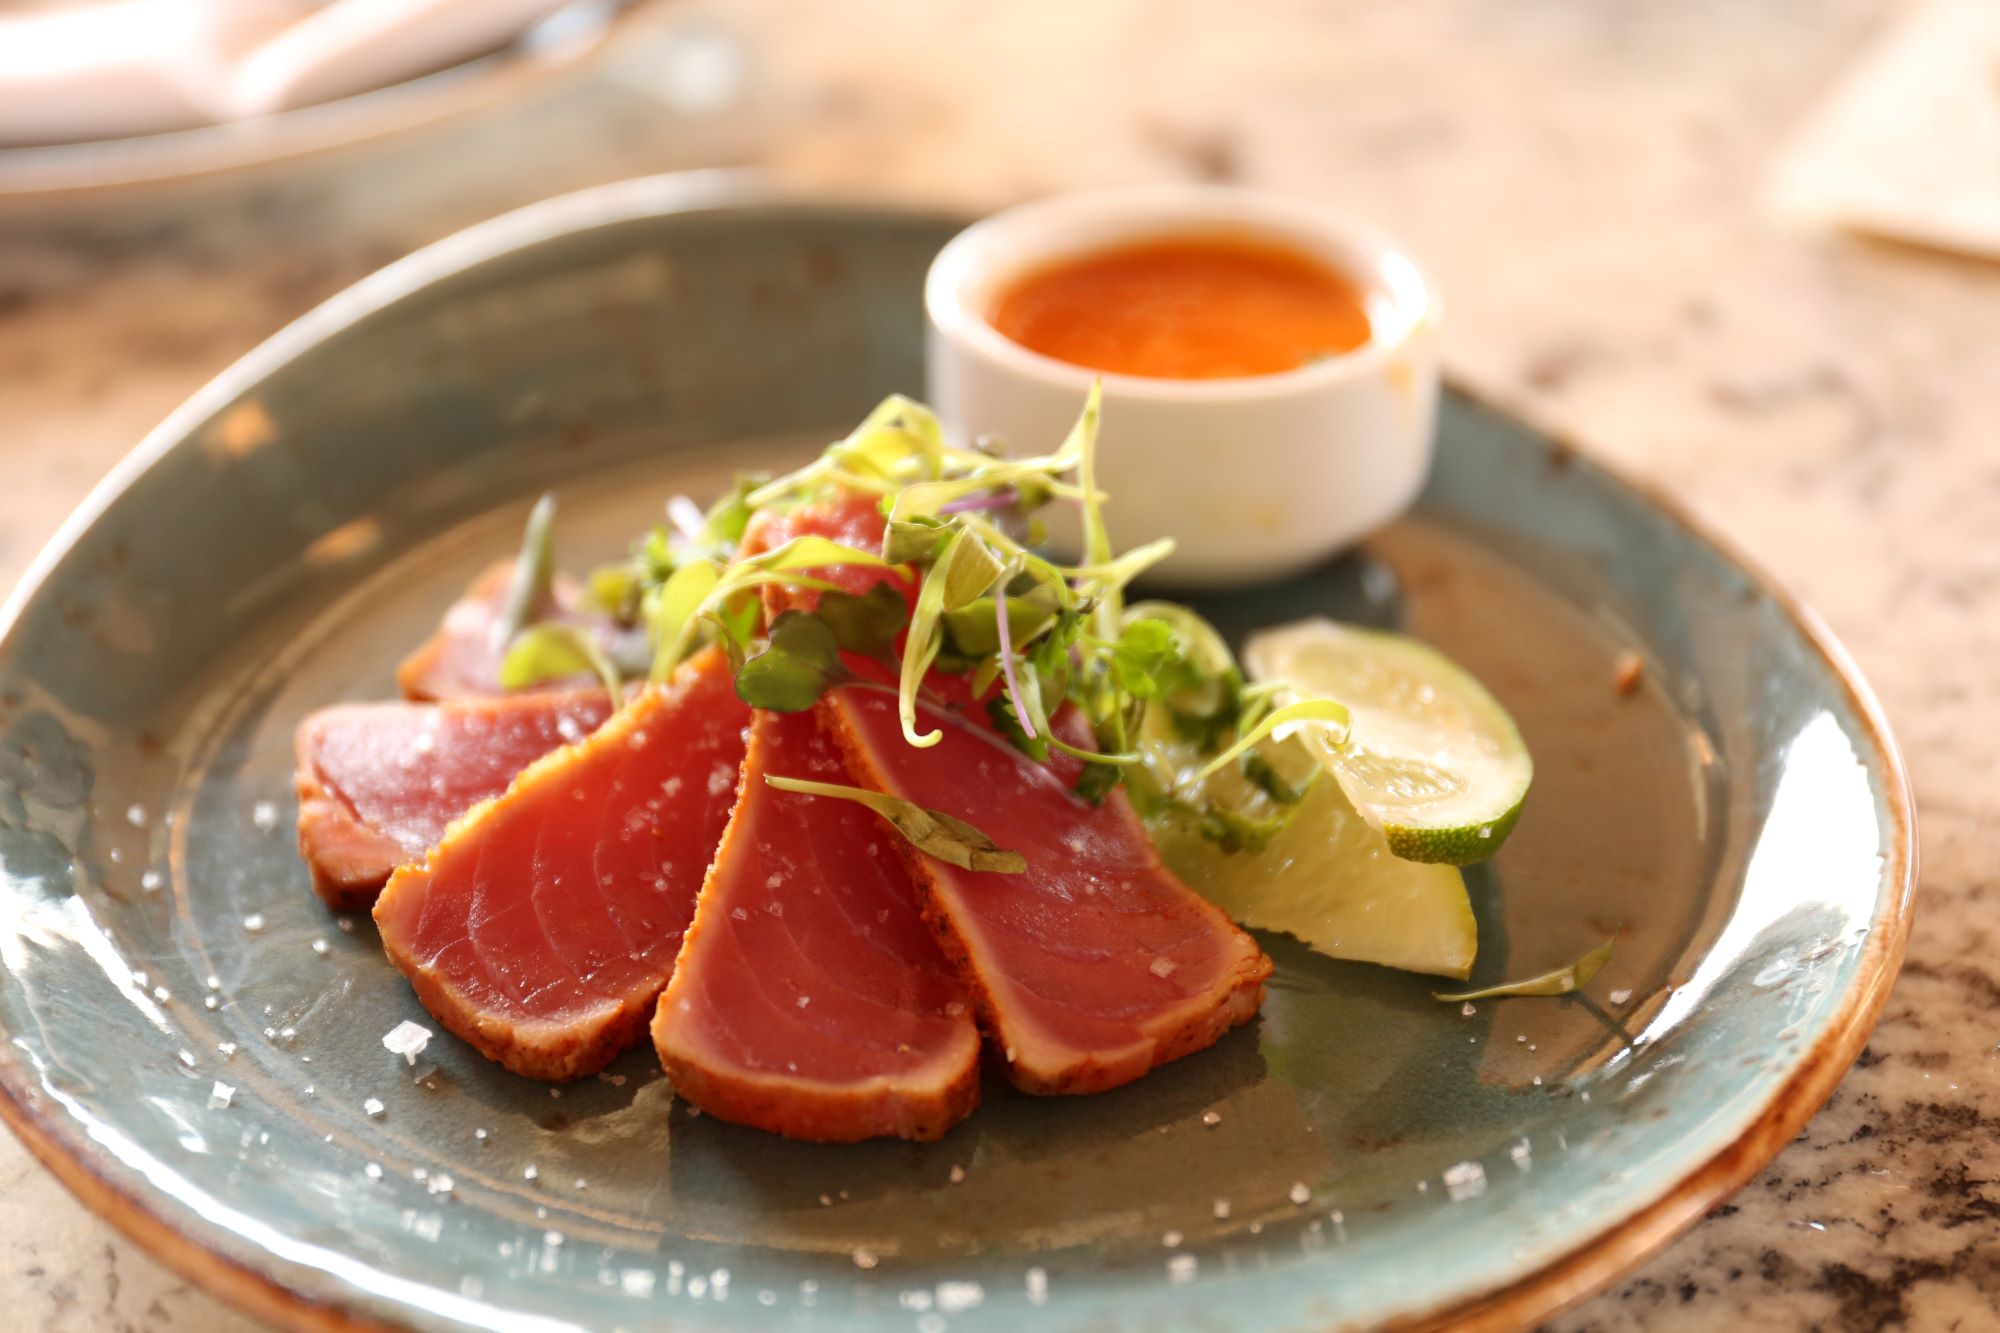
Seared Ahi Tuna Recipe

Create a delicious plate of freshness and flavor with this recipe. Ahi tuna also known as yellowfin tuna can be prepared with a side of white rice, shoyu, radish sprouts and nori. When shopping for your tuna the freshness and quality of the fish makes a big difference. Look for a higher grade tuna. Prep time: 5 minutesCook time: 5 minutesMarinating time: 1 hourYield: 2 servings Ingredients: 2 (6-8 ounce) ahi tuna steaks (3/4 of an inch thick) For the marinade: 2 tablespoons dark sesame oil 2 tablespoons soy sauce (or 2 teaspoons of wheat-free tamari for gluten-free option) 1 tablespoon of grated fresh ginger 1 clove garlic, minced 1 green onion (scallion) thinly sliced (a few slices reserved for garnish) 1 teaspoon lime juice Directions: Marinate the tuna steaks: Mix the marinade ingredients together and coat the tuna steaks with the marinade, cover tightly, and refrigerate for at least an hour. Sear the tuna: Heat a non-stick skillet over medium high to high heat. When the pan is hot, remove the tuna steaks from the marinade and sear them for a minute to a minute and a half on each side ( even a little longer if you want the tuna less rare than pictured.) Slice and serve: Remove from pan and slice into 1/4-inch thick slices. Sprinkle with a few green onion slices. Serve plain, with white rice, or over lettuce or thinly sliced cabbage or fennel. Sources: Simply Recipes

How to Clean a Scorched Pan

Pans are bound to be neglected at times. Leaving something in for too long leaves food burned and your pan scorched. While there are popular store-bought cleaners, try these other easy solutions if you ever find yourself short on money or time. Vinegar & Baking Soda Vinegar is a great multi-purpose cleaner that can save your pans. Pour a small layer of equal parts water and white vinegar on the bottom of the pan. Next, heat the solution on the stovetop until it comes to a boil. Once it boils for a minute, remove and drain it down the sink. Add a tablespoon of baking soda to the empty pan. Finally use a scouring pad to massage the baking soda and combat any burn marks. Rinse clean. Salt Coarse Kosher salt is another solution to scorch marks on pans. Pair it with a dish detergent and hot water. Massage it into the pan with the juicy core of a cut lemon. Cream of Tartar Try using cream of tartar as an abrasive substitute for baking soda. Mix a tablespoon of it in a cup of water and bring it to a boil on a scorched pan. Let the water cool and then scrub the pan to combat any marks. Dryer Sheet Take soap, water and add a dryer sheet into a mix on the burnt pan. Allow it to sit for an hour. The sheet will loosen the burnt food and leave you with a shiny pan. Alka Seltzer Add 1-2 tablets to hot water in your pan and allow it to sit. The solution will take action against any stubborn burns. Sources: HGTV

An Easy Hummus Recipe

There’s nothing else quite like homemade hummus. Try this easy recipe to enjoy all the flavor in about just five minutes! Ingredients: ½ cup of tahini (roasted, not raw) ¼ cup extra virgin olive oil (plus more for garnishing) 2 garlic cloves, mashed and roughly chopped 2 15-oz cans of chickpeas (garbanzo beans), drained ¼ cup freshly squeezed lemon juice ½ cup water ½ teaspoon of salt Garnishes: A sprinkling of paprika, a swirl of olive oil, toasted pine nuts, and/or chopped parsley Directions: Process tahini and olive oil: In a food processor, combine the tahini and olive oil and pulse until smooth. Blend the oil and tahini first when making hummus. Blending the oil and tahini first helps it blend into the chickpeas better Add remaining ingredients, process until smooth: Then add the garlic, garbanzo beans, lemon juice, 1/2 cup water and 1/2 teaspoon of salt. Process until smooth. The longer you process in the food processor, the smoother the hummus will be. Add more salt or lemon juice to taste. Add the chickpeas to the blender Blend the chickpeas, tahini, and olive oil until the hummus is creamy Serve: Spoon into serving dish, swirl a little olive oil over the top and sprinkle with garnishes—a little paprika, toasted pine nuts, or chopped fresh parsley. Serve with crackers, raw dip vegetables such as carrots or celery, or with toasted pita bread. To toast pita bread, cut the pita bread into triangles, brush with olive oil and toast for 10 minutes in a 375°F oven, turning them over half-way through the cooking. Source: Simply Recipes

Sheet Pan Pizza with Roasted Cauliflower and Greens Recipe

Try this delicious new pizza recipe that can be prepared on a sheet pan. Combine cauliflower and other greens for a large and unique pizza everyone will love. Prep time: 35 minutes Cook time: 15 minutes Yield: 12 pieces Ingredients ½ large head cauliflower 6 tablespoons olive oil, divided ½ teaspoon salt ¼ teaspoon pepper 1 recipe (about 1 ½ pounds) dough 1 cup (2 ounces) grated Parmesan 12 ounces fresh mozzarella, torn into pieces 2 tablespoons drained green peppercorns in brine, or drained capers 3 handfuls baby greens such as arugula, kale or spinach 1 tablespoon balsamic vinegar Equipment: 2 (13 x 18) rimmed baking sheets Directions: Preheat the oven to 450ºF. Place a rack in the lowest position. Prepare the cauliflower: Trim away the outer leaves and cut the cauliflower in half. Cut one half into slices about 1/4-inch thick, and reserve the other half for another use (or roast it all now and save half for another meal.) Some smaller florets will fall away; this is fine. Spread the cauliflower slices and any florets that have fallen off on a rimmed baking sheet. Drizzle with 2 tablespoons of the oil. Using your hands, rub the oil into the cauliflower, coating both sides. Sprinkle with 1/2 teaspoon salt and 1/4 teaspoon pepper. Roast the cauliflower: Place the cauliflower on the lower rack of the oven. Roast for 20 minutes, or until tender. Let the cauliflower cool slightly on the pan and break or cut it into smaller pieces. At this point, the cauliflower can be kept refrigerated for up to 5 days. Stretch the dough onto the baking sheet: Wipe clean the baking sheet used to roast the cauliflower. Place the dough in the center of the baking sheet and drizzle with 2 tablespoons of the oil. Turn the dough to coat it well, spreading some of the oil over the baking sheet. Gradually stretch the dough until it reaches the edges of the baking sheet. If it springs back or is difficult to stretch, cover with plastic wrap and let rest for 10 minutes before continuing. Turn the oven to 500ºF. Top the pizza: Brush the top of the dough with 1 tablespoon of oil and sprinkle with the grated Parmesan. Top with the mozzarella, followed by the cauliflower. Sprinkle the peppercorns (or capers) evenly over the dough. Bake the pizza: Set the pan on lowest shelf of the oven and bake for 15 minutes, or until the cheese melts and the pizza is golden brown. Top with greens: In a bowl, toss the greens with the remaining tablespoon of the oil, the vinegar and salt and pepper. Top the cooked pizza with the greens; they will wilt slightly from the heat of the pizza. Cut into squares and serve hot. Sources: Simply Recipes

6 Ways to Reduce Food Waste

Wasting food is one of the fastest ways to lose money while also negatively impacting the environment. Before going out on your next grocery store run, read up on these 6 ways to help reduce food waste in your kitchen. Look at Your Fridge This may seem obvious, but take a look at your pantry and fridge before heading to the grocery store. Do a quick inventory count to see what you have and what you’re missing. This will help prevent purchasing unnecessary foods. You can also end up finding some ingredients that are easily turned into a meal, cutting back on the number of trips to the store. Make a List Meal prep can be an easy path to success. Planning out your meals for the week ensures your shopping list only has the ingredients you need. While you’re in the grocery store, don’t be tempted by advertisements or offers and only grab what you have on your list. Cut Back on Bulk Buying Buying in bulk may seem like a great deal, but it’s an easy way to overload your cart with things you don’t need. Even if a bag of avocados is a steal at a low price, you may not use them all up before they go bad. Buying in bulk is best for ingredients you are absolutely sure you’ll use up or will last a long time. Store Food Properly Food can go bad if it’s not properly stored to preserve freshness. Any extra fruits or veggies can be frozen or preserved to lengthen their flavor. You can freeze a loaf of bread and take out the slices a few hours before you need it. Make sure you store bananas, apples and tomatoes by themselves as these fruits emit natural gases that can spoil any produce around them. Wait to wash berries until you’re going to eat them to prevent mold. Organize Your Shelves Whenever you buy new food, bring all the older items in your pantry or fridge to the front. This will ensure older food won’t spoil and you can find ingredients that have gone bad. Cook Smarter If a recipe calls for half an onion, save the other half for a soup or stew. Save carrot tops and make a pesto instead of tossing them out. There’s great ways you can turn food you may think is waste into other delicious meals. Source: Good Housekeeping

Creamy Pumpkin Soup with Smoked Paprika Recipe

Try this delicious creamy pumpkin soup recipe that pairs perfectly with a crusty garlic bread. Look for sugar pumpkins or Japanese kabocha pumpkins to roast as normal store pumpkins aren’t always meant for cooking. Prep time: 15 mins Cook time: 45 mins Roasting pumpkin time: 1 hour Yield: Serves 8 Ingredients 4-5 pounds of cooking pumpkins, or 3 (15-ounce) cans of pumpkin purée 4 tablespoons butter 2 medium yellow onions, chopped, about 2 cups 3 garlic cloves, minced 2 to 3 teaspoons smoked paprika, more or less to taste 1/2 teaspoon ground cumin 1 pinch cayenne pepper 1 large tart green apple (Granny Smith) peeled, cored, chopped (about 2 cups) 4 cups chicken broth (or vegetable broth for vegetarian option, and gluten-free broth for gluten-free version) 1 cup water 1 teaspoon fresh thyme or 1/2 teaspoon dried thyme 1/4 teaspoon ground sage 1 cup milk 1/2 cup cream Salt and freshly ground pepper, to taste Handful of toasted pepitas (shelled pumpkin seeds) for garnish Directions Roast the squash: Preheat the oven to 350°F. Cut your pumpkin(s) in half, and scoop out the seeds and stringy stuff (an ice cream scoop works well for this purpose). Lay the halves face down on a foil or silicone lined baking sheet and bake until soft, about 45 min to an hour. Cool, remove the peel, scoop out the flesh. You’ll need 6 cups roasted pumpkin for this recipe; freeze whatever you don’t use for future use. Cook the onions with the seasonings: Melt butter in a 4-quart saucepan over medium-high heat. Add the onions and cook, stirring often, until softened, about 4 minutes. Add the garlic and cook a minute more. Add smoked paprika, ground cumin, and cayenne and stir for a minute more. Add the remaining ingredients and simmer: Add the chopped apple, pumpkin, broth, water, thyme, and ground sage. Mix well with a wooden spoon. Season with a little salt and pepper. Bring to a boil, then reduce heat to medium-low, partially cover, and simmer for 20 minutes or until the apples are cooked through. Purée the soup: Working in batches, transfer soup to a blender or a food processor. Cover tightly and blend until smooth. Alternatively, use an immersion blender to purée. If you want extra smooth soup, pass the purée through a food mill, after it’s been through the blender. Stir in the milk and cream: Return the soup to the saucepan over low heat. Slowly add the milk and cream, stirring to incorporate. Taste and add additional salt or other seasonings if needed. Serve! Sprinkle with toasted pepitas (shelled pumpkin seeds) and a little more smoked paprika to serve. This soup can be made a day ahead. Leftovers will keep refrigerated for about a week, or frozen for up to three months. Source: Simply Recipes

An Easy Weeknight Chicken Ramen Recipe

You can never go wrong with a bowl of ramen. Try this recipe to cut down on some cook time while still enjoying all the flavor of a great ramen. It’s also a perfect meal for the colder season. Prep Time: 15 minsCook Time: 15 minsYield: 4 servings Ingredients For the broth: 2 tablespoons toasted sesame oil 4 scallions, thinly sliced, including some of the green part 1 clove garlic, minced 1 small carrot, peeled and thinly sliced 4 ounces button, cremini, or shiitake mushrooms, thinly sliced 1 1/2 cups thinly shredded Napa cabbage, spinach, kale, or other greens 1-inch piece fresh ginger, minced 6 cups low-sodium chicken broth, store-bought or homemade 1 tablespoon brown sugar, optional Lime wedges, optional For the soup: 4 large eggs 20 ounces fresh ramen noodles, or 12 ounces dried noodles 2 medium cooked chicken breast halves, sliced For the garnish: Soy sauce Sriracha or other hot sauce Handful fresh cilantro, leaves removed from stems Lime wedges Directions: Make the broth: In a large saucepan over medium heat, heat the oil. Add the scallions, garlic, carrot, mushrooms, and cabbage. Cook, stirring often, for 3 minutes, or until the vegetables soften.Stir in the ginger and brown sugar (if using) and cook for 30 seconds. Finally add the chicken broth and bring to a simmer. Simmer for 10 minutes. Cook the eggs: While the broth is simmering, bring a pot of water to a boil. Set a bowl of cold ice water nearby.Use a slotted spoon to gently lower the eggs, still in the shell, into the water. Simmer for 7 minutes for eggs that are soft and a little runny in the center, or 9 minutes for hard-boiled eggs.Transfer the eggs to the bowl of cold water and set aside until ready to serve. Cook the noodles: Return the pot of water to a boil. Add the noodles and cook for 3 minutes, or according to the package directions, until tender. Drain in a colander. Assemble the soup: Divide the noodles among 4 large bowls. Ladle the broth and vegetables over the noodles.Remove the eggs from the ice water. Tap the shells with a spoon to crack and then peel off the shells. Pat the eggs dry and cut them in half.Top each bowl with the egg halves and the sliced chicken. Serve with soy sauce, hot sauce, cilantro leaves and lime wedges. Source: Simply Recipes

Natural Gas vs. Liquid Propane: What You Should Know

If you’re in the market for a new range or cooktop you may come across some different fuel types. A gas range can often work with natural gas or liquid propane after a conversion process. You may wonder what the differences are between the two fuels and if one is better than the other. See our guide below on some of the differences you should know. Natural Gas. This gas fuel is distributed through a centralized pipeline network. Underground utility pipelines deliver it in a gaseous state all the way to a cooktop. This can be a cheaper fuel depending on the location as well as the state of the fuel market. Natural gas differs from liquid propane in that it is delivered at a much lower pressure and heats at a slower rate. Liquid Propane. One of the most distinct characteristics of propane is that it is in a liquid state rather than a gas. Unlike natural gas, propane can be stored at room temperature so long as it is kept under pressure. This makes it easily transportable and available in many differing tank sizes. Liquid propane would have to be delivered regularly to a home for propane fueled appliances. Propane can have a higher upfront cost than gas, but offers almost twice as much heat. Cost can differ by area and the fuel market, similarly to natural gas. In order for an appliance to work with another fuel type it’s important that a proper conversion kit is installed. Since propane and natural gas work in differing pressure, certain orifices must be installed to accommodate this. It’s critical that these kits are installed properly to prevent any damage or possible danger when operating the appliance. Here at Cosmo, select gas appliances can be converted to liquid propane with a unique conversion kit which is sold separately. Kits are available at our parts and accessories page here. Guides for conversion are also available at our Customer Support Hub.

Easy Fish Tacos Recipe

Prepare a quick and delicious meal with this classic fish taco recipe. Ingredients Fish: 1 pound cod, tilapia, halibut, or other white fish filets 2-3 teaspoons chili powder, enough to coat the fish 1 teaspoon salt Fish Taco Sauce: 1/2 cup sour cream 1/4 cup mayonnaise 3-4 tablespoons lime juice (from 2 limes) 1 teaspoon hot sauce, optional Toppings: 1/2 small head red cabbage, shredded (about 4 cups) 12 taco-sized corn or flour tortillas 1 avocado, sliced 4 radishes, thinly sliced 4 spring onions, thinly sliced 1/3 cup roughly chopped cilantro Directions Make the fish taco sauce: In a small bowl, combine the sour cream, mayonnaise, lime juice, and hot sauce (if using) for the taco sauce. Stir until combined. Make the red cabbage slaw: In a medium bowl, combine the shredded cabbage with 3 tablespoons of the taco sauce. Stir to coat and add more taco sauce if you like. (The cabbage shouldn’t be dripping with sauce; aim for a very thin coating.) Warm the tortillas: In a dry skillet over medium-high heat, warm the tortillas one at a time for about 30 seconds on both sides. Alternatively, wrap 1 to 3 tortillas in a damp paper towel and microwave for 30 seconds, until warm. Keep warmed tortillas wrapped in a clean dish towel while you make the fish. Season the fish: Sprinkle the fish on both sides with chili powder and salt. Gently rub in the seasonings with your fingers to make sure the fish is entirely coated. Cook the fish: Warm a large cast iron or nonstick skillet on the stovetop. When hot, add one tablespoon of olive oil and tilt the pan to entirely coat the bottom.Add the fish to the pan and cook for 2 minutes. Flip the fish and cook another 2 minutes. Flip and cook 1-2 minutes longer if needed; the fish is done when it is opaque all the way through and breaks apart easily. If any smaller, thinner pieces of the fish start to break off as you flip, just scoop them out and transfer them to a serving platter. Serve the tacos: Transfer the cooked fillets to a platter and use a fork or a knife to gently break the fish into large chunks. Assemble the tacos with a few pieces of fish, some cabbage slaw, toppings of your choice, and a drizzle of taco sauce. Sources: Simply Recipes

How Frequently Should You Use Your Dishwasher

Contrary to popular belief, dishwashers are designed to be more efficient than hand-washing dishes. On average a person uses four gallons of water every two minutes washing at the sink where dishwashers use less than four gallons per cycle. In the long run a dishwasher could be more beneficial not only to your water bill but the environment. But there remains the question of how frequent a dishwasher should be used. On average, the number of dishwasher cycles per week in a household is about five. Surpassing this number could increase the need for repairs or a replacement in the long run. A typical dishwasher will last about 10 years. If you can cut down your cycles fewer than five per week your dishwasher could last 12 years or more. While running a dishwasher everyday of the week may not be best for the longevity of the appliance, it could be more efficient for water use and the environment. Source: Apartment Therapy