Author : Cosmo

Why You Shouldn’t Always Refrigerate Champagne

If you’ve just bought yourself a bottle of champagne and decide to leave it in the fridge before you enjoy it, you may actually be ruining it. You should only be sticking champagne or sparkling wine in a fridge if you plan on enjoying the bottle within three to four days. But if you won’t be drinking it for more than a few days, you’re better off skipping the refrigerator. If the bottle sits in a fridge for weeks, the cork can dry out due to the lack of humidity. When the cork dries out, it’ll loosen up and release the seal against the bottle. The champagne will oxidize faster, changing it’s aroma. Aroma refers to the tiny odorous compounds that can be smelled when sniffing a bottle. The aroma and taste work together to create a wine’s flavor, any changes here will also affect the impression of it. You’re better off storing bottles of champagne in a cool, dark place with a consistent temperature, such as a wine cellar. If you plan on enjoying the bottle, simply place it in a bucket filled with ice 15 to 20 minutes beforehand. Source: House Beautiful

Cleaning Your Silver

There’s no denying your silver jewelry, dishes and cutlery will naturally tarnish over time. No matter how well you take care of your silver, it’ll always require upkeep to maintain its original shine. Polishing is abrasive, so it’s best to limit the cleaning to a minimum, anywhere from two to six times a year. If you have a silver polish, you’ll start by putting a small amount on a clean cloth and dampen if necessary. Rub and polish in an up-and-down motion, not circular to avoid fine scratches. Turn the cloth frequently as you don’t want to deposit the tarnish back onto the item. Rinse in warm water and buff with a clean, dry cloth. If you’re out of the silver polish you can also try these homemade cleaners If the silver is dull and not yet discolored, mix a few drops of mild dish soap with warm water and dip in a soft cloth. Rub then rinse in cool water and buff until dry. For heavily tarnished silver, mix a paste of three parts baking soda to one part water. Wet the silver and apply the cleaner with a soft, lint-free cloth. Work it into the smaller crevices, turning the cloth as it gets gray. Rinse and buff dry. Source: Good Housekeeping

Easy Air Fryer Roasted Potatoes

Enjoy a quick snack with your air fryer. The potatoes are left delicious and crispy thanks to the heated air circulation. You can enjoy these with your favorite seasoning as you toss it in the air fryer. Ingredients: Russet potato Garlic salt Olive oil spray Seasonings (optional) Directions: Wash and chop a russet potato. Season heavily with garlic salt. Coat pan and potatoes with olive oil. Cook at 400 degrees F for 25 minutes. Shake the basket every 5-8 minutes.

Skillet Shrimp Fajitas Recipe

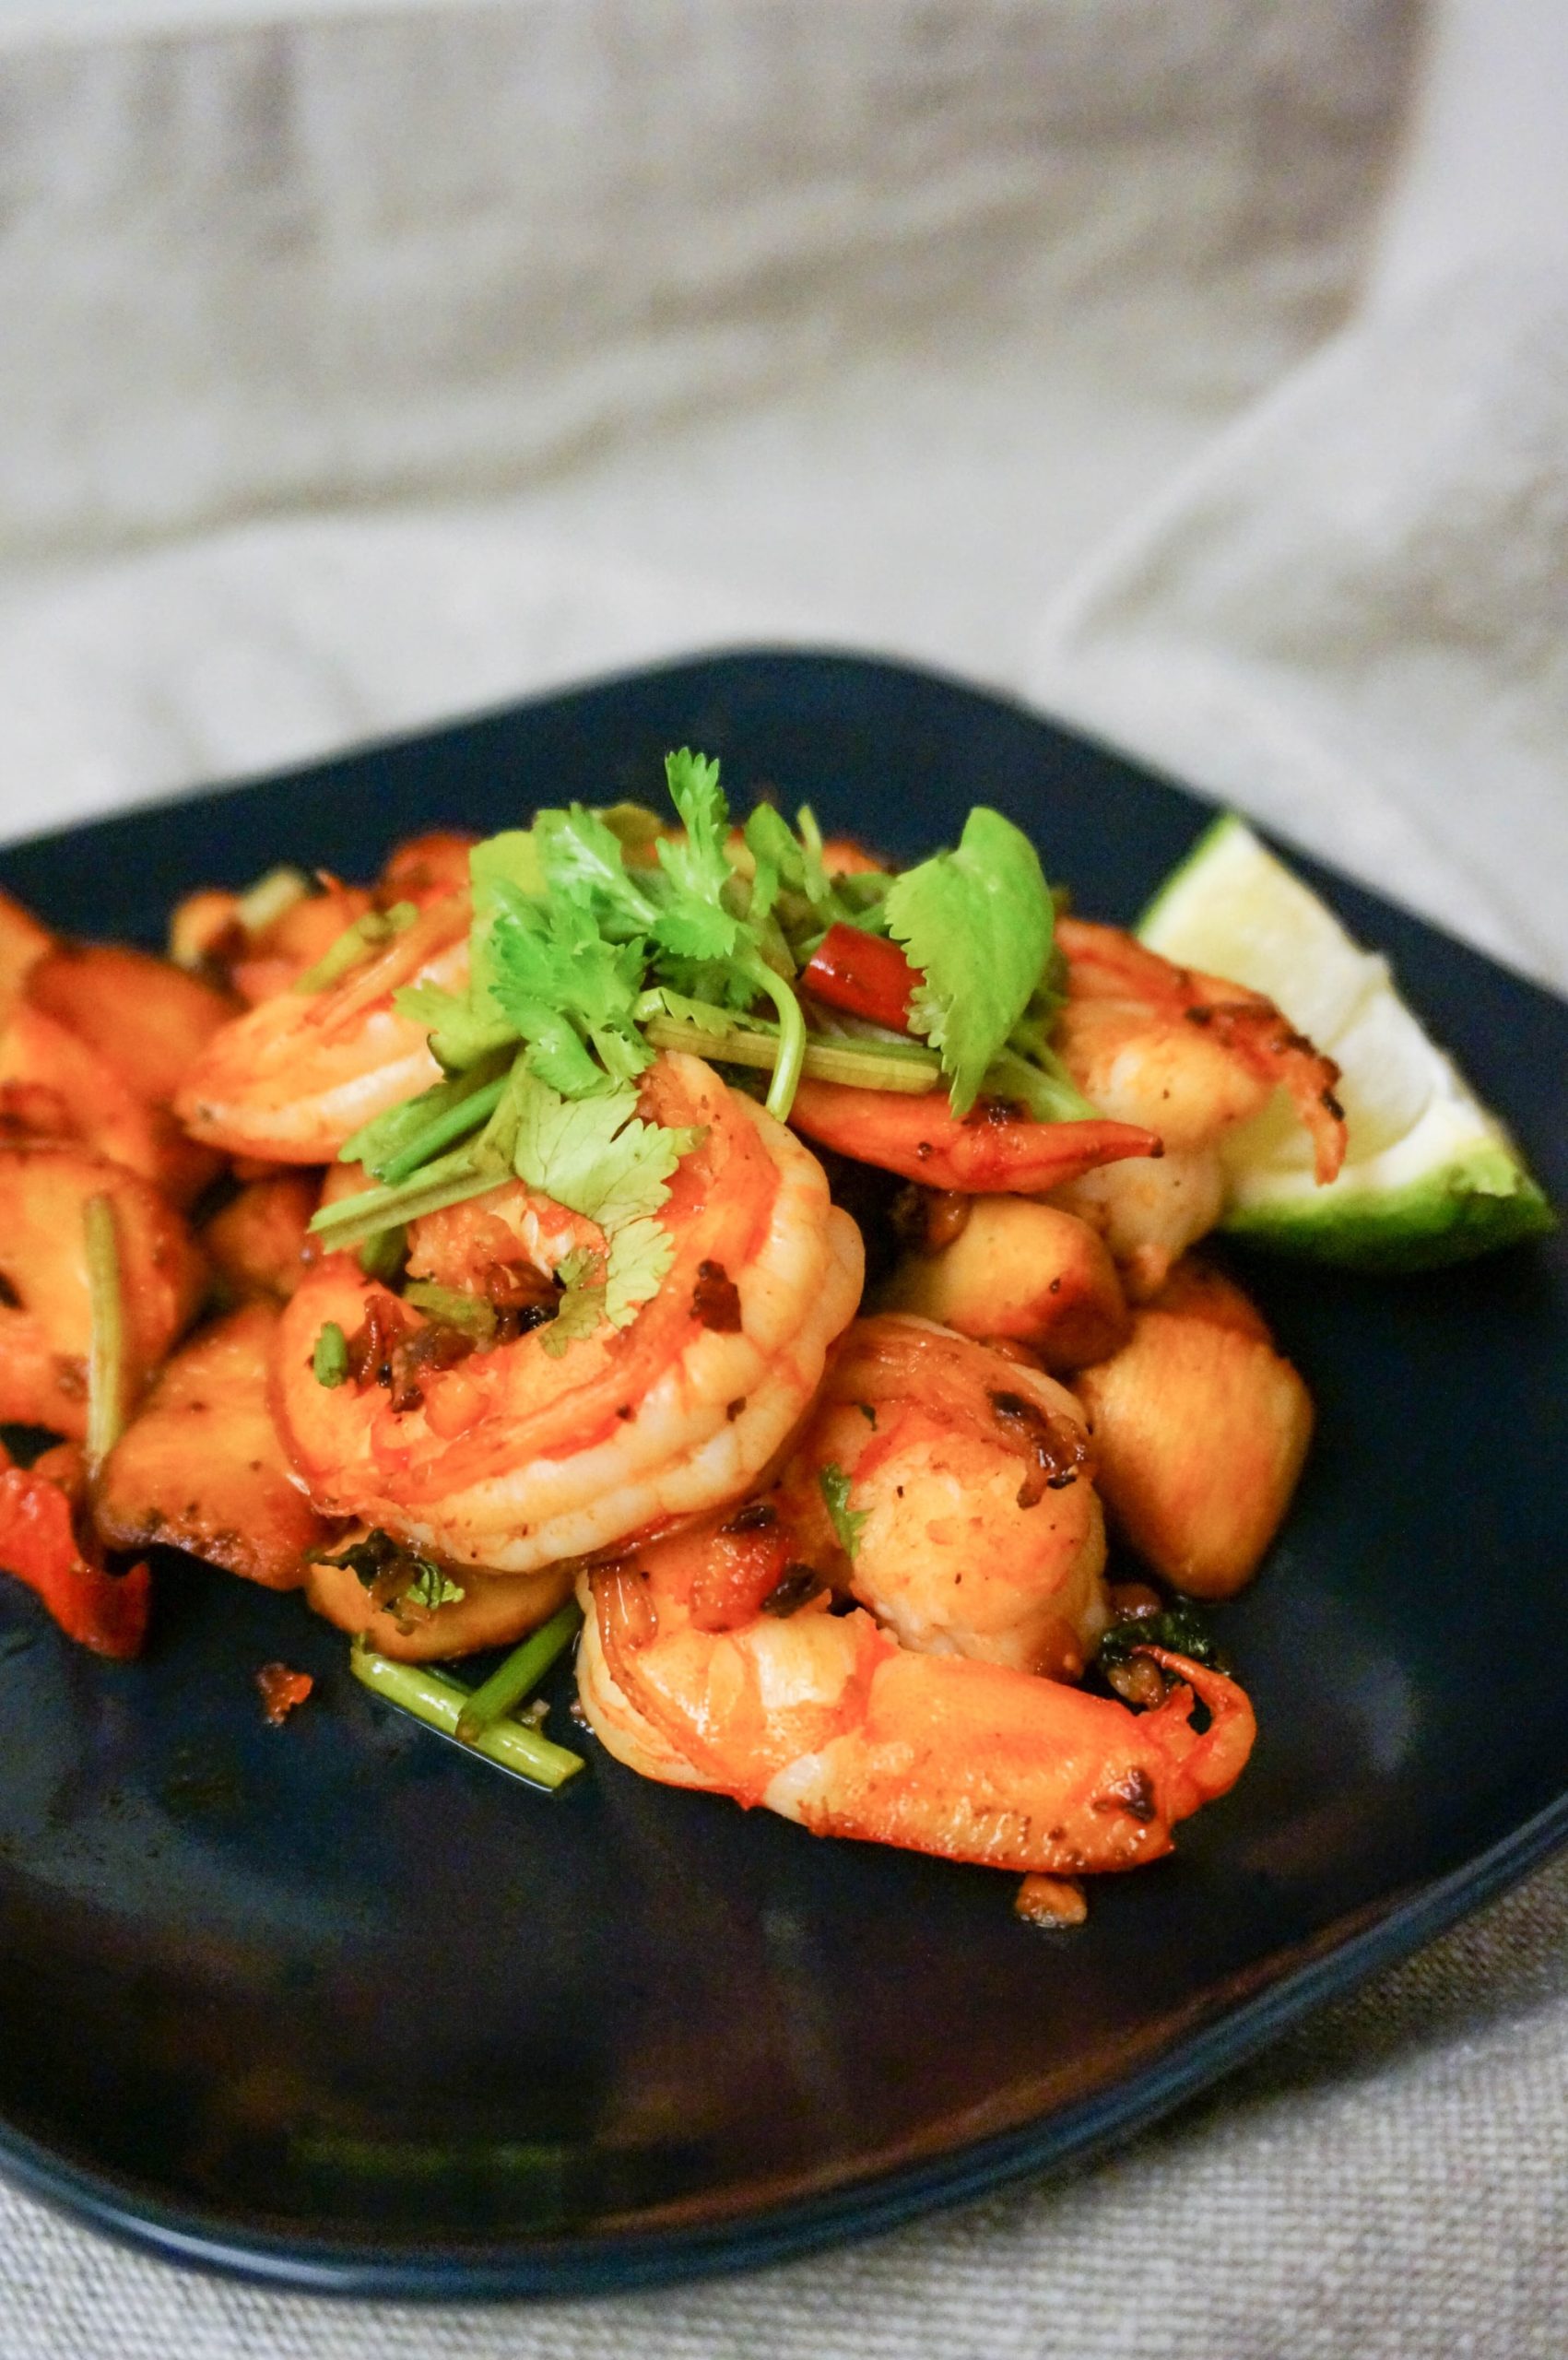
Prepare this dinner recipe and skip out on the restaurant. Toss these with some chili powder and red pepper flakes with added veggies for a plate full of flavor. You’ll want to cook these in a skillet or over a grill. A cast iron skillet will sear the shrimp nicely. Prep time: 10 minsCook time: 15 minsTotal time: 25 minsServings: 4 servings Ingredients: Charred Serrano Salsa: 2 serrano chiles 1/2 cup medium red salsa, store-bought or homemade 1/2 lime, juice only Pinch of salt Shrimp Fajita Spice Mix: 2 teaspoons mild chili powder 1 teaspoon kosher salt 1 teaspoon ground black pepper 1 teaspoon granulated onion 1 teaspoon ground cumin 1 teaspoon dried oregano 1 teaspoon red pepper flakes, optional Fajitas: 1 pound large shrimp, peeled and deveined (31/35 size) 2 tablespoons olive oil, divided 1 red pepper, sliced 1 green pepper, sliced 1/2 large red onion, sliced, about 1 cup 10 medium flour tortillas Toppings: Fresh avocado Salsa Fresh cilantro Sour cream Directions: Make the salsa: Char the serrano chiles in a cast iron skillet over medium heat for 2 to 3 minutes per side, or grill over medium-high heat. Once cooked, cut the peppers in half and scoop out seeds. Then chop and stir into your favorite salsa along with lime and salt. It boosts the flavor and heat substantially! Season the shrimp: Mix up the spice mix of chili powder, kosher salt, black pepper, granulated onion, cumin, dried oregano, and optional red pepper flakes. Drizzle shrimp with 1 tablespoon of olive oil and toss with 2 tablespoons of spice mix. Stir well to combine and coat the shrimp. Add 1 tablespoon olive oil to the peppers and onions, and sprinkle the remaining spice mix over them. Stir to coat. Cook the fajitas: To cook the fajitas on the stovetop, heat a large skillet over medium-high heat. If you’re grilling the fajitas, heat your grill to medium-high heat along with a grill pan. Once hot, add veggies to the skillet or grill pan and cook for 5 to 6 minutes until vegetables soften and start to char in spots. Scoot the veggies to one side of the pan and add shrimp. Cook shrimp for 3 to 4 minutes, stirring regularly until they are cooked through. They will cook fast! Serve the fajitas: Smear the flour tortillas with some sour cream. Divide veggies and shrimp between tortillas (I like to serve 3 to 4 shrimp per tortilla). You can remove the tails prior to serving, or let each person remove their own tails. Top the fajitas with avocado, salsa, fresh cilantro and/or sour cream. Leftover fajitas filling will keep okay in the fridge for a day or two. I prefer to reheat in a skillet over medium-low heat until warmed through. I don’t recommend microwaving shrimp unless you want your microwave to forever smell like shrimp. Source: Simply Recipes

Air Fryer Potato Chips

Enjoy a quick snack with your air fryer. Chips are left crispy and crunchy thanks to the heated air circulation. You can enjoy these chips with your favorite seasoning as you toss it in the air fryer. No more runs to the store for a bag of chips! Ingredients: Russet potato Water Olive oil spray Seasonings (optional) Directions: Slice the potato into thin slices. (use a mandoline for even slices) Soak the slices in water for 20 minutes to remove the starch. Rinse and repeat. Coat pan and chips with olive oil. Cook at 375 degrees F for 20 minutes. Shake the basket every 5 minutes. Season and shake the chips with your favorite seasoning.

Kitchen Renovation Ideas That Pay Off

Thinking of renovating your kitchen in the near future? You should also consider the possible positive contribution this could have on your home’s value. Not every redesign or renovation is a profitable one. To maximize the financial return, keep to the basics and avoid trends. A high-cost kitchen remodel doesn’t always automatically translate to high returns. Here are a few of the projects that pay off. Kitchen Paint Picking the perfect color makes for a lively, pleasant space. It’s one project that is relatively inexpensive with a great return value. Keep it timeless with a traditional all-white kitchen color scheme. You can also go in the opposite direction with a chic black kitchen. A Feng shui-inspired kitchen keeps colors cool, relaxed and neutral. Upgrade Cabinetry The last thing you want your cabinets to be is dated. To attract the maximum value from your kitchen, you should put cabinets at the top of the list. You don’t necessarily need to tear everything out and buy new cabinetry, rather update it with a fresh new paint color. There are also several low-cost projects such as handcrafted wood cabinet pulls that can drive up their value. Cabinet refacing is also great to visually alter the prominent areas of doors and drawer fronts. Add a New Backsplash A kitchen’s backsplash is an ideal investment, since the investment is low while the visual impact is high. Most backsplashes are DIY projects and with a glass or metal tile, you’ll be sure to attract attention. There are less expensive alternatives such as wallpaper, tile decals, or laminate flooring planks that can be completed in a day or two. Hang New Pendant Lights Lighting is often ignored, but can bring two benefits in one. It helps to illuminate your kitchen while also bringing in a new centerpiece to the design. Pendant lighting is bright and center, and can add much needed personality to the space. If you’re going with pendant lighting you should always go big and bold. Be sure to scale these to fit your space to not overwhelm the rest of your kitchen. Source: the Spruce

Crunchy Moist & Chewy Twix Air Fryer Cookies Video Recipe

Add Twix into a new cookie dough recipe! These are extremely easy to make and only take 10 minutes to bake. Skip the hassle of baking in an oven, and bake these in an air fryer instead. Ingredients: Twix Cookie dough Non-stick cooking spray Directions: Chop a Twix into small pieces Roll several pieces into the cookie dough. Spray non-stick spray in air fryer. Bake at 340 degrees F for 8-10 minutes. Let cool for 5 minutes and then serve.

How to Grow Parsley

Parsley is a versatile herb that can be incorporated into many different dishes and cooking styles. It’s great to tie into a variety of dishes to enhance flavor such as a vegetable omelet, tabbouleh salad or a chimichurri sauce. Parsley is also packed with nutrients such as vitamin C. Planting Parsley Like other herbs, parsley can perform well in a container. If you plant it indoors, keep the pot near a warm and sunny window. If the parsley is outside in a garden, it’s best to plant it around rose bushes. How to Cultivate Soil: Plant parsley in moist, well-turned soil. Incorporate rich compost early in the growing season, just as you’re planting the parsley. Sun: The parsley does well in both full-sun and part-sun environments. If the parsley is indoors, be sure to grow it near a sunny window. Water: Parsley is pretty adaptable and is relatively drought-tolerant. Try to grow it in moist soil for the best results. Spacing: Plant parsley 9” apart whether it’s a seed or a small plant. Companion Planting: Plant it next to tomatoes, corn and asparagus. If you plant parsley next to rose, it can enhance the health and aroma of your roses. How to Harvest Parsley is a biennial plant, meaning you’ll want to harvest parsley for its leaves the first year. Choose stalks furthest out from the plant’s center. You’ll want to leave the inner stalks and leaves so it can keep growing. The second year, the leaves will be less flavor-intense. You can use them, or let the parsley bloom. In the fall of the second year, harvest the parsley’s root. It’s actually the most flavorful portion of the plant. Try shaving the root over salads for a crunch and intense flavor. Source: the Kitchn

Crunchy Moist Air Fryer M&M Cookies Video Recipe

Add your favorite M&M’s into a new cookie dough recipe! These are extremely easy to make and only take 10 minutes to bake. Serve these along with your favorite desserts. Skip the hassle of baking in an oven, and bake these in an air fryer instead. Ingredients: M&M’s Cookie dough Non-stick cooking spray Directions: Roll several M&M’s into small cookie dough pieces. Spray non-stick spray in air fryer. Bake at 350 degrees F for 10 minutes.

Chinese Orange Chicken Recipe

This meal is packed with sweet citrus flavors, sesame seeds and scallions. It’s a breeze to make, and all you need is a large skillet. Be sure to add the orange zest in the sauce for the final touch. You can also use chicken wings for this recipe! Just deep fry them until they’re cooked through, before tossing them in the sauce. Pair this dish with white rice and big pinches of fresh scallion along sesame seeds. Prep time: 20 mins Cook time: 15 mins Total time: 35 mins Servings: 4 servings Ingredients: For the orange sauce: Zest from 1 orange 1/4 cup orange juice 1/4 cup soy sauce 1/4 cup water 1/3 cup rice vinegar 1 tablespoon cornstarch 1 tablespoon sesame oil 1/2 cup sugar For the chicken: 1 1/2 pounds boneless skinless chicken thighs 2 large eggs 1 teaspoon salt 1/4 teaspoon black pepper 1/2 cup cornstarch 1/2 cup all-purpose flour 2 cups vegetable oil, for frying 2 cloves garlic, chopped 1 large shallot, chopped To garnish and serve: Sliced scallions, garnish Sesame seeds, garnish Cooked white rice, to serve Directions: Make the orange sauce: Whisk together sauce ingredients in a medium bowl. Set aside. Prep the chicken: Cut chicken into about 1-inch cubes. Whisk eggs with salt and black pepper in a bowl and add chicken. Stir together. In a separate bowl, whisk together flour and cornstarch. Remove chicken from eggs with a slotted spoon or tongs, letting excess egg drain off, then transfer to cornstarch mixture and coat well. Fry the chicken: Add oil to a large 10- to 12-inch skillet. Heat over medium-high heat until it reaches 350F. If you don’t have a thermometer, you can also test the temperature by sprinkling in some flour and it should fizzle immediately. Once oil is hot, fry the chicken in two batches. The oil might not completely cover the chicken—that’s okay. Cook for 3-4 minutes. Flip the chicken pieces and cook until the chicken is cooked through, about 3 to 4 more minutes. Total cook time is about 6-8 minutes. Remove fried chicken cubes and transfer to a plate lined with paper towels, so the chicken can drain. Repeat until all the chicken is cooked. Simmer the chicken in the sauce: Once chicken is done, pour out hot oil and wipe pan clean. Add a fresh tablespoon of oil along with chopped garlic and shallot. Cook for a minute and then add the sauce. Simmer the sauce until it starts to thicken. Once the sauce is lightly bubbling, add fried chicken and toss together to coat. The sauce should continue to thicken and stick to the chicken. Let simmer for a minute or two more. Serve orange chicken over cooked white rice, garnished with sesame seeds and fresh scallions. Source: Simply Recipes