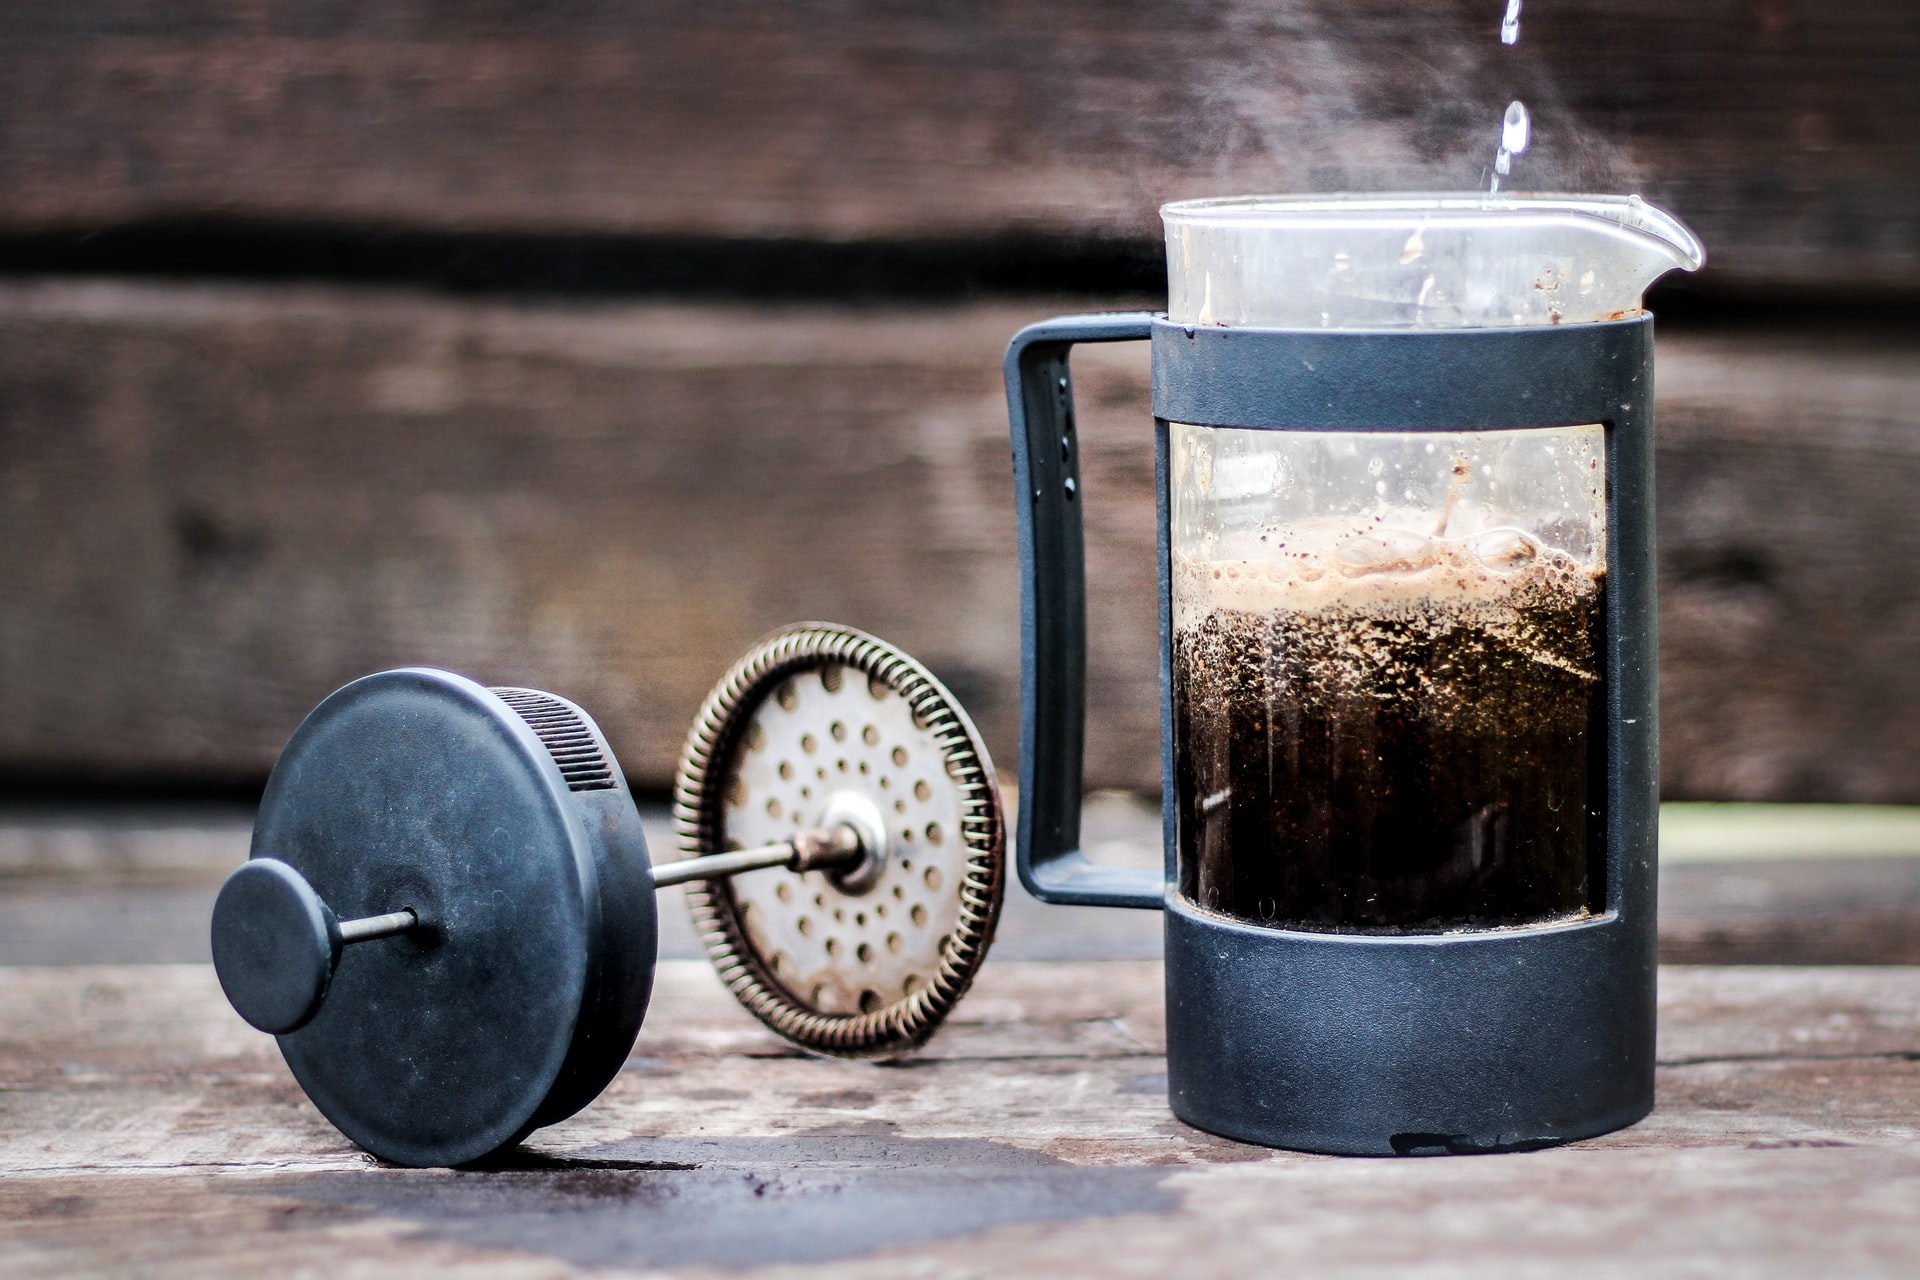
Kitchen

Amateur Painting Mistakes to Fix

A paint job brings a spark back to a space and is one of the most affordable DIY-friendly projects. Painting is relatively simple, but without the proper patience and precision you could be left with a botched job. Here’s a breakdown of all the common amateur painter mistakes. Inconsistent Coverage. Primer can alleviate many headaches down the line. It will ensure the paint has a good foundation. A primer will help the paint adhere to the surface better and improve durability. Without it, you can be left with a splotchy or streaky wall. If you need to fix a splotchy wall, let it completely dry overnight and apply another coat of paint afterwards. Paint Splatters. Even if you perfect a paint job, protecting your space is imperative. A professional will cover anything in a room to prevent accidental splatters. This includes dropping cloths on the floor, plastic over furniture and taping off trim. If paint drips, a damp cloth usually does the trick to pull the paint off wood floors. If it’s already dried you can try to gentry scrape it up, then use a damp cloth to wipe any excess. Solvents are available for really stubborn spots. Be sure to check the label to ensure it won’t damage the floor. Sloppy Edges. If you end up with wavering cut lines on a paint trim, chances are you didn’t use painter’s tape. Apply painter’s tape on areas you don’t want the paint to go. This will minimize mess and provide crisp paint lines. Removing the tape is just as important. Remove it within a few hours or you increase your chances of pulling away sections of dried paint. Incorrect Finishes. A paint finish is almost as important as the color itself. Each sheen is suited for different situations and rooms. Eggshell paints offer a soft look with minimal glossiness that is a nice middle ground for durability and luster. A flat paint on the other hand, offers virtually no gloss and is great for hiding surface imperfections underneath. You can use this type of sheen for an old door. Cracking Paint. An issue most common in kitchens and bathrooms, this issue occurs due to there being something on the surface such as grease or cleaning residue. Pre-paint cleaners can help prevent this from happening. You can also prepare walls by lighting sanding prior to priming and painting. Planning a kitchen renovation soon? Shop our extensive catalog of kitchen appliances for your next upgrade here. Source: the Kitchn

Indoor Plants 101

If you’re looking to give your interior space an instant update, look no further than a houseplant. They’ve been gaining popularity over the past few years and are great in kitchens, bathrooms or living rooms. Research shows that being surrounded by plants offers benefits including improved mental health, better sleep and boosting feelings of connection. If you’re worried about losing a plant because the one you bought last year died in ten minutes, don’t worry! Follow this guide to find everything you should know before buying. Plants come in many different types and luckily there’s plenty for beginners. Looking for a low maintenance and striking plant? Try the snake plant. If you’re looking for a splashy plant that doesn’t require a lot, go with the monstera deliciosa. Always read the plant tag for care tips so you’ll be better prepared for the maintenance. How to Purchase You may be asking yourself, where should I be purchasing plants, in person or online? Both are great options. An in person experience with a nursery gives you a physical and tangible feel for the available plants. But there are also many reliable online retailers. They do a great job at packaging plants for shipment and offering unique and unusual varieties. If you’re browsing in person look for plants that appear healthy, no droopiness, yellow or brown leaves, and no sticky or cottony masses. These can be signs of pests. If you know a specific plant you want, be sure to look for it by its botanical name to ensure you get just what you’re looking for. Pets Unfortunately, many plants can make your pets sick. An English Ivy can cause your pet aches and vomiting, while lilies can be deadly, especially to cats. Always check the ASPCA toxic plants list to learn which plants you should keep away from your pets. Remember, any plant if ingested in large enough quantities can cause gastrointestinal upset. Keep an eye on your pets to see if they like to nibble on plants and always call your vet as soon as possible if you suspect they may have eaten something potentially toxic. Maintenance Besides giving it the right kind of light, watering correctly is the next most important thing for your houseplants. Overwatering is the most common reason for houseplants dying. Use a finger and press into the soil to feel for dampness. If the soil clings it’s probably wet enough and you shouldn’t water it again. If the soil pulls away from the sides of the pot or the plant is wilted, it’s time to water. It’ll take time to find the right balance but try to stay closer to dry to be safe. Insufficient light will cause plants to drop leaves, stretch toward the light or die altogether. Even if you want a specific plant, if there’s not enough light for it you’d be better off picking a plant that tolerates low light. Analyze your space to see how much light a specific area gets. You can also use your phone’s compass if you’re unsure of the direction. In general south-facing windows get the most intense light, while east-facing windows receive bright morning light and indirect light for the rest of the day. West-facing windows will get the setting sun so bright light plants will do well here. North windows get the least amount of light so they’re best for low light plants. Source: House Beautiful

The One Mistake to Avoid For Renovations

Homeowners can feel the urge to jump through homes whenever they’re unhappy with where they live. After all, finding a home you’ll want to stay in forever can be daunting. However, renovating a home or kitchen can be a manageable solution to avoid the urge to move all together. These upgrades bring the heart to a space and improve the home for the better. There’s one big mistake people are making when renovating their homes: not taking into consideration if there are young children living in it. Babies and toddlers especially make a mess and will most likely scratch, draw on, or break something they’re not supposed to. There isn’t much sense to redo your floors if they will be drawn over in a week or two. It’s logical to wait until children are a bit older before you start investing in any serious upgrade. Patience is key for these kinds of renovations. While a renovation can look pretty temporarily, it could really cost you in the long run. Source: House Beautiful

Where to Start with Wood Flooring

Wood flooring is a highly versatile flooring that can work with virtually every interior style. But not all wood floorings are the same. The type, finish and species all play a critical role in not only the look, but how it will maintain over time. Solid vs. Engineered Solid wood floorboards are solid planks of hardwood. They’re common in older houses and can be sanded and restained many times. A drawback of hardwood is they may warp in humid environments. Engineered floorboards are made up of layers of wood veneer. These boards of tiny sheets of wood are more durable than solid wood and don’t warp. However, since these boards are made of thin layers, they usually cannot be refinished. These are a more permanent color decision while solid wood can be altered afterwards. Finish vs. Unfinished Floorboards can come in one of two ways, pre-finished or unfinished. A pre-finished floorboard will come with the stain already on them before installation. You won’t need to sand or stain them which will cut down on labor and time. They tend to be more expensive for this specific reason. An unfinished floorboard is sanded and stained on-site. You’ll have more control over the color and finish, while also cutting down on the price. However, they will require more labor and process for installation. Species Hardwood floors come in dozens of options, both new and reclaimed or salvaged from other building projects. Here’s a list of some of the most popular kinds. Oak. One of the most common floor types. Favored for its durability, wide grain and ability to stain in main different ways. Maple. A distinct grain pattern, finer than many other woods. These floors are more susceptible to rot from insects compared to other wood types. Cherry. An extremely durable wood, with a reddish hue and shiny texture. Bamboo. A lighter finish compared to other woods. Due to it being a woody grass, it’s more fragile than other hardwoods. Bamboo is a renewable resource. Pine. A wide variety in species due to the countless types of pines. It’s best to advise with an expert before selecting a specific type. Source: House Beautiful

The Difference Between Ale and Lager Beers

Beers are all made from a basic combination of water, malts, hops and yeast. The difference between ale and lager is yeast, more specifically the type. This brings a wide range of changes between the two beers. Here’s what you can expect from the two brews. Ale Beers Ales are brewed with a top-fermenting yeast that prefers mid-range room temperatures. These ales are typically stored between 60°F and 75°F during the fermentation stage. This process gives ales a fruitier and spicier flavor than lagers. They are generally more robust and complex. Lager Beers On the other hand, lagers are made with bottom-fermenting yeast which works best in cooler temperatures, between 35°F and 55°F. The fermentation will happen slower, making the beer more stable. Lagers can be stored longer than ales. The yeast will have less prominence in the finished beer, resulting in a cleaner and crisper quality. Source: the Kitchn

Determining Wall Shelves Spacing and Spans

Wall shelves require a bit of planning before loading up your favorite dishes or plants. A shelf span is the distance between supports for the shelf. This span distance will vary based on the strength of the material of the shelf. In theory, the stronger the shelf the greater the distance you can put between wall supports. Shelf spacing will depend on preference and what you will store on the shelves. It’s important to fasten the shelf supports to wall studs whenever possible for maximum support. Span Limits The span limit will change depending on the material of the shelf as well as the load it will carry. For the following recommendations it’s assumed the shelf will support a full load of standard-sized hardback books. Plywood. Shelves should be ¾ inch thick or thicker. The longest recommended span is 36 inches between wall supports. Lumber. The longest recommended span between walls supports for 1×10 lumber is 24 inches. If the lumber is 1×12 then it is 28 inches. Particleboard. Single layer shelving made of particleboard should have a thickness of ⅝ inch. The recommended span for this would be 24 inches. If you have a thicker particleboard of ¾ inch then you can span wall supports by 28 inches. Spacing Recommendations The vertical spacing between shelves will ultimately be determined by the objects it will hold. Here’s a general clear shelf height depending on specific items. Paperback books: 8 inches Hardback books: 11 inches Large hardback catalogs: 14 inches Magazines: 14 inches DVDs: 8 inches Source: the Spruce

Kitchen Items You Can Put in Your Dishwasher

We may think dishwashers are only useful for plates and utensils, however there are plenty of larger items it can clean as well. It leaves them cleaner than you might achieve normally. Here’s a list of the items that are generally okay to run through the dishwasher. As with any product, always follow your user manual first to see if there are any specific cleaning requirements. Stove Grates and Caps. As long as your grates and caps are coated in enamel they’re fine to put in a dishwasher. Check to see if they look or feel like raw uncoated metal. If so, skip the dishwasher and wash these manually. Microwave Tables. Depending on their size, these tables are often a pain to clean in a sink. If you’re worried these aren’t as clean as they should be, toss them in the dishwasher. Refrigerator Shelves and Drawers. Some of these may be too big to fit in a dishwasher, but you may be able to stack a few in the same place you normally stack plates. Others you might be able to lay across the top. Sink Drain Cover. This one may be relatively easy to clean by hand compared to the previous ones, but they’re generally covered in stuff you may not want to touch. Give it a wash in your dishwasher for a quick and effortless clean. Select Cosmo Range Hoods come with ARC-FLOW permanent stainless steel filters. These are designed to be washed as many times as you need in your dishwasher. They’re also conveniently sized to fit! Find our entire catalog of Wall Mount, Under Cabinet, or Island Range Hoods here. Source: Food Network

How to Clean Stainless Steel Pots and Pans

These pans can often carry a hefty price tag, so it’s important to keep them in pristine condition. Luckily, it’s easy to shine up these pots and pans if you have all the necessary ingredients. Read how below. What You’ll Need: Stainless steel cleaning powder or baking soda Water A non-abrasive scrubbing pad (a Dobie pad or non-abrasive sponge is ideal to minimize scratches) A detail brush, like a toothbrush, to clean crevices A toothpick Rubber gloves (optional, but recommended, to protect your hands) Instructions: Add a small amount of tap water into the pot, followed by generous shakes of powdered cleaner. With the sponge, mix the water and powder to form a paste-like texture. With the sponge, spread the mixture around the pot. Make sure to cover the sides or walls. If you need more, add more powder and water. Scrub away at the stains. Make more paste as needed to clean out any pesky pots or crevices. Repeat the process for the outside of the pain. Rinse and dry the pan with a lint-free towel. Source: the Kitchn

Managing Wood Utensils in a Kitchen

Wood utensils have been used for centuries and are still one of the most common tools found in kitchens today. Wood is great to prevent scratching pots or pans, and won’t react chemically with hot food. Here are the few do’s and don’ts when it comes to handling your wood utensils. DON’T put the wood utensils in a dishwasher. The intense heat and steam will make the wood crack. DON’T let utensils sit in water for prolonged periods of time. DO wash the utensils in hot soapy water fairly quickly after use. DO pat the utensils dry with a cloth and let them air dry. DO rub with a slice of lemon and let air dry for any strong flavors that have seeped into the wood. DO apply a mineral oil every once in a while to the wood to prevent it from drying out and cracking. Source: Apartment Therapy

3 Cabinet Design Trends That Make Reselling Harder

Since a kitchen gets so much use day in and day out, it’s no surprise that it’s usually the biggest selling point in a home. A kitchen remodel gets expensive fast, so it’s even more incentive for a potential buyer to love the kitchen right away. Those looking to sell their home should be conscious of the design elements that may ultimately affect the sell price. Here’s three to avoid. Open shelving. An open shelf is a great concept in theory, but can be a lot more hassle for homeowners. While it does open up a space, the dishware placed on it can easily gather dust. If a potential buyer doesn’t have the means to close off the shelves, it could have them feeling overwhelmed to constantly maintain the look. Dark cabinets. These are very big commitments to homes. A white kitchen will usually sell faster than a dark blue one. A darker kitchen with dated hardware can feel old, and especially unattractive to millennials. The cost to repaint kitchen cabinets will hit a lot harder than a simple wall recolor. Intricate millwork. A younger buyer prefers transitional looks, where lines are clean and geometric. Simplicity is the key here. A neutral kitchen with light countertops and brass hardware is typically a good option. Source: the Kitchn