Mexican breakfast

Air Fryer Egg Roll Burrito: The Crispy Breakfast Wrap

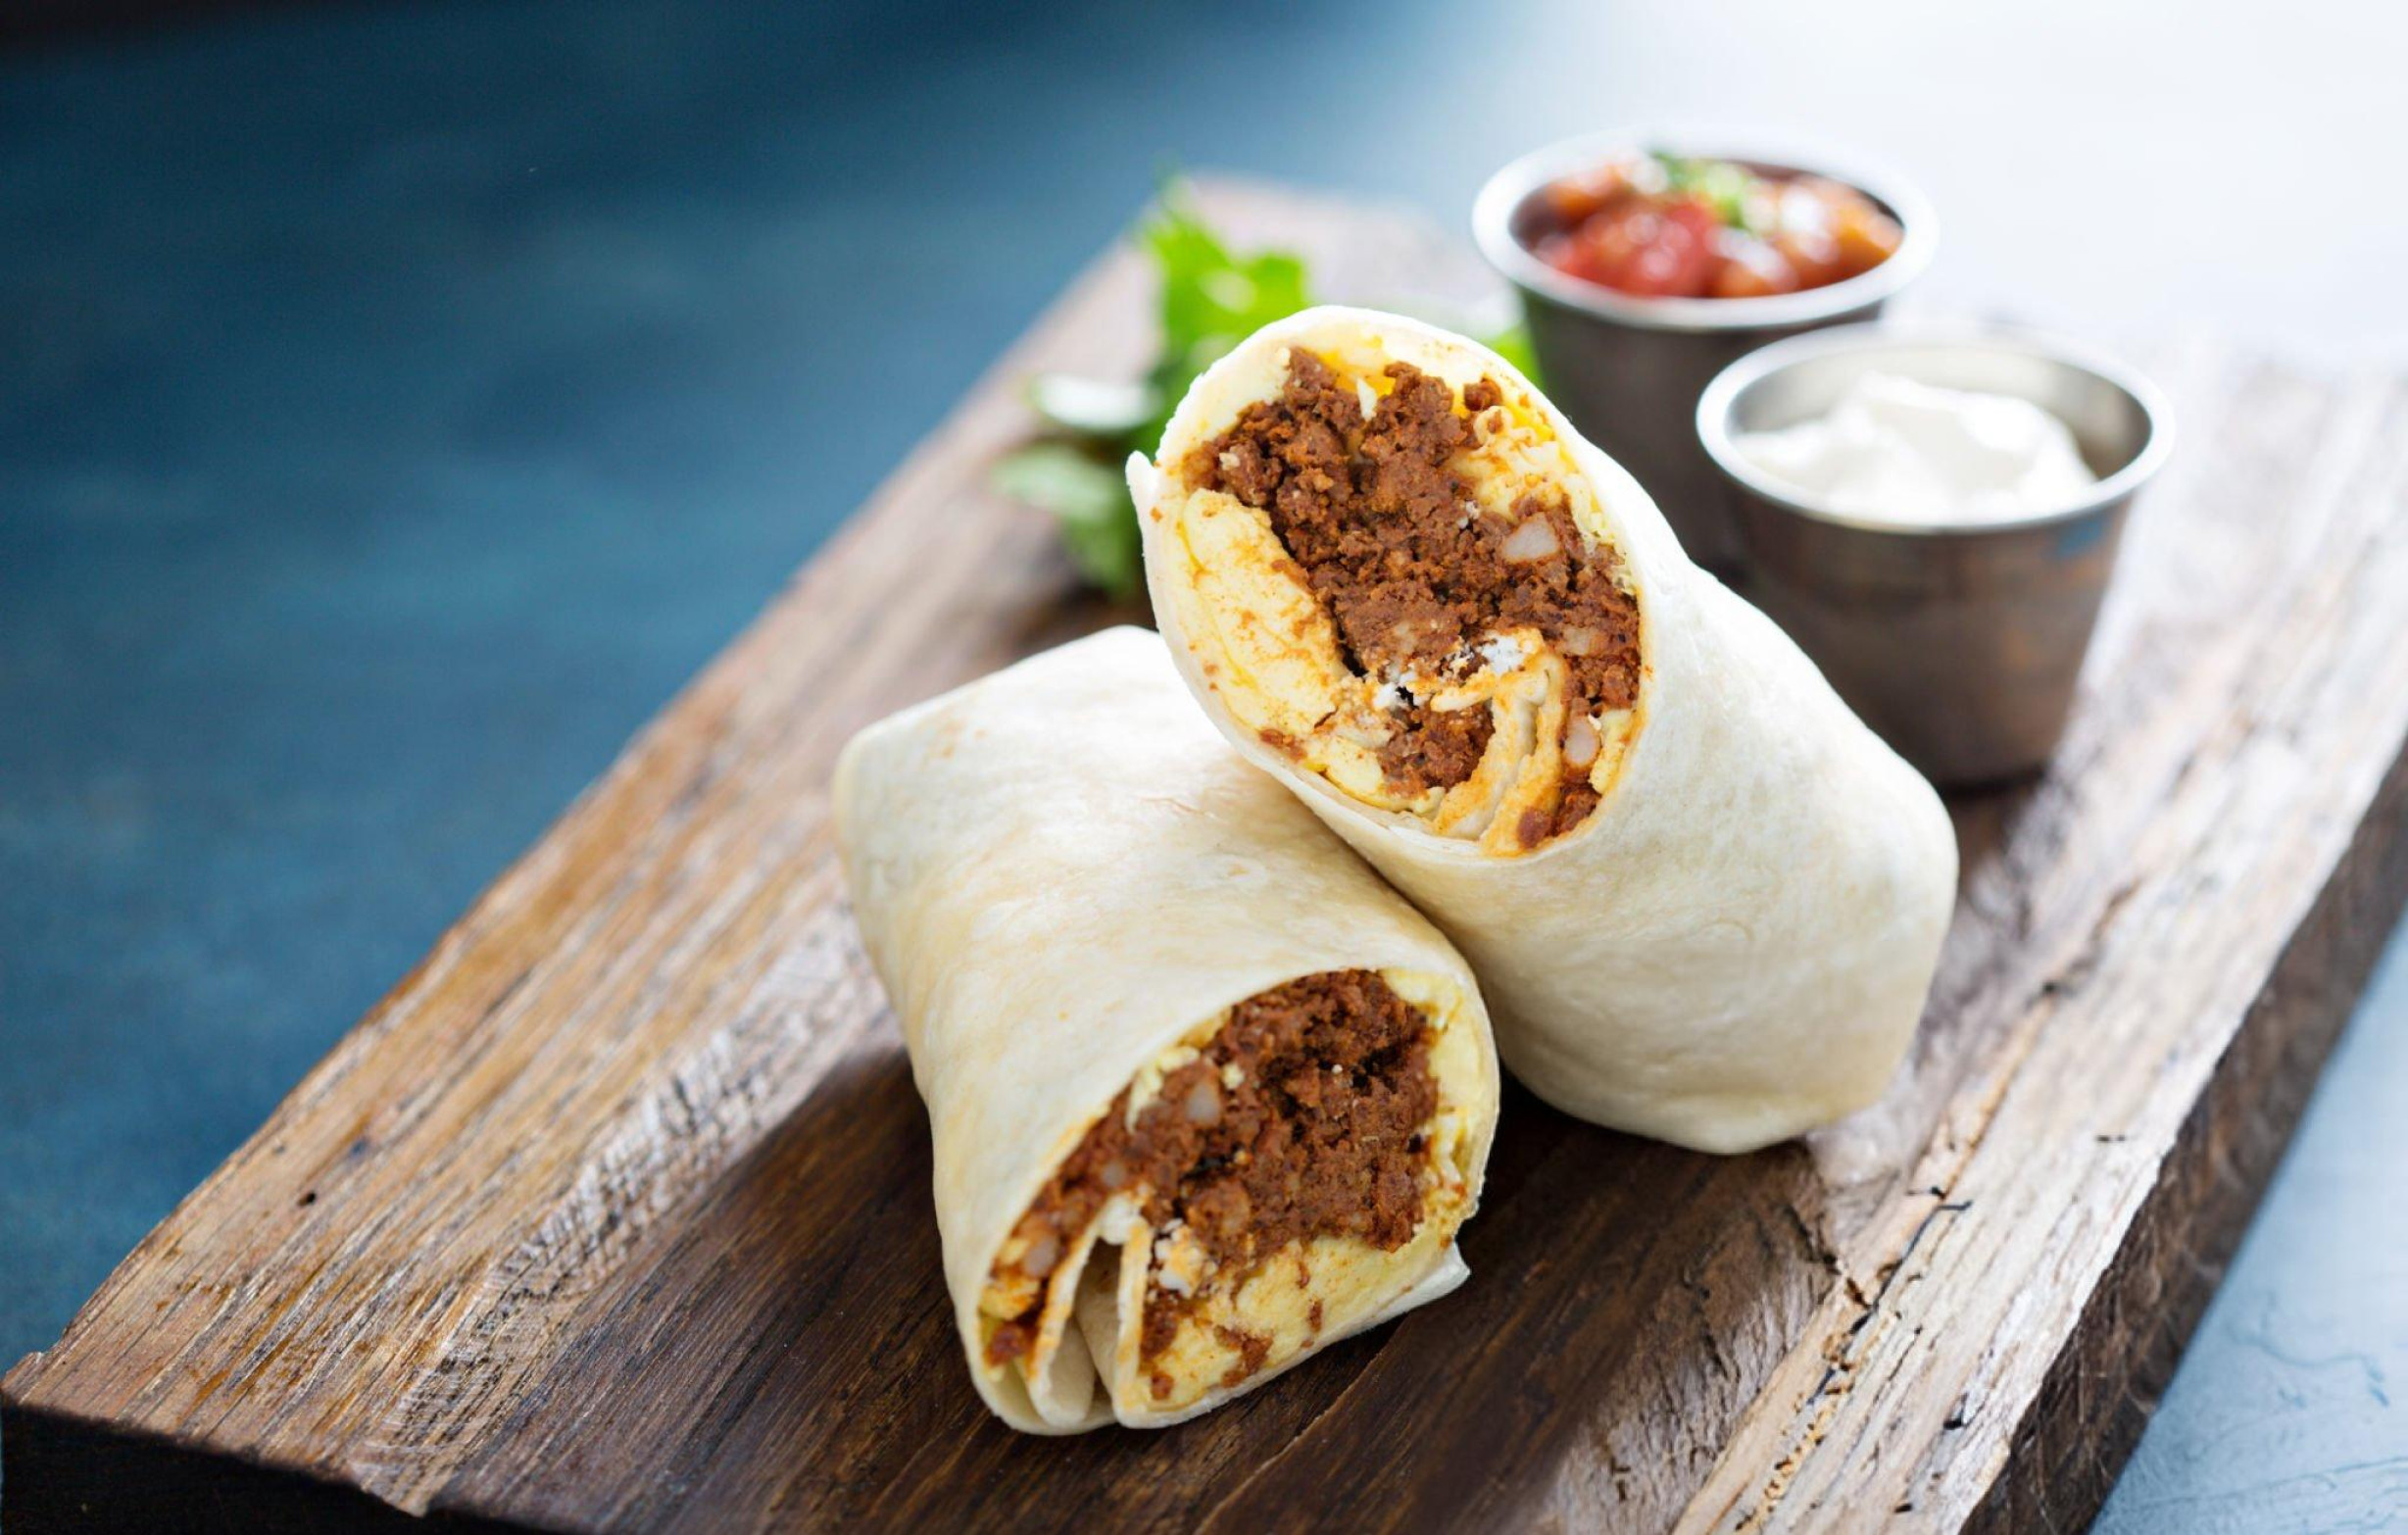
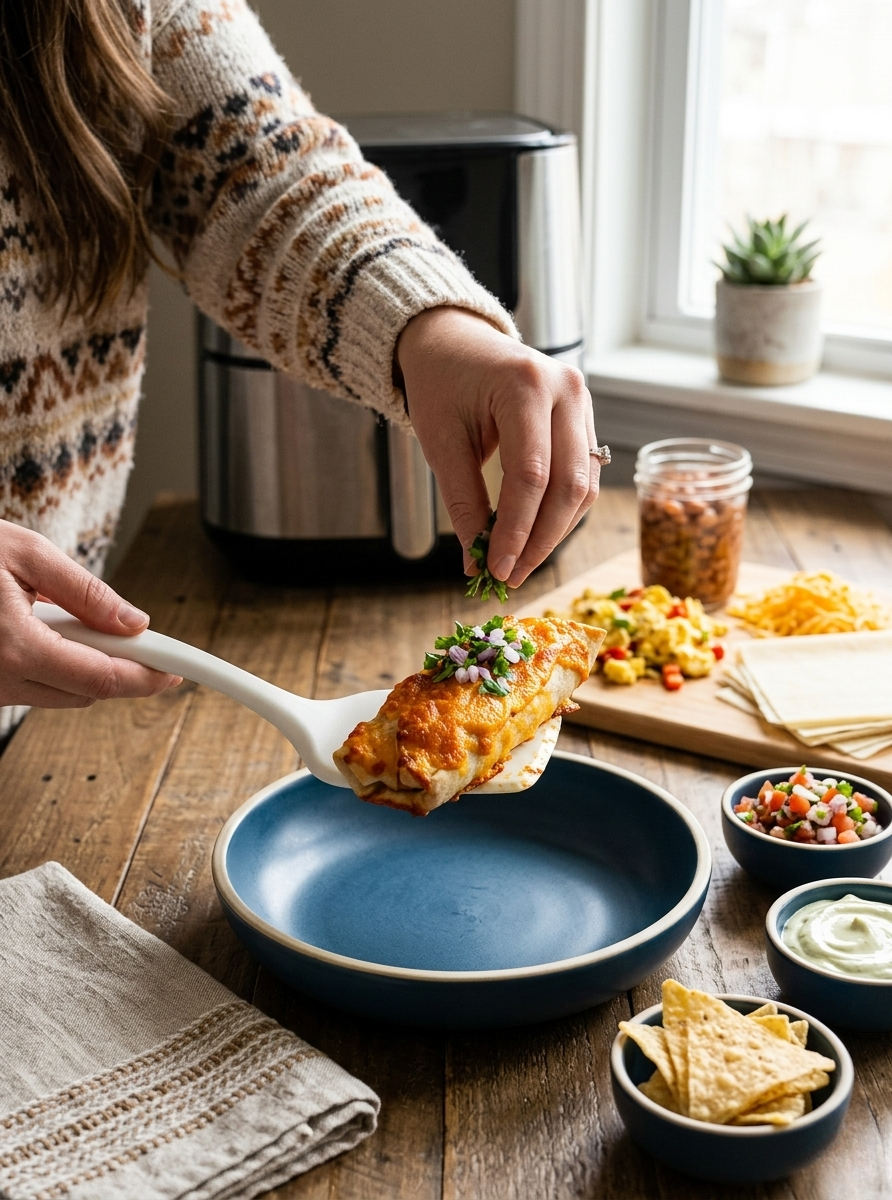
Egg roll wrappers replace flour tortillas creating crispy exterior that holds beans, eggs, and cheese without getting soggy. Air frying produces golden edges without deep frying oil. Here’s how to make egg roll burritos in your air fryer combining breakfast burrito flavors with egg roll texture. What You’ll Need Ingredients: Equipment: Step-by-Step Instructions Step 1: Cook the Eggs Crack 2-3 eggs into a small oven-safe bowl or ramekin that fits in your air fryer basket. Do not scramble—leave eggs whole or lightly mix if you prefer scrambled texture. Place the bowl in your air fryer and cook at 360°F for 3 minutes. The eggs will set but remain slightly soft. Add shredded cheese on top of the partially-cooked eggs. Return to air fryer and cook for another 3 minutes at 360°F until eggs are fully set and cheese melts. Remove bowl from air fryer and let cool slightly before handling. The eggs should be firm enough to layer into egg roll wrapper. Step 2: Prepare Your Filling Warm your beans if using canned refried or black beans. Room temperature or warm beans spread easier than cold beans. Have shredded cheese ready for layering. You’ll use cheese both inside the egg roll and on top before final cooking. Cut or break cooked eggs into manageable pieces that fit within egg roll wrapper dimensions. Step 3: Assemble the Egg Roll Burrito Lay one egg roll wrapper on clean surface positioned like a diamond (corner pointing toward you). Spread a layer of beans across the center of the wrapper leaving edges clear for sealing. Add cooked egg pieces on top of beans. Sprinkle shredded cheese over the eggs and beans. Fold the bottom corner up over the filling. Fold the side corners inward. Roll tightly toward the top corner creating sealed cylinder. Use water on your finger to moisten the final corner helping it seal closed. Press firmly. Step 4: Oil and Top Brush or spray the assembled egg roll with cooking oil. This creates golden crispy exterior during air frying. Sprinkle additional shredded cheese on top of the oiled egg roll. The cheese will melt and crisp during cooking creating cheesy crust. Step 5: Air Fry Place the assembled egg roll in your air fryer basket seam-side down. This helps seal stay closed during cooking. Air fry at 360°F for 5 minutes. Check at 4 minutes if your air fryer runs hot. The egg roll is done when wrapper turns golden brown and crispy and cheese on top melts and browns slightly. Flip halfway through cooking if you want even browning on all sides, though seam-down cooking typically produces good results without flipping. Step 6: Cool and Serve Remove egg roll from air fryer and let cool for 1-2 minutes before handling. The filling will be very hot immediately after cooking. Slice in half if desired to show the layered interior, or serve whole. Serve with salsa, sour cream, hot sauce, or guacamole for dipping. Why Egg Roll Wrappers Work Egg roll wrappers create crispy texture that flour tortillas can’t match. The thin wrapper crisps completely in the air fryer producing crunchy exterior. Structural integrity from egg roll wrapper holds filling better than tortillas. The sealed edges prevent filling from leaking during cooking. Lower carb option compared to large flour tortillas. Egg roll wrappers contain less total carbohydrate than burrito-size tortillas. Portion control from smaller wrapper size. Egg roll format naturally creates single-serving portions rather than oversized burritos. Filling Variations Add cooked breakfast sausage or bacon for meat protein. Crumbled cooked meat layers with beans and eggs. Include sautéed peppers and onions for vegetables. Pre-cook vegetables before adding to prevent excess moisture. Swap beans for hash browns or potato filling. Cooked diced potatoes provide different texture and flavor. Use scrambled eggs instead of whole cooked eggs. Scrambled eggs distribute more evenly throughout filling. Add jalapeños or hot sauce to filling for spice. Mix hot sauce with beans before layering. Assembly Tips Don’t overfill egg rolls or they won’t seal properly. Use modest portions of each filling component leaving room for folding. Keep wrapper edges dry when filling. Wet edges from bean moisture prevent proper sealing. Roll tightly to prevent air pockets. Loose rolling creates gaps where filling can leak. Seal well with water on final corner. Moisture activates wrapper’s ability to stick to itself. Air Fryer Timing Adjustments Different air fryer models require timing adjustments based on power and heating patterns. Check at 4 minutes for first batch. If wrapper browns too quickly before interior heats through, reduce temperature to 340°F. Larger egg rolls need 6-7 minutes. Thicker rolls with more filling require longer cooking time. Smaller egg rolls finish in 4 minutes. Less filling cooks faster. Make-Ahead Strategy Assemble egg rolls in advance and refrigerate until ready to cook. Wrapped egg rolls hold in refrigerator for several hours before air frying. Cook eggs ahead and refrigerate. Cold cooked eggs layer into wrappers easily during assembly. Prepare filling components the night before. Pre-cooked beans and eggs speed morning assembly. Freeze assembled uncooked egg rolls. Air fry from frozen adding 2-3 minutes to cooking time. Serving Suggestions Serve egg roll burritos with Mexican breakfast sides: salsa, sour cream, guacamole, or pico de gallo for dipping. Pair with fresh fruit for balanced breakfast. The crispy egg rolls contrast with fresh fruit texture. Make multiple egg rolls for meal prep. Cook several at once and reheat throughout the week. Cut into smaller pieces for breakfast appetizers. Sliced egg rolls work as party food. Watch the Video Tutorial Air fryer egg roll burritos transform breakfast burrito flavors into crispy handheld format without deep frying. Layer beans, air-fried eggs, and cheese into egg roll wrappers, seal them up, brush with oil, top with more cheese, and air fry until golden and crunchy. The egg roll wrapper creates texture that flour tortillas can’t match while the air fryer handles the crisping without messy oil. Five minutes from assembled to crispy breakfast ready to eat.

Chorizo Burrito Recipe: Protein-Packed Satisfaction for Any Time of Day

Sometimes you need a meal that delivers serious flavor and lasting satisfaction without complicated ingredients or lengthy preparation. This chorizo burrito recipe does exactly that, combining the rich, spicy flavors of chorizo with fluffy scrambled eggs wrapped in a warm tortilla. With just four simple ingredients and about 10 minutes of cooking time, you can create a hearty meal that works equally well for breakfast, lunch, or dinner. The beauty of this recipe lies in its simplicity and versatility. Chorizo provides bold flavor and protein that makes this burrito incredibly satisfying, while eggs add creaminess and additional protein that keeps you full for hours. Whether you’re fueling up for a busy day or need a quick dinner solution, this chorizo burrito delivers the comfort and nutrition you’re craving. Why This Chorizo Burrito Recipe Works So Well The combination of chorizo and eggs creates a perfect balance of flavors and textures that make this burrito both satisfying and delicious. Understanding why these ingredients work together helps you achieve the best results while building confidence to customize the recipe to your preferences. Chorizo releases flavorful oils as it cooks, creating a natural base for scrambling eggs that infuses them with rich, spicy flavor. This integration means every bite contains the bold chorizo taste rather than having separate components that don’t complement each other. High-protein content from both chorizo and eggs provides lasting satiation that keeps you satisfied much longer than carbohydrate-heavy meals. This protein combination makes the burrito an excellent choice for active days or when you need sustained energy. Quick cooking time makes this recipe perfect for busy schedules or when hunger strikes and you need something satisfying immediately. The entire cooking process takes less than 10 minutes from start to finish. Simple ingredients mean you can keep the components on hand for whenever the craving hits. Chorizo keeps well refrigerated, eggs are a staple, and tortillas store easily, making this a reliable go-to meal. Versatile timing allows you to enjoy this burrito any time of day. The combination works as well for breakfast as it does for lunch or dinner, providing flexibility for various meal needs. One-pan cooking minimizes cleanup while maximizing flavor development. Cooking everything together allows the ingredients to meld perfectly while reducing the number of dishes you need to wash. Choosing the Right Chorizo for Best Results The type and quality of chorizo you choose significantly affects both flavor and cooking results. Understanding your options helps you select the best chorizo for your taste preferences and cooking style. Mexican chorizo typically comes raw and needs full cooking, providing bold, spicy flavor with a crumbly texture that works perfectly for this recipe. The raw chorizo breaks apart easily during cooking while releasing flavorful oils. Spanish chorizo comes pre-cooked and has a firmer texture with different spicing. While it can work in this recipe, it requires different handling and provides a different flavor profile than traditional Mexican chorizo. Fresh chorizo from butcher shops or Mexican markets often provides superior flavor compared to mass-produced versions. The higher quality ingredients and traditional spicing create more complex, satisfying taste. Spice level varies significantly between different chorizo brands and types. Start with milder varieties if you’re sensitive to heat, or choose spicier versions if you enjoy bold flavors. Fat content affects both flavor and cooking characteristics. Higher-fat chorizo releases more oils for cooking eggs, while leaner versions may require additional cooking fat for optimal results. Storage considerations include keeping chorizo refrigerated and using within recommended timeframes. Fresh chorizo typically keeps for several days refrigerated, while some varieties can be frozen for longer storage. Step-by-Step Technique for Perfect Results Success with this chorizo burrito depends on proper cooking technique and timing. Following these detailed steps ensures the chorizo cooks properly while the eggs achieve the perfect creamy texture. Egg Preparation: Crack four eggs into a bowl and whisk thoroughly until whites and yolks are completely combined. Proper whisking creates the smooth texture that makes scrambled eggs creamy rather than lumpy. Pan Setup: Heat your pan on the Cosmo GRP486G range using medium heat. Add a small amount of oil or butter to prevent sticking and provide additional richness to the final dish. Chorizo Preparation: Cut the chorizo roll in half using a sharp knife, then place the pieces in the heated pan. The chorizo will begin releasing oils immediately as it heats. Breaking Apart Chorizo: Use a spatula to break the chorizo into smaller pieces as it cooks. Continue breaking it apart until you achieve a crumbly texture with no large chunks remaining. Cooking Chorizo Completely: Cook the chorizo until it’s fully broken apart and no pink color remains. This typically takes 3-4 minutes, depending on the size of the pieces and heat level. Adding Eggs: Pour the whisked eggs directly into the pan with the cooked chorizo. The eggs will begin cooking immediately upon contact with the hot pan and chorizo oils. Mixing Thoroughly: Stir the eggs and chorizo together constantly to ensure even cooking and flavor distribution. The eggs should cook quickly while absorbing the chorizo flavors and oils. Recognizing Doneness: The mixture is ready when the eggs look solid and set rather than liquid or runny. They should be creamy but not wet, with the chorizo evenly distributed throughout. Tortilla Warming: Heat your tortilla using your preferred method – directly over a gas flame, in a dry pan, or wrapped in damp paper towels in the microwave for a few seconds. Assembly: Place the warm tortilla on a plate, add your desired amount of the chorizo and egg mixture, then roll or fold according to your preference. Recipe Variations and Customizations This basic chorizo burrito recipe provides an excellent foundation for numerous variations that can accommodate different tastes, dietary needs, and available ingredients. Cheese Additions: Shredded cheese added to the eggs during the last minute of cooking creates extra richness and helps bind the ingredients together. Cheddar, Monterey Jack, or Mexican cheese blends work particularly well. Vegetable Enhancements: Diced onions,