Month: June 2021

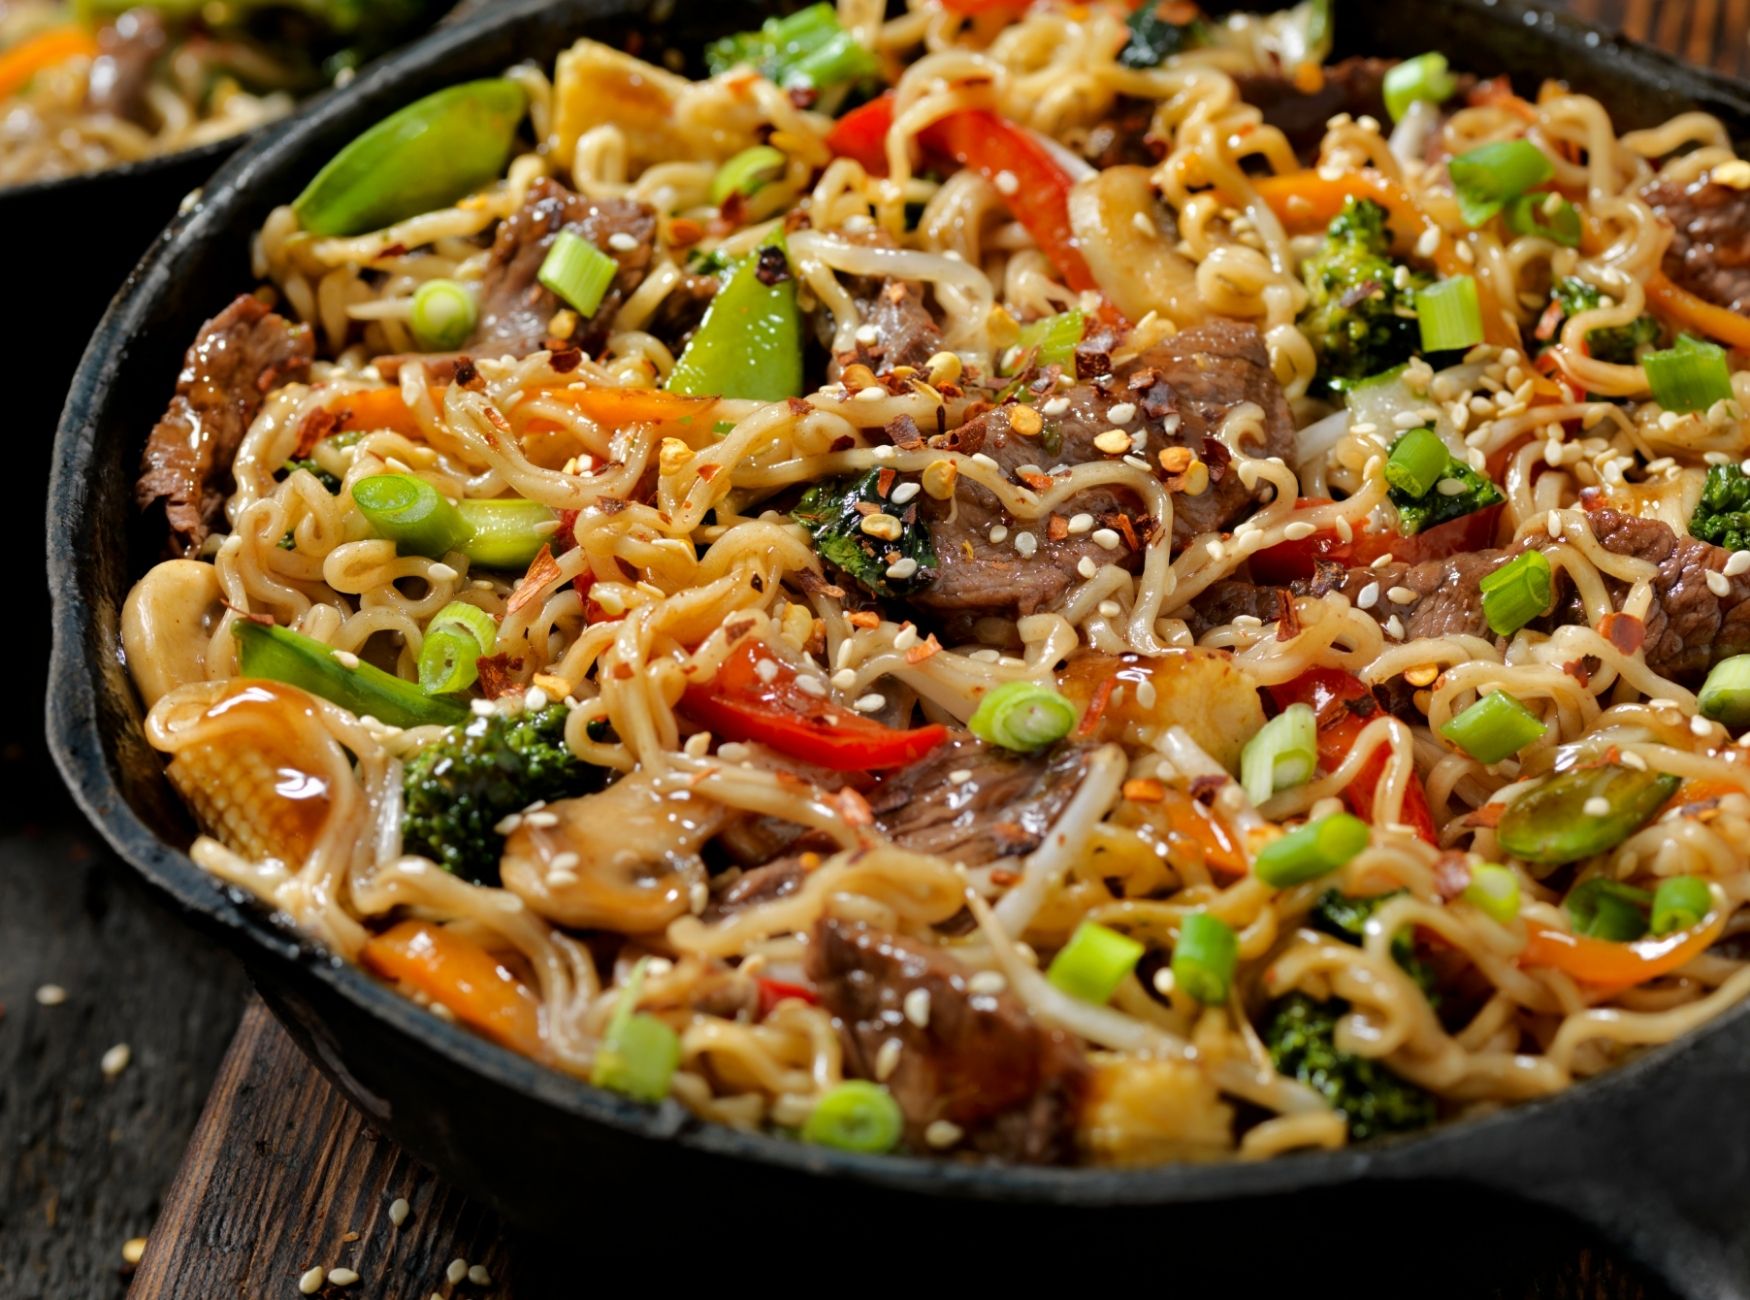
Beef and Broccoli Ramen Stir Fry Recipe

Skip on the takeout tonight! This classic dish combines ramen noodles with a homemade savory sauce for a complete dinner experience. Use sirloin steak for the perfect mix of lean meat and fat. When picking the noodles, don’t overthink it–the cheap kind works just fine. Read more below to have a delicious meal ready in under 30 minutes. Prep time: 10 minsCook time: 15 minsTotal time: 25 minsServings: 4 servings Ingredients: For the stir fry sauce: 2 cloves garlic, minced 1 tablespoon grated fresh ginger 1/3 cup soy sauce 1/4 cup honey 1/4 cup hoisin sauce 3/4 cup beef broth 2 tablespoons rice vinegar 2 tablespoons sesame oil 2 tablespoons cornstarch For the stir fry: 2 (3-ounce) packages dried ramen noodles, seasoning packets discarded 2 tablespoons olive oil, divided 1 pound sirloin steak, trimmed of fat and sliced into 1/4-inch thick strips 1/2 teaspoon kosher salt 1/2 teaspoon ground black pepper 3 cups fresh broccoli florets Sesame seeds, garnish Sriracha, garnish (optional) Directions: Make the stir fry sauce: Add garlic and ginger to a bowl and whisk in all sauces from soy sauce through sesame oil. Whisk in cornstarch last, and try to whisk out as many lumps as possible. It’s okay if there are a few lumps, as they will cook out when you add the sauce to the skillet.This makes a lot, because I like this dish to be very saucy. You could halve the recipe if you like a drier stir fry. If you have leftover sauce, it stores well in the fridge for a week in an airtight container or jar. Prepare the noodles: Cook dry ramen noodles in boiling water until they are tender, 2 to 3 minutes. Drain the noodles and rinse with cold water to stop them from cooking. Cook the stir fry: In a large skillet or wok over medium-high heat, add 1 tablespoon olive oil. Season the steak with 1/2 teaspoon salt and pepper.Once the skillet is glistening hot, add the steak strips. Cook for about 3 minutes, undisturbed, to allow them to sear well on one side. Then stir and continue to cook for 2 to 3 more minutes, until the steak is cooked through.Remove the steak from the skillet, and add another tablespoon of olive oil and the broccoli florets. Add 1/2 cup of water to the skillet and cover. Steam broccoli for 2 minutes. Broccoli should be bright green and tender, and not mushy at all.Add the steak back to the skillet, along with cooked and rinsed noodles. Pour in all of the sauce. (If you prefer a drier stir fry, you can start with half the sauce.) Use tongs or a large rubber spatula to stir together ingredients as the sauce cooks. Cook for another 2 to 3 minutes until sauce thickens. Serve: Serve stir-fry immediately, garnished with sesame seeds and, optionally, sriracha. Source: Simply Recipes

How to Clean Granite Counters

Cleaning granite counters may seem like a simple task, but there’s a lot of different advice out there on the best method. The most important note, you don’t need a special granite cleaner to get those countertops shiny and streak-free. Here’s what you should know about cleaning granite and what you’ll need. Sealed Counters. Granite is a hard surface but porous, meaning an unsealed granite will soak up oils, spills and stains. Check that your granite is sealed by leaving a few drops of water on the surface. If it beads up, the granite is sealed. However, if it soaks into the granite it’s time to reseal it. Avoid Harsh Cleaners. Ammonia or bleach based products should be avoided. Windex, vinegar, lemon and lime will dull and weaken the sealant over time. The harsher the cleaner the quicker the sealant will break down. Gentle Cloth. For daily cleaning, use warm water and a gentle dish soap with a microfiber cloth or nubby washcloth. What You’ll Need: Warm water Mild or gentle dish soap Dish cloth Clean microfiber cloth or terrycloth towel Isopropyl alcohol Spray bottle Directions: Wet your dish cloth with warm, soapy water: Fill a clean sink with warm water and a mild dish soap, then thoroughly wet a clean dish cloth. Wipe down the granite countertops: You don’t need us to tell you how to do this part. Just use your wet dish cloth to wipe away any spills or crumbs on your countertop! Dry with a microfiber cloth to avoid streaking: Dry and buff your granite countertop thoroughly with a microfiber cloth or soft terry cloth towel to avoid streaking. Disinfect: To periodically disinfect your granite countertops, remove soap residue, and restore shine, spray 70% isopropyl alcohol onto your counters. Allow it to sit for three to five minutes, then rinse with water and dry with a clean microfiber cloth. Enjoy!: Your nice, shiny, clean granite countertops are ready to go. Source: the Kitchn

Hollandaise Sauce Recipe

Hollandaise is the sunny yellow sauce poured over eggs benedict at brunch. It’s a warm emulsion of butter and lemon juice with egg yolks. Combining these ingredients with care turns them into a sauce that is both light and rich. Hollandaise is best served immediately as it does not reheat well. Here’s how to prepare it. Prep time: 5 minsCook time: 15 minsTotal time: 20 minsYield: 1 cup Ingredients: 10 tablespoons (142 grams) unsalted butter, at room temperature, cut into 1 tablespoon pieces 3 egg yolks 1 tablespoon lemon juice 1 tablespoon water 1/4 teaspoon salt Freshly ground black or white pepper Pinch of cayenne pepper (optional) Directions: Combine egg yolks, lemon juice, and water: In a medium heavy-bottomed saucepan, combine the egg yolks, lemon juice, and water. Whisk off the heat until the egg yolks double in volume. Add 1 tablespoon of butter and cook sauce: Set the pan over low heat and add 1 tablespoon of butter. Whisking constantly, cook the sauce, very gently until the eggs are thick, pale, and fluffy.The whisk should leave trails in the sauce. This could take up to 5 minutes. Don’t skimp on this step! It’s what makes a thin, so-so hollandaise into a sensational sauce with body. Whisk in remaining softened butter: Once the egg mixture is thick, begin whisking in the remaining softened butter, one tablespoon at a time. Make sure each addition of butter is fully incorporated into the sauce before whisking in the next piece. This can take up to 10 minutes and you may need to move the pan on and off the burner to regulate the heat and prevent the sauce from cooking too quickly.As you whisk in more butter the sauce will grow in body. When you’ve added all the butter, reduce the heat as low as it will go. Season, taste, and strain the hollandaise if desired: Add the salt and some freshly ground pepper, to taste. If using a pinch of cayenne pepper, omit the freshly ground black pepper. It’s an intense sauce, so dip a raw vegetable like a carrot stick in there, to taste and adjust for seasoning as needed.If you’re serving it with something salty, like ham, you might not want to season it as aggressively, but I do think this sauce is better when it’s on the salty side, and I usually wind up adding a few more pinches of salt.If you desire a thinner hollandaise, you can thin the sauce by using one of two methods. You can strain the seasoned sauce into a large bowl using a fine mesh sieve. Use a rubber spatula to help you strain the hollandaise, if needed. You can also whisk in warm water, 1 tablespoon at a time, to reach your desired consistency. How to keep hollandaise warm before serving and how to store: You may hold the sauce for up to 30 minutes on the stovetop with the burner on its lowest setting. You may need to slide the pan on and off the burner in order for the hollandaise to not overheat and break.Refrigerate leftover hollandaise within 2 hours of making it and use the leftovers to spread on toast within 3 days. It does not reheat well, but if you decide to try to reheat it do so in a double boiler whisking continuously. Source: Simply Recipes

Chicken Taco Dorito Nachos Recipe

Have tonight’s dinner ready in no time with this chicken taco Dorito nachos recipe. They’re simple to make, just layer down the chips, chicken and cheese and let the air fryer do the work for you! The secret ingredient is the Dorito tortilla chips. For an even easier dinner, enjoy these directly out of the air fryer pan. Ingredients: Dorito Tortilla Chips Mozzarella Cheese Shredded Chicken Non-stick cooking spray Directions: Spray air fryer pan with non-stick cooking spray Layer chips, cheese and chicken on pan Repeat with another layer Cook at 300°F for 5 to 7 minutes

How to Make Perfect Burger Patties

Pressing out a patty and throwing it on the grill might seem simple enough, but often we end up with burgers that are too crumbly or too small for the buns. The goal is to have a juicy and tender burger that stays together and fits the bun perfectly. Here’s how to get a perfect patty every time. Temperature. Other meats are often brought up to room temperature before cooking, but with patties you want to break this habit. If a patty is warm and further warmed by hands, the fat will melt too quickly on the grill, resulting in a dry burger. Keep the beef refrigerated all the way up until it’s time to season and press the patties. Toss them on the grill immediately after or cover with plastic wrap and put back in the refrigerator until it’s time to grill. Handle with Care. Ground beef consists of two parts, lean meat and fat. The goal is to have these two parts stick together once pressed. If a patty is overworked the burger will be dry and crumbly. Handle the beef as little as possible. Fold the seasonings into the ground beef gently, and don’t spend more than 30-45 seconds mixing. You can test the mixture by scooping a tablespoon and pressing it between your palms. Turn it over and if the meat sticks, then it’s well mixed and ready to be pressed into patties. Four-Inch Rule. A patty will shrink when it’s cooked, so make the patties one inch thick and one inch larger than the bun. Most of the time, buns are around three inches, so a four-inch patty should do the trick. If you’re still unsure about how to press out the patties, trace out the desired sized circles on parchment paper before shaping. Shaping Patties. Here’s how to get a perfectly flat patty every time. Start with a baking sheet lined with parchment paper. Wet your hands and then place 5-ounce mounds of beef on the parchment paper. Press each mount in the center gently with the palm of your hand. Use your other hand to cup the beef and help shape it into a circle. You should end up with a patty with a depression, or dimple in the center with a ½ inch lip around the edge. Patties will bloat in the middle and shrink everywhere else during grilling. Source: Simply Recipes

Air Fryer Onion Rings Recipe

Your air fryer is the best way to fry healthier food with less mess than traditional frying. These onion rings are perfect for smaller portions and ready within a few minutes. There’s no grease to cleanup afterwards! Pair with the quick French fry dip for an easy homemade alternative. Prep time: 10 minsCook time: 40 minsTotal time: 50 minsServings: 4 servingsYield: 24 onion rings Ingredients: For the onion rings: 3 medium sweet yellow onions 1 cup all-purpose flour 2 tablespoons cornstarch 1 teaspoon kosher salt 1 teaspoon black pepper 3 large eggs 3/4 cup milk 4 cups panko breadcrumbs Nonstick spray, for cooking Minced parsley, garnish (optional) For the easy fry dip 1/3 cup mayonnaise 2 tablespoons ketchup Directions: Prepare the onion rings: Cut the non-root end of the onions off and peel onions. Slice onions into 1/4-inch thick slices and separate each slice to make rings. For thicker onion rings, you could cut them up into 1/2-inch thick slices. Make the breading station: In a medium bowl, combine flour, cornstarch, salt, and pepper. In a separate medium bowl, whisk together eggs and milk until smooth and cohesive. Into a third medium-sized bowl add the panko. Bread the onion rings: Dip onion rings in the flour mixture to coat well, then into the egg mixture, making sure to shake off any excess, and finally into the panko bowl to fully coat with breadcrumbs. Use your dry hand to pack on the panko so it sticks well. Transfer breaded onion rings to a plate. Air fry the onion rings: Spray the air fryer basket and the onion rings with non-stick cooking spray. Place onion rings in a single layer in the basket. Air fry the onion rings at 350°F for 5 minutes, then flip the onion rings, and air fry for another 5 minutes on the second side. Remove onion rings and repeat until the rings are all air fried. Make the fry sauce: In a small bowl combine the mayo and ketchup to make the fry sauce. Serve the onion rings: Garnish onion rings with parsley, if desired and serve while warm. You can keep air fried onion rings in a 200˚F oven while you finish cooking the other batches. Serve onion rings with the fry sauce or your favorite ring dip. Source: Simply Recipes

Air Fried Taquito Recipe

Try this air fried taquito recipe for tonight’s dinner! The surprisingly easy dish only requires four ingredients that you most likely already have! If you have a smaller air fryer you can cut the taquitos in half to accommodate for the basket. Ingredients: Chicken breast ¼ cup mozzarella cheese 2 tbsp cream cheese Tortillas Non-stick cooking spray Directions: Shred chicken breast into bowl Add mozzarella cheese and cream cheese. Mix together Warm tortilla in air fryer Roll mix into the tortilla. Cut in half if air fryer is smaller Spray air fryer pan and taquito with cooking spray and load into air fryer Cook at 350 degrees F for 8 to 10 minutes.

Gluten Free Chocolate Cake Donuts Recipe

These donuts are perfect for breakfast! They’re vegan and gluten-free so everyone can enjoy them. Since these donuts are baked instead of fried, you will need a donut pan. These are best eaten the same day they’re made, so make sure to have a big appetite. The donuts have a light texture and are glazed with a punch of chocolate flavor. Prep time: 20 mins Cook time: 10 mins Cooling: 25 mins Total time: 55 mins Servings: 10 donuts Ingredients: For the donuts: 1 tablespoon flax meal 1 1/2 cup plus 1 tablespoon (215g) gluten-free flour blend 1/2 cup (100g) granulated sugar 1/3 cup plus 1 tablespoon (30g) unsweetened dairy-free cocoa powder 1 teaspoon baking powder 1/2 teaspoon baking soda 1/4 teaspoon cream of tartar 1/2 teaspoon kosher salt 1/4 cup coconut oil, melted and liquid, but slightly cooled 1 teaspoon vanilla extract 1 tablespoon apple cider vinegar 3/4 cup plus 2 tablespoons warm non-dairy milk, such as soy milk or oat milk For the glaze: 1 cup (115g) powdered sugar (make sure it’s gluten-free) 3 tablespoons unsweetened dairy-free cocoa powder 2 to 4 tablespoons non-dairy milk, such as soy milk or oat milk Rainbow sprinkles, to top Directions: Prepare the flax “egg”: Combine the flax meal with 2 1/2 tablespoons of water in a small bowl. Let stand for 7 to 10 minutes to thicken. (This will be used as an egg replacer in this recipe.) Preheat the oven and prepare pans: Preheat the oven to 375°F. Lightly spray two full-sized donut baking pans with nonstick cooking spray, and set them aside. Mix dry ingredients: In a medium bowl, whisk together the flour, sugar, cocoa powder, baking powder, baking soda, cream of tartar, and salt until smooth. Mix wet ingredients: In a separate medium bowl, whisk together the oil, flax egg, vanilla, vinegar, and non-dairy milk until smooth. Combine dry and wet ingredients: Pour the dry ingredients into the wet ingredients and stir to combine, making sure all the dry bits are incorporated. Fill the donut pan: Use a kitchen spoon to scoop the dough into the wells of the donut pan, stopping when each is almost full (these donuts don’t rise a ton, so fill the indents almost to the top). The dough will be thick and sticky, so use your fingers or the back of a spoon to gently press it into the indentation. Bake: Bake donuts for 9 to 10 minutes, or until they spring back to the touch and a toothpick inserted into the center comes out clean. Cool: Allow donuts to cool in pan for 5 minutes, then remove from the pan and transfer to a wire rack to cool completely. Make the glaze: In a small bowl, whisk together the powdered sugar and cocoa powder. Be sure there aren’t any clumps, and if there are, sift the ingredients so your glaze will be smooth. Add 2 tablespoons of non-dairy milk and whisk well. You’re looking for a smooth, pourable glaze. If your glaze is too thick, add additional non-dairy milk one tablespoon at a time until you reach the desired consistency. Glaze the donuts: Cut a piece of parchment paper the same size (or slightly larger) as your wire cooling rack and place under your cooling rack to catch drips. Dip one side of each doughnut in the glaze and place glaze-side up on the cooling rack. Allow any excess to drip off. Sprinkle and serve: While the glaze is still wet, sprinkle the tops of each donut with colorful sprinkles. Let the donuts set at room temperature for at least 25 minutes to allow the glaze to firm up. Serve immediately, or cover leftovers and store at room temperature for up to 1 day. Source: Simply Recipes

Decluttering Tips for An Organized Kitchen

Paying a professional organizer is expensive, but having a tidy kitchen is the key to achieving a picture perfect finish. Here are a few tips professional organizers offer their clients when it comes to decluttering a kitchen. Apply these to your home to keep your kitchen in pristine shape year-round! Sort Through Items. The most common issue is an excess of items. In a kitchen, all sorts of items can pile up such as food, dish sets, and utensils. The challenge is to sort through everything and decide whether it should be kept, tossed or donated. Always check for expired food as this is an obvious item to get rid of. Don’t forget to review all your spices too! Pull out all the rarely used appliances to see if they’re still working. Relocate Items. Often, a kitchen can be a landing ground for many items that don’t belong in a kitchen. Go through these items to see if they can be relocated to another part of your home. If it needs to absolutely stay, designate a single neat and tidy drawer to house all these items. The One-In-One-Out-Rule. This rule is a pro tip you can apply to further declutter your kitchen. Whenever you purchase a new item, throw an old item away. It will help keep your kitchen organized while preventing a pile up. Labels. Once everything has been sorted, edited and organized, it’s time to properly label everything. This will help you keep track of what goes where and make sure items don’t end up in the wrong spot again. Source: Apartment Therapy

TikTok Wrap Hack Quesadilla Recipe

Try this TikTok Quesadilla trend! The delicious stacked layers of cheesy goodness makes for a fun snack. You can easily prepare these in an air fryer, so no burning yourself trying to melt the cheese! Add your favorite spicy sauce or opt for spicy mayo instead. Ingredients: Chicken Spicy mayo or hot sauce Mozzarella cheese Non-stick cooking spray Directions: From the center make one cut to the edge of the tortilla Add chicken to one of the four corners Add spicy mayo or hot sauce to another and fill the final two with cheese Fold each corner on itself until you get a triangle Spray air fryer pan with cooking spray and load the quesadilla Cook at 350 degrees F for 5 minutes. Flip and repeat.