Year: 2021

Philly Cheesesteak Recipe

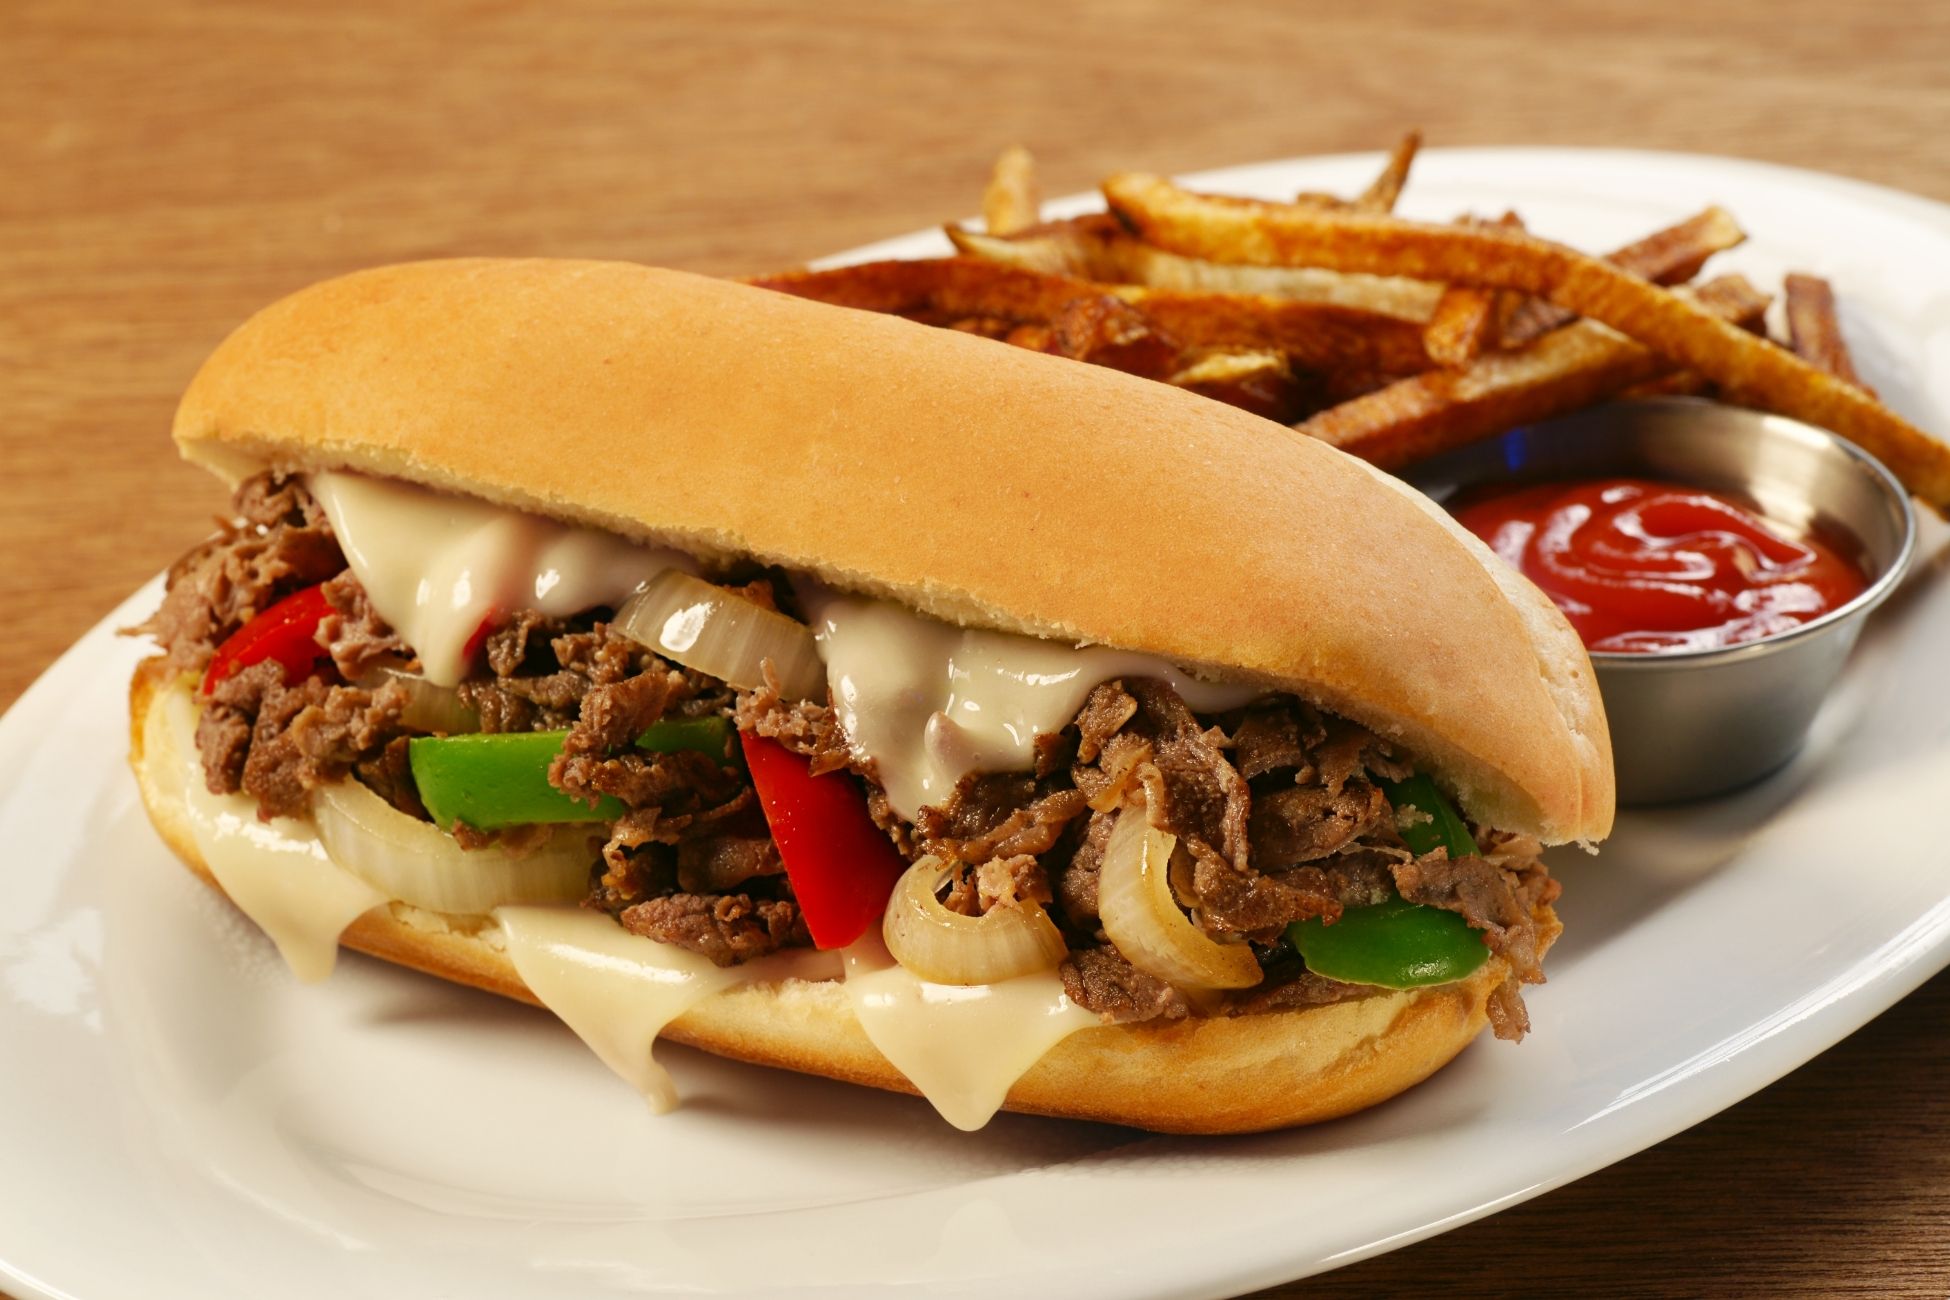
Preparing a classic Philly cheesesteak can be a daunting task. After all, so many people are opinionated on the correct way to make one! It ultimately consists of thinly shaved steak, cheese, and caramelized onions. This recipe will transport you right to Philadelphia! Feel free to experiment and substitute as desired. Prep time: 10 minsCook time: 20 minsTotal time: 30 minsServings: 2 servings Ingredients: 10-12 ounces ribeye steak 1/2 teaspoon kosher salt 1/2 teaspoon black pepper 2 tablespoons olive oil, divided 1/2 sweet onion, sliced 1/2 green bell pepper, sliced 1/2 red bell pepper, sliced 2 ounces (3 slices) provolone cheese 2 hoagie rolls, toasted 1/4 cup Cheez Whiz, warmed Fresh thyme, for garnish, optional Directions: Freeze and slice the steak: Place steak in the freezer on a sheet pan for about 10 minutes so it gets very cold but not frozen through.Trim off any large pieces of fat normally around the edges of the steak, but some veins of fat in the middle of the steak are good. Slice the steak as thin as possible with a sharp knife. You won’t be able to get it paper thin without a meat slicer, but think of thick deli cut meat. Season steak with salt and pepper. Cook the onions and peppers: In a large skillet set over medium heat, add 1 tablespoon of olive oil along with sliced onions and peppers. Season with 1/4 teaspoon salt and pepper. Cook, stirring occasionally, until the onions and peppers have softened and start to caramelize around the edges, 12 to 15 minutes. Don’t rush them! Cook the steak: Heat a griddle or large skillet over medium-high heat. Add the remaining 1 tablespoon of olive oil and the sliced steak. Spread out the steak in the skillet in a thin even layer so it covers as much surface area as possible. Cook for a minute or two and then stir to finish cooking the steak. It might need another minute or two, but it will cook very quickly. Finishing the cheesesteak: Turn heat down to low on the steak and add the peppers and onions to the steak mixture and stir to combine. Add the provolone slices to the top of the steak mixture and let the cheese melt. Stir to combine, once the cheese has melted. Assemble the cheesesteaks and serve: Evenly scoop the cheesesteak mixture into the toasted hoagie rolls. The hoagie rolls should be packed! Optionally, drizzle the cheesesteaks with warm Cheez Whiz for maximum cheesiness. Sprinkle fresh thyme over top and serve. Source: Simply Recipes

Air Fried Double Decker S’mores

S’mores but with a twist! You can never go wrong with more. Prepare this delicious double decker s’more right in your air fryer! You can have these ready in no time for a weekend night in! Ingredients: Graham crackers Chocolate Marshmallows Directions: Place 2 Graham crackers in air fryer pan and layer chocolate and marshmallows Air fry at 300 degrees F for 5 to 7 minutes Add another graham cracker on top and stack the two Enjoy!

Tips for Your Cast Iron Skillet

Purchasing a new cast iron skillet poses its challenges especially when you’re unfamiliar with seasoning and how to care for it. These skillets are great for their versatility and durability. Here are two tips you should definitely know about your cast iron skillet. Cleaning Is Easier Than You Think Soaking dishes is an effective way to remove buildup but the same doesn’t apply to cast iron skillets. Leaving these submerged in water for a long period of time can cause them to rust. However, you can still use dish soap and a brush or sponge to clean cast iron, just not as much as you would use on your other dishes. Cast iron is naturally resilient so it can withstand a good scrubbing. A more simple and effective way to clean cast iron is with salt. Pour big flakes of salt on the pan and use a damp towel to scrub away. The salt is abrasive enough to remove burned-on buildup. Seasoning Your Skillet Seasoning cast iron can be a bit intimidating. It’s the process of adding oil and baking the skillet to create a seal over the surface. This helps prevent rust over time and keep the cast iron in the best shape. Surprisingly, most cast iron pans come pre-seasoned (check with the manufacturer). Every time you cook and add layers of baked-on fat and oil, you’ll naturally add a finish to your skillet. You’ll still need to season it every so often, but not as often as you may think! Source: the Kitchn

Easy Cheese Spinach Frittata Recipe

Take a new approach to brunch with this easy and versatile Italian egg dish. The frittata is left simple and allows each ingredient to shine. Highlight the spinach with sweet shallots, sharp cheddar and nutty parmesan. You can serve it at any temperature any time of the day. If you’re serving it for brunch, pair it with a fruit salad and focaccia. Learn how to prepare this dish below. Prep time: 10 minsCook time: 27 minutes to 30 minutesYield: Serves 4 to 6 Ingredients: 1 medium shallot 3 ounces sharp cheddar cheese 1/2 ounce Parmesan cheese 8 large eggs 1/3 cup whole or 2% milk 1/2 teaspoon kosher salt 1/4 teaspoon freshly ground black pepper 2 tablespoons olive oil 5 ounces baby spinach (about 5 packed cups) Equipment: Box grater Chef’s knife and cutting board Large mixing bowl Whisk 10-inch cast iron or oven-safe nonstick skillet Rubber spatula or wooden spoon Directions: Preheat the oven. Arrange a rack in the top third of the oven and heat the oven to 350°F. Prepare the shallot and cheeses. Dice 1 medium shallot. Grate 3 ounces sharp cheddar cheese on the large holes of a box grater (about 3/4 cup). Finely grate 1/2 ounce Parmesan cheese on the small holes of a box grater (about 1/4 packed cup). Whisk the eggs and dairy together. Place 8 large eggs in a large bowl and whisk until blended. Add 1/3 cup whole or 2% milk, cheddar cheese, 1/2 teaspoon kosher salt, and 1/4 teaspoon black pepper. Whisk to combine. Sauté the shallot and spinach. Heat 2 tablespoons of olive oil in a 10-inch cast iron or oven-safe nonstick skillet over medium heat until shimmering. Add the shallot and sauté until softened, about 3 minutes. Add 5 ounces baby spinach a handful at a time, and sauté until just wilted, about 2 minutes. Pour in the egg mixture. Spread the vegetables into an even layer, then pour the egg mixture over the top. Tilt the pan to make sure the eggs settle evenly over all the vegetables. Sprinkle with the Parmesan. Cook undisturbed until the eggs at the edges of the pan begin to set, about 2 minutes. Bake the frittata. Transfer the skillet to the oven and bake until the eggs are just set, 18 to 20 minutes. To check, cut a small slit in the center of the frittata. If raw eggs run into the cut, bake for another minute or two. If not, then the eggs are set. Broil the frittata. Heat the broiler to HIGH. Broil until the top of the frittata is lightly golden-brown in spots, 2 to 3 minutes. Let cool in the pan for 5 minutes, then slice into wedges and serve warm or at room temperature. Source: the Kitchn

Air Fried Crack Bread

Prepare this delicious crack bread with just an air fryer! You’ll surely achieve all the flavor packed in a Ciabatta bread. You can have it ready in just about 10 minutes! Ingredients: Ciabatta bread Chives Garlic salt 1 tbsp. Butter 2 tbsp. cream cheese Italian seasoning Garlic salt Mozzarella cheese Directions: Use a knife and cut across the bread in a criss cross fashion Mix butter, cream cheese, chives, garlic salt, Italian seasoning in a bowl Use a brush and pack mix into bread Sprinkle with Italian seasoning and mozzarella cheese Cook at 375 degrees F for 7 to 8 minutes.

Frozen Veggies and Fruits You Should Be Getting Year Round

Stocking up on frozen produce is one of the best ways to stick to a budget. There are myths that fresh is always better than frozen, but in fact sometimes the opposite is true! Frozen foods are picked and frozen when they’re ripe, sometimes between eight to 12 hours. This ensures all the valuable nutrients are locked in. Nutrients in fresh produce are lost during harvesting, packaging or while sitting on shelves in a store for weeks at a time. Frozen produce is usually less expensive and will save you money in the long-run. Here are a few must-buy frozen items. Dark Sweet Cherries. Fresh cherries come with a hefty premium price. Frozen cherries are rich in antioxidants, fiber and nutrients making them perfect for smoothies and healthy desserts. Edamame. Edamame is a great source of plant-based protein and fiber. They’re very affordable to buy in frozen form, and make for an easy snack. Let them thaw on the counter before preparing. Broccoli. Without a doubt much easier to prepare when frozen, broccoli is a super-healthy veggie. You’ll only want to opt for fresh broccoli when you’d like to grill it. Green Beans. Frozen green beans are consistently more flavorful and have a better texture. They’re also easier to find! Packed with fiber, vitamin C, and antioxidants, they’re another great source of plant-based protein. Pre-Made Smoothie Packs. We all get busy and pre-made packs are the perfect solution to making smoothies. They have all the healthiest fruits and veggies in perfect portions. You’ll pay a little more upfront but nothing beats the convenience. Mixed Vegetable Blends. This is a no-brainer for essential frozen food purchases. These are a staple in meal prep. Steam them in soups, stews, curries and even casseroles. Change up the varieties you buy and purchase them in bulk to save even more. Source: the Kitchn

Cheddar Cheese Puffs Recipe

Treat yourself to light and savory cheese puffs with cheddar cheese and thyme. You’ll first need to make a pâte a choux dough. It’s surprisingly easy to make and with the cheddar cheese will elevate the flavor of the cheese puffs. You can always experiment and add your own ingredients such as crumbled bacon, sage or rosemary. Prep time: 5 minsCook time: 45 minsTotal time: 50 minsServings: 24 servings Ingredients: 1 stick butter (8 Tbsp or 4 ounces) 1 cup water 1/2 teaspoon salt 1 cup all purpose flour 4 large eggs 1 cup (4 ounces) grated sharp cheddar cheese 2 teaspoons chopped fresh thyme (or rosemary) Freshly ground pepper Directions: Boil the water, butter, salt: In a medium sized saucepan, add the water, butter, and salt, and bring to a boil over high heat. Add the flour and stir: Reduce the heat to medium and add the flour all at once. Stir rapidly. The mixture will form a dough ball that will pull away from the sides of the pan.It helps to use a wooden spoon to stir as the dough will be rather thick. Continue to cook for a couple minutes. Let cool a couple minutes, then add eggs, one at a time: Remove the pan from the heat and let cool for a couple of minutes. Stir so that the dough cools more evenly. You want the dough to be warm, just not so hot that when you start adding eggs they cook as they hit the dough.Add the eggs one at a time, stirring after each addition until the eggs are incorporated into the dough. (Do this part in a mixer if you want, or by hand with a wooden spoon.) The dough should become rather creamy. Stir in the grated cheese, thyme, and a few grinds of pepper. Scoop spoonfuls onto lined baking sheet: Heat oven to 425°F. Spoon out small balls (about a heaping tablespoon) of the dough onto a silicone or parchment lined baking sheet, with at least an inch separating the spoonfuls. Bake: Place in oven and cook for 10 minutes at 425°F. Lower heat to 350°F and cook for another 15-20 minutes, until puffed up and lightly golden. Source: Simply Recipes

Garlic Chive Cream Cheese Wontons

Prepare a delicious appetizer for dinner with just an air fryer! These garlic chive cream cheese wontons are quick and easy with readily accessible ingredients. You can have it ready in just about 10 minutes. Ingredients: Cream cheese Chives Garlic salt Wonton wraps Water Non-stick cooking spray Directions: Mix cream cheese, chives and garlic salt in a bowl Put one and a half teaspoon of the mix at the center of wonton wraps Wet the edges with water, fold and press to seal Spray cooking spray on the pan and sealed wontons Cook at 375 degrees F for 7 minutes. Flip and cook for another 2 to 3 minutes

Breaking Down Dishwasher Detergent Compartments

You may be looking at your dishwasher, more specifically the detergent compartments and asking yourself what all those mean. Let your dishwasher take the load of the work by utilizing these compartments to their maximum potential. Your owner’s manual will be the most useful for model-specific practices. You can also find many manuals online in their PDF formats. If you’re still looking for a guide to fill the gaps, look no further! Here’s what dishwasher compartments mean, and how you should use them. (From left to right as pictured above) Main Wash Compartment. This is the main compartment where you’ll always be using when running the dishwasher. Many kinds of detergents can go here such as powder, gel and pods. Even if you use a pod, it should go into this compartment and not be tossed into the dishwasher as this will make it dissolve too quickly. Be sure to follow the recommended detergent amount, often times people use too much! Pre-Rinse Compartment. The smaller compartment usually located with the main wash compartment is there for a reason, even if most people don’t use it. The pre-rinse cup is meant to hold extra detergent if you feel the load will require some extra power on greasy pots and pans. It’ll add a bonus cleaning action to the pre-wash cycle of your dishwasher. Rinse Aid Compartment. Not often used, but should be! The Rinse aid helps break the surface tension of the water that rests on your dishes after they’re washed. The water will in turn slide off easily. It’ll help dishes dry faster and prevent water spots on your dishes. This compartment will hold more product than you actually need for a single cycle. Fill it up and refill once it runs out. There is usually an indicator to let you know it’s getting low. Source: the Kitchn

Cherry Clafoutis Recipe

Among one of the easier desserts to make is classic French clafoutis. It’s a custard with enough structure to support a lot of fruit. Try this recipe if you’re looking for a dessert with little work and plenty of payoff. You can create this delicious treat with just basic ingredients like eggs, sugar, flour and fruit! Prep time: 15 minsCook time: 40 minsTotal time: 55 minsServings: 6 servings Ingredients: 2 cups of fresh sweet cherries, pitted 2 tablespoons of blanched slivered almonds 3 eggs 1/2 cup of sugar (can reduce to 1/4 cup) 1 tablespoon of brown sugar 1/2 cup of all-purpose flour 1/8 teaspoon of salt 1 cup of milk (2% or whole milk) 3/4 teaspoon of almond extract (can sub 2 teaspoons of Amaretto) 1 1/2 teaspoons of vanilla extract Powdered sugar for dusting Directions: Butter and flour baking dish, scatter with cherries and slivered almonds: Preheat the oven to 350°F. Butter and lightly flour a 9X9 or 10X7 baking dish. Scatter the cherries and slivered almonds over the bottom of the dish. Make batter with eggs, sugar, salt, and flour: Whisk the eggs and sugars together until smooth. Whisk in the salt and flour until smooth. Add the milk, almond extract, and vanilla extract: Whisk until smooth. Pour batter into the baking dish over the cherries and slivered almonds. Bake: Bake at 350°F for 35-45 minutes or until lightly browned and a tester inserted into the center comes out clean. Check about halfway through the baking and if the top is getting well browned tent it loosely with aluminum foil. Remove from oven to cool: When you pull it put of the oven it will wiggle a bit which is normal. Place on a wire rack to cool. The clafoutis will have puffed up quite a bit and will deflate while cooling. Dust with powdered sugar: When cool dust the clafoutis with powdered sugar. Serve. Source: Simply Recipes