Month: February 2022

Cosmo Gives Back with Habitat for Humanity

Here at Cosmo our mission is to craft a happy home with a happy kitchen. We are driven to make luxury appliances accessible to all while turning dream kitchens into realities. With Habitat for Humanity, that mission can reach more families. Habitat for Humanity is a nonprofit organization founded in 1976 that “helps families build and improve places to call home”. Through various programs including affordable housing, neighborhood revitalization and disaster response, Habitat for Humanity works around the world in more than 70 countries to better lives for families and their children. Their vision “is of a world where everyone has a decent place to live”. We aim to align with this mission by donating our appliances to communities in need. Our recent donation is just one of many that we have planned with Habitat for Humanity. We hope our appliances can offer an opportunity to inspire people to come together and create unforgettable moments. Stay informed with other ways Cosmo is helping communities by checking back for more updates in the future! Learn more about Habitat for Humanity here. “A better home starts with Cosmo.”

Sherry Potatoes Recipe

A quick and effortless recipe for delicious potatoes. These are baked with sherry and butter with a generous salting and a little bit of parsley. Pop these in the oven and have them ready for tonight’s dinner in no time. Prep time: 10 minsCook time: 35 minsTotal time: 45 minsServings: 4 servings Ingredients 1 pound russet or yukon gold potatoes, scrubbed clean, sliced into 1/4-inch slices 1/4 cup butter (1/2 a stick), melted 1/4 cup dry sherry Salt Freshly ground black pepper 1 tablespoon chopped fresh parsley Directions Preheat oven to 375°F Prepare potato slices in baking dish: Arrange potato slices in layers in a gratin pan or baking pan, sprinkling salt and pepper over each layer. Pour sherry over the potatoes. Pour the melted butter over the potatoes. Make sure the potatoes are well coated. Bake: Bake at 375°F uncovered for 30-40 minutes or until potatoes are cooked, but not mushy, and they are slightly browned on top.Remove from oven, sprinkle with chopped fresh parsley to serve. Source: Simply Recipes

Chicken Stuffed with Pepperoni & Mozzarella

Create a new and delicious meal with this recipe. A chicken stuffed with mozzarella and pepperoni for a perfect bite sized snack. You’ll only need to season and add these ingredients inside, let the air fryer do all the work for you. Serve with a side of marinara for dipping! Try this out for tonight’s dinner. Ingredients: Chicken Breast Garlic Salt Chili Powder Italian Seasoning Chili Powder Mozzarella Cheese Pepperoni Marinara Sauce (to serve) Non-stick Cooking Spray Directions: Cut a pocket into the chicken breast. Oil and season with garlic salt, chili powder, and Italian seasoning Stuff with mozzarella cheese and pepperonis Spray air fryer pan with non-stick spray. Load the chicken and air fry at 365­°F for 18 to 20 minutes Serve with marinara sauce and enjoy! Shop Our Air Fryers Air Fryer Giveaway

Grapefruit Margarita Recipe

A refreshing and sweet margarita with a bit of tang. This grapefruit margarita is a bit juicier than a standard margarita without any orange liqueur. You’ll end up with a more balanced margarita, allowing the grapefruit to shine. Prep time: 5 minsTotal time: 5 minsServings: 2 servings Ingredients 4 ounces silver tequila 4 ounces freshly squeezed grapefruit juice (from one grapefruit) 2 ounces freshly squeezed lime juice (from two limes) 1 1/2 ounces simple syrup For garnish Grapefruit slices Kosher salt Directions Juice the grapefruit: Place a fine mesh strainer over a small bowl or measuring cup. Squeeze the grapefruit over the fine mesh strainer to release all the juice and catch any pulp or seeds. You should have 4 ounces of squeezed grapefruit juice. Rim cocktail glass with salt: Pour the salt onto a small plate or bowl. Take your cocktail glasses and rub the rim of it with a grapefruit slice. Dip the glasses into the salt to coat the rim. Make the cocktail and serve: In a shaker filled 2/3 with ice, pour in the silver tequila, grapefruit juice, lime juice, and simple syrup. Shake for 20 seconds until chilled, then strain into the prepared glasses. Garnish with a grapefruit slice and serve. Source: Simply Recipes

How to Clean Electric Coil Burners

Electric stoves with coil heating elements can get soiled overtime with food spills. If left unattended, these can create unpleasant smoke, smells or even flame when the stove is operated. As with any other appliance, start with your user manual to find the appropriate cleaning methods. Remove the completely cooled burners. Most burners will have two prongs that unplug from socket fittings on the stove. You may need to squeeze the prongs together to loosen mounting collars in order to pull them free. Be careful when unplugging the coil as bending the prongs may ruin them. Use a cleaning cloth and a mixture of mild dish soap and water to remove any food residue. Since the heat from the coils will cook off most residue, this step is usually all that is needed. Don’t submerge the coils in water as this may ruin the electrical connections. If burnt-on food persists, try making a baking soda and water paste. Use it to gently scrub residue off the electric heater coil. You can let the paste sit on the coil for up to 20 minutes before scrubbing for tough stains. Rinse off the paste thoroughly afterwards. Clean drip pans at this point in the process. Dump out any charred remnants and wipe down the pans. Replace once dried. Carefully plug the prongs back into their sockets. Careful not to bend or damage the prongs during this process. For regular maintenance, simply wipe down the heater coils whenever you wipe down the stove during routine cleaning. Source: the Spruce

Red Velvet Cake Recipe

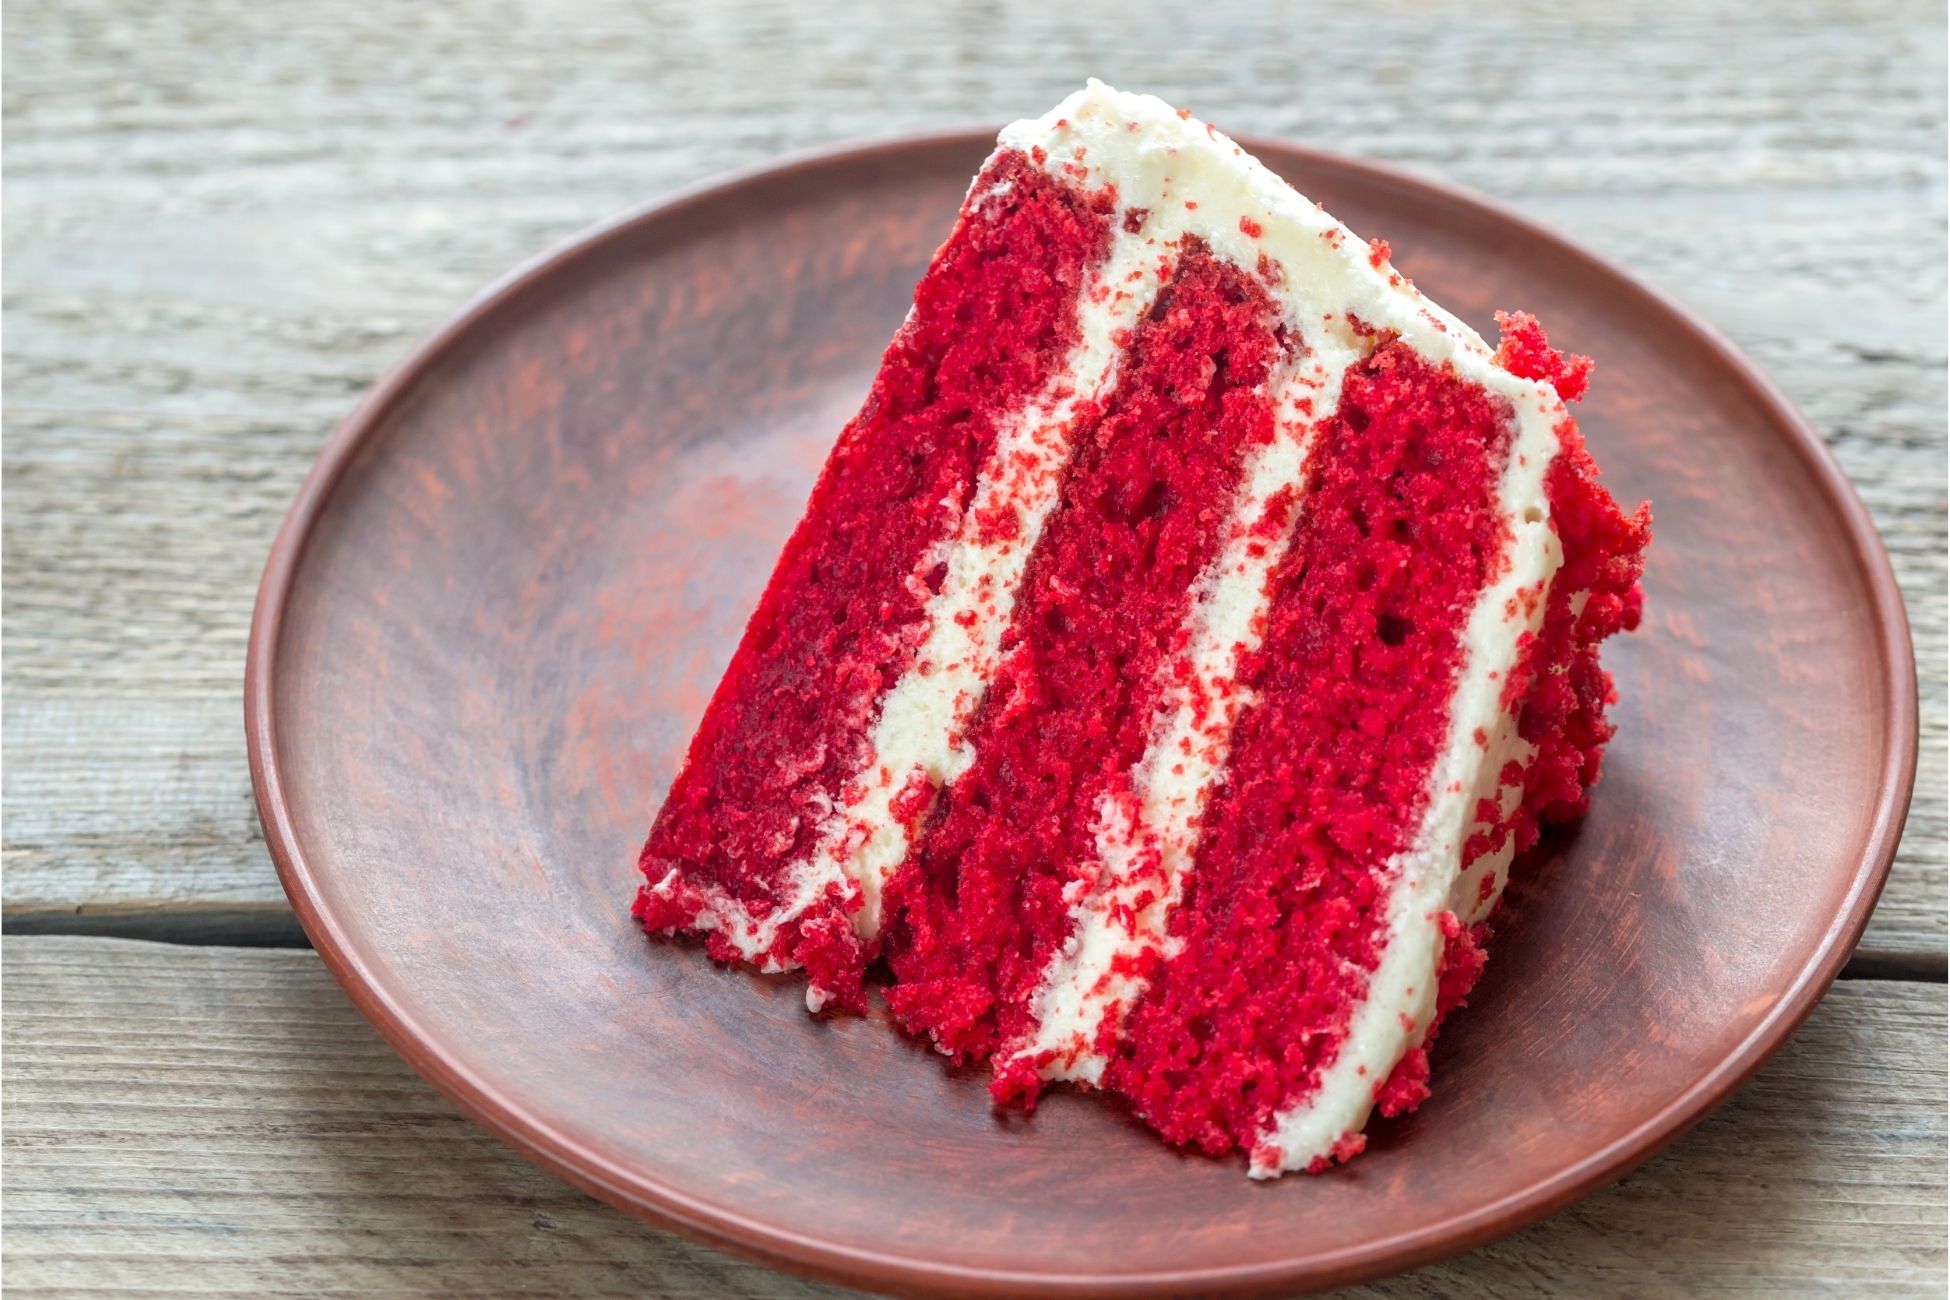
An all time classic, red velvet has its own characteristic flavor because of the tart buttermilk and vinegar. It’s an eye-catching cake with subtle chocolate and vanilla notes for a pleasant tanginess. Red velvet cake is perfect for special occasions and can be prepared in a couple hours. When frosting, make sure all the cakes have cooled completely or else you’ll risk melting the frosting. Try using an offset spatula for the most control when spreading frosting for a smooth, straight side. Prep time: 90 minsCook time: 35 minsTotal time: 2 hrs 5 minsServings: 16 servingsYield: 1 (8-inch) two-layered cake Ingredients For the red velvet cake 2 2/3 (320g) cups cake flour 3 tablespoons (16g) unsweetened cocoa powder 1 teaspoon baking soda 1/2 teaspoon kosher salt 1 cup (240ml) buttermilk, at room temperature 1 tablespoon distilled white vinegar 2 teaspoons vanilla extract 1 tablespoon red gel food coloring 1/2 cup (113g) unsalted butter, softened 3/4 cup (180ml) vegetable oil 1 1/2 cups (300g) granulated sugar 2 large eggs, at room temperature For the cream cheese frosting 2 (8-ounce) packages full-fat cream cheese, softened 1/2 cup (113g) unsalted butter, softened 5 cups (568g) powdered sugar 1 tablespoon vanilla extract Special Equipment Offset spatula 2 (10-inch) cardboard cake round 2 (8-inch) cake pans Directions Preheat the oven: Preheat the oven to 350°F. Prepare the pans: Grease two 8-inch round cake pans with butter. Line the pans with parchment paper and grease the parchment. Dust the bottom and sides of the pans with flour and tap out the excess. Sift the dry ingredients: In a medium bowl, sift together the flour, cocoa powder, baking soda, and salt. If you don’t have a sifter, whisk the ingredients together instead. Cake flour and cocoa powder tend to clump, and sifting helps ensure a smooth batter. Measure the wet ingredients: Measure the buttermilk in a liquid measuring cup or small bowl. Add the vinegar, vanilla extract, and red food coloring and whisk to combine. Beat the butter, oil, and sugar: In the bowl of a stand mixer fitted with the paddle attachment, or in a large mixing bowl with a hand mixer, beat the butter, vegetable oil, and granulated sugar on medium-high speed until very pale and fluffy, about 4 minutes. The mixture will have doubled or nearly tripled in volume. Add the eggs: Add the eggs, one at a time, beating until fully combined after each addition. Scrape down the bottoms and sides of the bowl with a rubber spatula. Combine the wet and the dry: Add one third of the flour mixture into the butter mixture and mix on low speed until incorporated. Pour in half of the buttermilk mixture and continue mixing on low speed just until combined. Continue alternating the dry and wet ingredients, making sure to end with the dry ingredients and mixing until just combined. Use a rubber spatula to scrape down the bowl in between additions to ensure the batter mixes evenly. Divide cake batter and bake the red velvet cake layers: Divide the batter evenly between the two prepared cake pans. Bake for 30 to 35 minutes, or until a toothpick inserted in the center of the cake comes out clean. The cake will have deepened in color to brick-red, the edges of the cake will have begun to pull away from the sides of the pan, and the cake should spring back when gently poked with your finger. Cool the cakes: Let the cakes cool in the pans for 15 minutes, then turn them out onto a wire rack to cool completely before frosting. Beat the cream cheese and butter for frosting: To make the frosting: In a stand mixer fitted with the paddle attachment, or in a large mixing bowl with a hand mixer, beat the cream cheese and butter on medium speed until smooth, about 2 minutes. Add the powdered sugar and vanilla: Add the powdered sugar and vanilla extract and continue beating on medium speed until smooth and creamy, about 2 minutes. The frosting will be much thicker than standard buttercream frosting.If the frosting seems too soft, place it in the refrigerator for 10 minutes to stiffen. If it still seems too runny, add more powdered sugar, 1/2 cup at a time, until you reach the desired consistency. Trim the red velvet cake layers: Depending on your cake pans, the red velvet cake layers may have domed while baking. It’s not a problem if they have. Use a large serrated knife to remove the domes. Optionally, you can save the trimmings to make crumbs to sprinkle on the cake. Assemble the cake: Place one of the cake layers right-side-up on a large plate or a 10-inch cardboard cake round. Use an offset spatula or a butter knife to spread a thick layer of frosting, 1/2 to 1 cup, evenly over the layer. Top with the remaining cake layer, placed up-side-down, so the top of the cake is smooth and flat. Check that the cake layers are centered and that the top of the cake is level. Gently adjust accordingly. Apply the crumb coat: Spread a generous amount of frosting over the top and sides of the cake using an offset spatula or the straight edge of a large butter knife. Use the spatula to spread the frosting into a thin, even layer. You should be able to see the cake through the frosting.This thin layer of frosting is called the crumb coat and helps catch any loose crumbs on the outside of the cake so that the final layer of frosting doesn’t have any bright red crumbs caught in it. Refrigerate the cake and frosting: Place the cake in the refrigerator for 30 minutes for the frosting to set. Cover and refrigerate the bowl of frosting. Frost the cake: Remove the cake and the bowl of frosting from the refrigerator. Stir the frosting a few times until smooth.Spread a generous amount of frosting over the top and sides of the cake as before,

Candied Bacon Roses Recipe

Valentine’s Day is upon us! Create a new and thoughtful treat with these candied bacon roses. It’s packed with all the flavor from the garlic salt, paprika, cinnamon and chili powder. To finish everything off, place the roses on a plastic bouquet to finish off the look. Everything’s prepared conveniently in an air fryer for an easy clean up afterwards. Ingredients: Garlic Salt Black Pepper Paprika Ground Cinnamon Chili Powder Bacon Non-stick Cooking Spray Directions: Toothpicks Plastic Flowers Directions: Mix the brown sugar, garlic salt, black pepper, paprika, ground cinnamon and chili powder in a bowl Coat the bacon and wrap into a pinwheel shape. Use toothpicks to hold its shape Spray air fryer pan with non-stick spray. Load the bacon and air fry at 400­°F for 10 to 13 minutes Place them on plastic flowers for decoration (don’t eat the plastic) Serve and enjoy! Shop Our Air Fryers Air Fryer Giveaway

The Technique For Better Brownies

Brownies typically fall into one of two categories, cakey or fudgy. If you’re looking to perfect a fudgy brownie, there’s one technique that makes the biggest difference and it doesn’t involve changing the ingredients or ratios. Rapping is an old-school baking technique that forces the air out of baked goods by lifting up the pan and dropping it during baking, causing the batter to deflate. For other baked goods such as cakes or muffins this would be the last thing you want. You’d lose all the structure for a cake. However for brownies, it removes tiny air pockets making it more dense, which gives a more fudgy texture.You only need to lift up the pan about two inches then let it drop against the oven rack. You don’t need to repeatedly bang or smack the brownies. It’s best to do this when the brownies are about half-cooked. You’ll end up with perfectly fudgy brownies! Source: the Kitchn

Cheese and Egg Biscuit Bake Recipe

Create a perfect breakfast biscuit in no time with this recipe. Feel free to customize and add your own favorite ingredients such as bacon or ham to the egg and cheese. When creating the slits on the dough, make sure you try to make them as even as you can so they overlap neatly. Ingredients: Pillsbury Grand Egg Cheese Non-stick Cooking Spray Directions: Flatten a Pillsbury Grand biscuit into a flat shape. Cut diagonal slits on each side Fill the center with egg and cheese Braid the biscuit flaps over each other to wrap Spray air fryer pan with non-stick spray. Load the biscuit and air fry at 350­°F for 10 minutes Serve and enjoy! Shop Our Air Fryers Air Fryer Giveaway

Choosing Between Open Shelves and Cabinets

Empty kitchen walls can be daunting. With the increased popularity for open shelving, you may be wondering what would best suit your kitchen. It all comes down to functionality and what your intentions are for your storage. Shelving is a great solution for a more compact profile. Typical full cabinetry will extend about 12 to 14 inches while an open shelf can work in 8 to 10 inches. If you’re looking at open shelving strictly for design aesthetic, then you may be better off with a cabinet. Shelving is best when used functionally. If you’re torn on the decision, cabinets with glass doors are a happy medium. You can still put items on display and prevent your kitchen from feeling closed in while maximizing storage. Try mixing the glass fronts with traditional doors so you don’t have to have everything on display. Source: Apartment Therapy