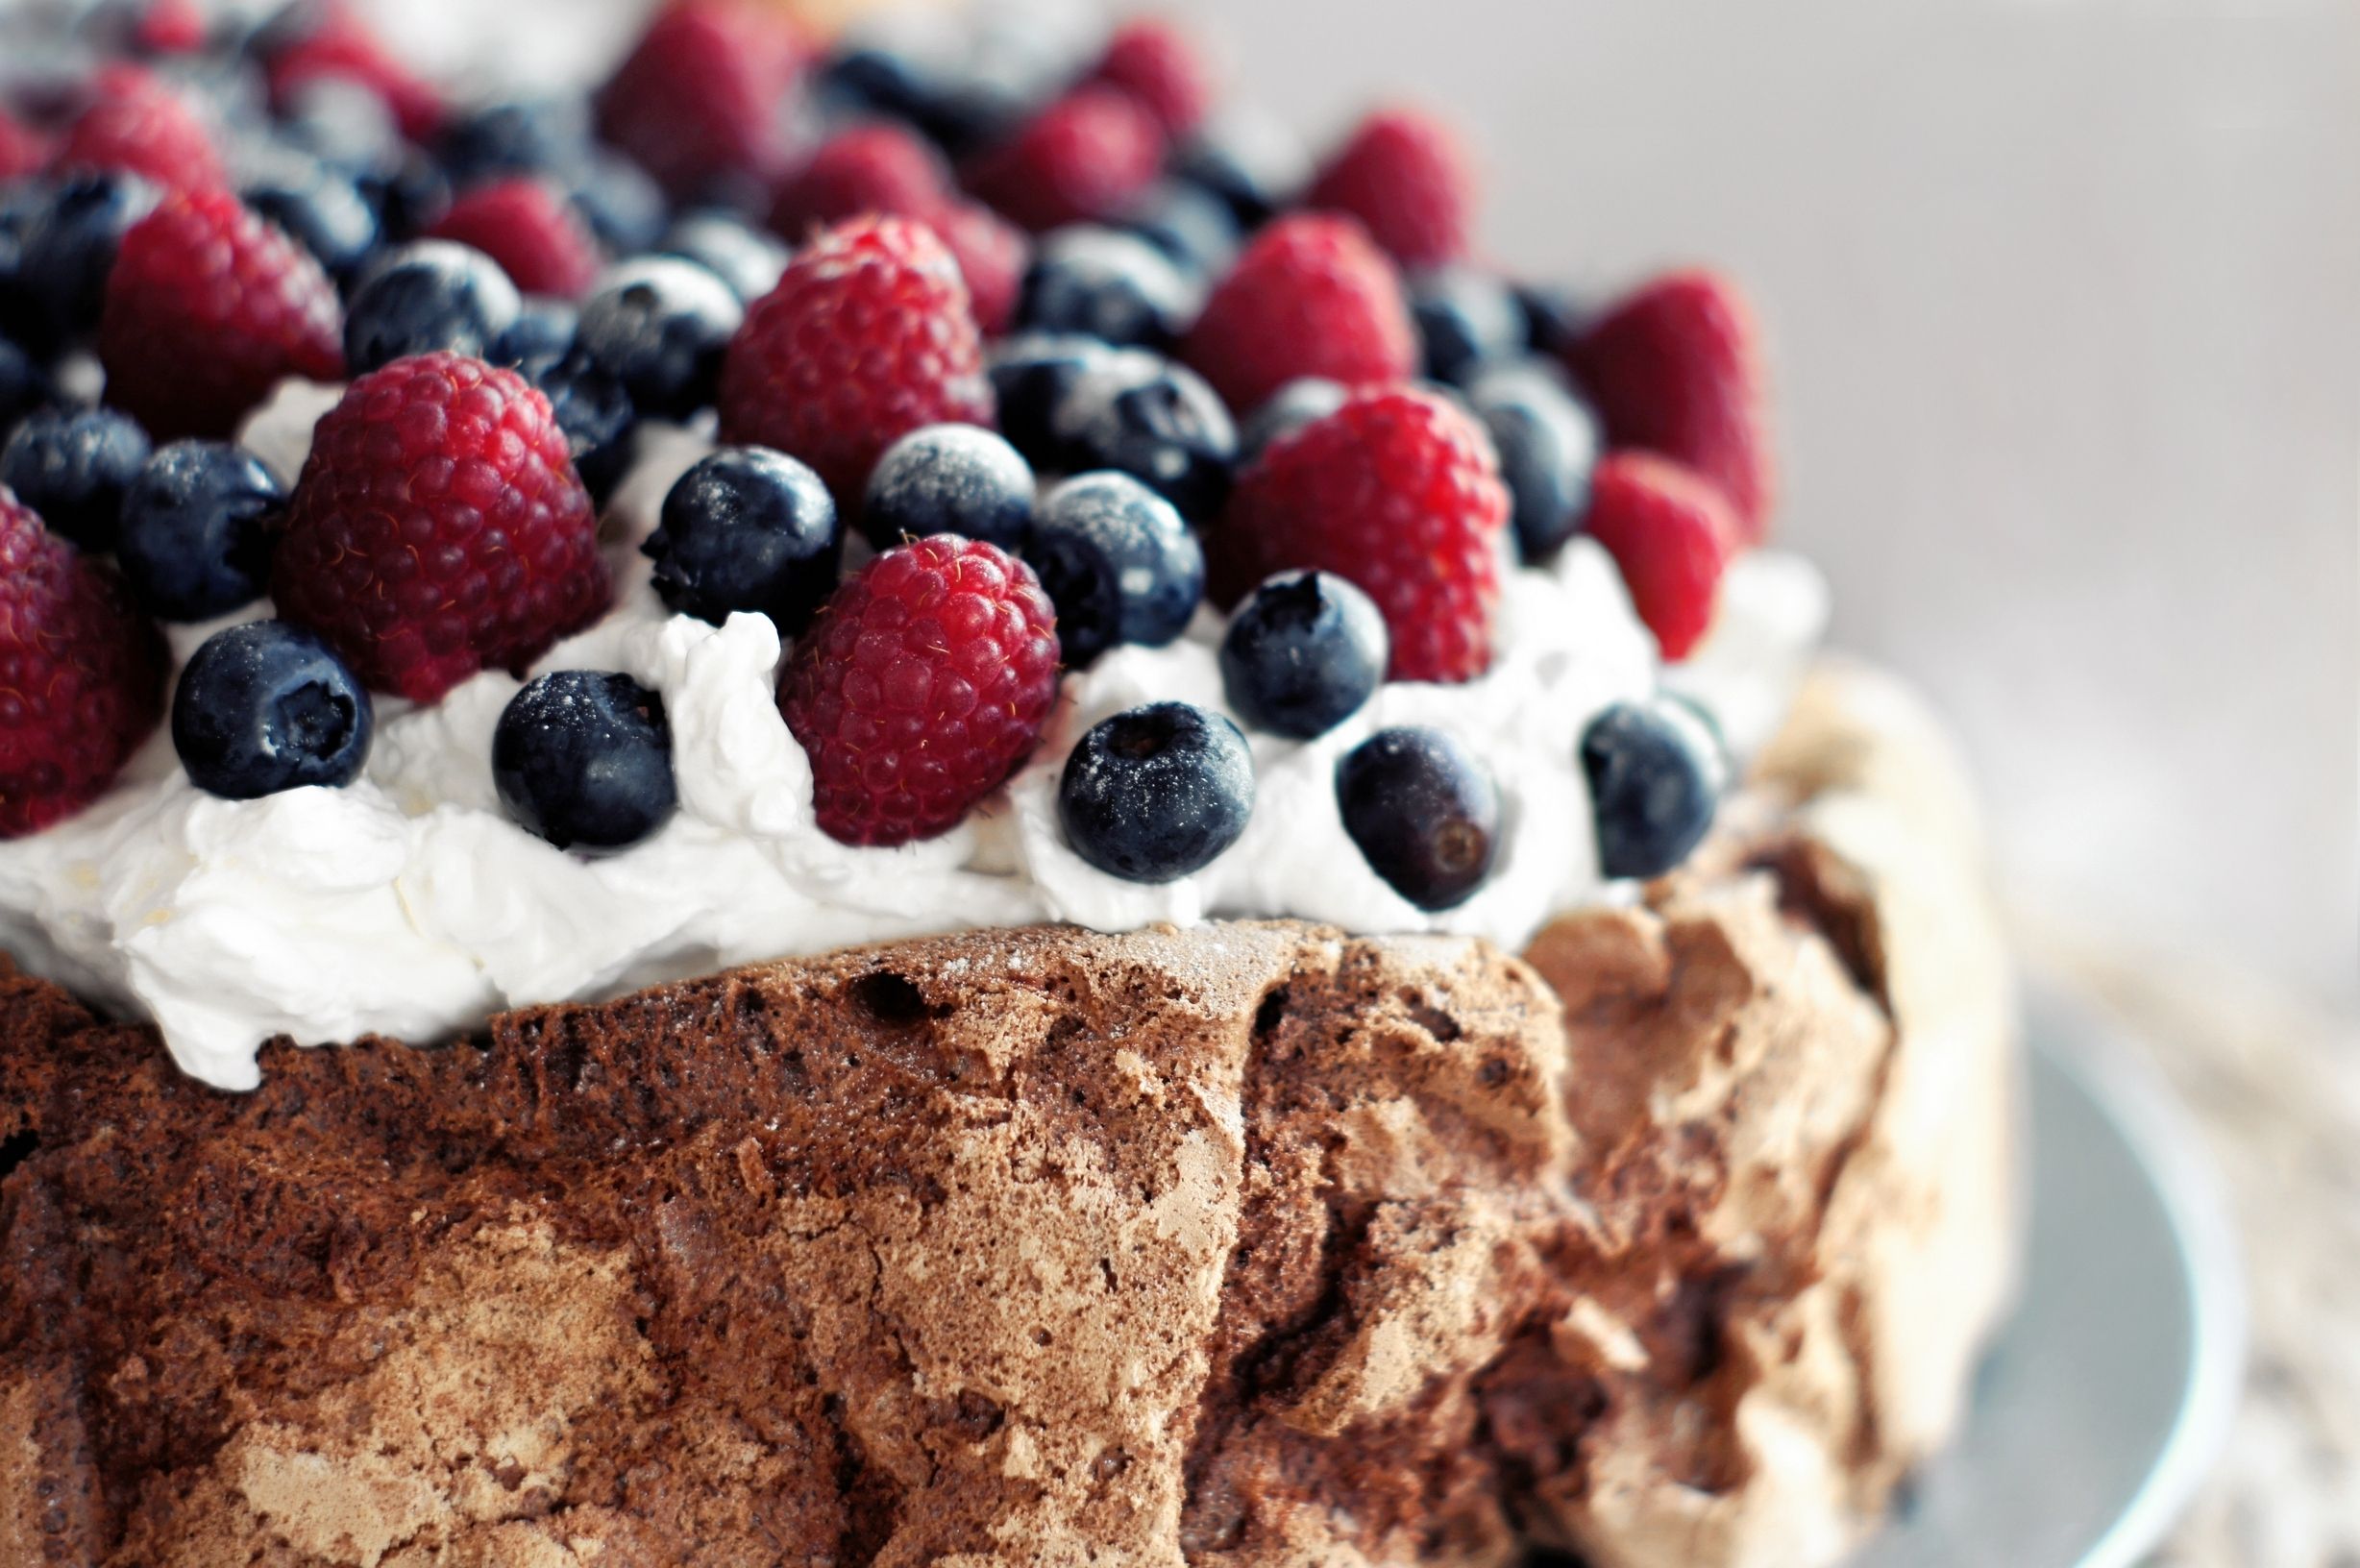
Recipes

Tips for Making Better Smoothies

Smoothies seem like they should be easy to pull off, but you may be wondering why yours don’t taste quite like the ones you get at your local juice bars. Here are a few ways to perfect your smoothie making skills for a delicious and vibrant smoothie every time. Frozen Foods. Don’t fall under the impression that frozen foods aren’t as nutritious for you. They’re easy to store, especially if they’re out of season. Keep smoothie ingredients on hand with this method. Try freezing your bananas next time, they taste like ice cream and have a super creamy texture when blended. Look at Your Blender. If you’re ending up with chunky and lumpy smoothies, it may be time to invest in a good blender. Blenders come at many price points with plenty of differing features. Some may have a more powerful motor but too noisy for a family home. Shop around for what’s best for you and your needs. Vegetables. Try incorporating at least one veggie when you can. Frozen cauliflower is easy since you won’t taste it and makes smoothies super creamy. Sweet potatoes, kale and spinach are all great vegetables to add into your next smoothie. Make It Effortless. Once you have your essentials covered, make smoothies to your liking. Try adding a fruit, a veggie and protein so you know you have all your bases covered. After that, do what tastes best to you. Maybe you want to add some protein powder or a new veggie to shake things up. The options are limitless! Source: Simply Recipes

Chicken and Cheese Air Fryer Dumplings

An easy dinner recipe with just a few ingredients. These dumplings combine chicken and cheese for the perfect filling on a Pillsbury biscuit. You’ll want to spread out the biscuit with a thicker edge to close later on. This recipe calls for mozzarella cheese but feel free to experiment with your own ingredients. Ingredients: Pillsbury Biscuit Chicken Mozzarella Cheese Non-stick Cooking Spray Directions: Spread out a Pillsbury biscuit with a pocket in the center Add the chicken and cheese, then close up the edges to form a ball Add non-stick cooking spray to the air fryer pan, then load the dumplings Air fry at 360­°F for 10 to 12 minutesServe and enjoy! Shop Our Air Fryers Air Fryer Giveaway

Cauliflower Nuggets Recipe

Make a delicious and healthy dish with these cauliflower nuggets. Be sure to use bite-sized cauliflower, chopping in half when necessary. The mixture of flour, milk, paprika and other seasonings add all the flavor to this recipe. Load these in your air fryer for a quick and easy clean up afterwards. Perfect for a weekday dinner! Ingredients: Cauliflower 3/4 Cup of Flour 3/4 Cup of Milk 1 Tsp. Paprika 2 Tsp. Garlic Powder 1 Tsp. Salt 2 Tbsp. Coconut Oil Non-stick Cooking Spray Directions: In a bowl mix the flour, milk, paprika, garlic powder, salt and coconut oil Add in the cauliflower and coat evenly Add non-stick cooking spray to the air fryer pan, then load the cauliflower Air fry at 400­°F for 15 minutes Serve and enjoy! Shop Our Air Fryers Air Fryer Giveaway

French Bread Pizza Recipe

Make pizza easier in an air fryer! This French bread variation couldn’t get easier with just a few ingredients. You’ll end up with a delicious pizza you can create in your air fryer for just a few minutes. Make this for tonight’s dinner! Ingredients: French Bread Mozzarella Cheese Pizza Sauce Pepperoni Directions: Cut the French bread in half, lengthwise On both sides add the pizza sauce, mozzarella cheese and pepperoni Load the pizza and air fry at 400­°F for 7 to 9 minutes Serve and enjoy! Shop Our Air Fryers Air Fryer Giveaway

S’mores Pastry Recipe

Create a delicious s’mores treat right in your air fryer. You only need a few common ingredients such as chocolate, marshmallows and a Pillsbury grand biscuit. When creating the slits on the dough, make sure you try to make them as even as you can so they overlap neatly. Prepare these for the weekend ahead! Ingredients: Pillsbury Grand Chocolate Marshmallows Cinnamon Graham Crackers Non-stick Cooking Spray Directions: Flatten a Pillsbury Grand biscuit into a flat shape and fill the center with chocolate and marshmallows Cut diagonal slits on each side of the ingredients and braid them over each other to wrap Top with more chocolate, cinnamon and crushed graham crackers Spray air fryer pan with non-stick spray. Load the pastry and air fry at 360­°F for 13 minutes Serve and enjoy! Shop Our Air Fryers Air Fryer Giveaway

Air Fryer Onions Rings Recipe

Perfect for a quick side dish or snack. The secret to this recipe is the combination of powdered buttermilk, onion powder, garlic powder and other spices, boosting the overall flavor. Try using vidalia onions as they are sweeter and milder than white or yellow onions. Look for onions that are as fresh and young as possible. Older onions will have a more potent flavor. These keep for up to five days. Yield: Serves 4 to 6Prep time: 30 minutesCook time: 36 minutes to 48 minutes Ingredients For the onion rings: 1 cup all-purpose flour 1 (1-ounce) packet ranch dressing and seasoning powder (2 tablespoons) 2 tablespoons kosher salt, divided, plus more for seasoning 2 teaspoons freshly ground black pepper, divided 4 large eggs 1/4 cup water 4 cups panko breadcrumbs 5 tablespoons olive oil 3 large Vidalia onions (12 to 16 ounces each) For the dip (optional): 1 cup sour cream 1 tablespoon ranch powder 1/4 bunch fresh dill 1 tablespoon water 1 tablespoon olive oil Pinch kosher salt Freshly ground black pepper Instructions Arrange a rack in the middle of the oven and heat the oven to 250ºF. Fit a wire rack in a rimmed baking sheet. Place 1 cup all-purpose flour, 1 (1-ounce) packet ranch powder (2 tablespoons), 1 tablespoon of the kosher salt, and 1 teaspoon of the black pepper in a shallow bowl or small rimmed baking sheet and stir with a fork to combine. Place 4 large eggs and 1/4 cup water in a second shallow bowl or rimmed baking sheet and whisk until well combined. Place 4 cups panko breadcrumbs in a third shallow bowl or rimmed baking sheet. Using your hands, crush up the breadcrumbs slightly to create a slightly finer crumb, which will adhere to the onion rings more easily. Add the remaining 1 tablespoon kosher salt and remaining 1 teaspoon black pepper and stir to combine. Drizzle with 5 tablespoons olive oil. Again, using your hands, rub the oil into the breadcrumbs, breaking up any lumps with your fingers and making sure all breadcrumbs are coated evenly. (You might be tempted to use a fork for this step, but it won’t be as effective as using your hands.) Peel and slice 3 large Vidalia onions crosswise into 1/2-inch-thick slices. Carefully separate the rings, setting aside only the large and medium rings. Use the small inner pieces for another recipe or caramelized onions! Heat an air fryer to 375ºF. Dredge and fry the onion rings in batches (enough to form two layers in the air fryer basket): Dredge the onion rings in the seasoned flour, shaking off the excess. Dip into egg mixture, thoroughly moistening the insides and outsides of the rings with your fingers. Return to the flour mixture, dredge again, and then back to the egg mixture. Transfer to the seasoned panko, and dredge, pressing the crumbs to the rings to properly adhere. Place the dredged rings in two layers in the air fryer basket, making sure the rings are not sitting within one another. Air fry until browned and crisp, 12 to 16 minutes, ignoring any potential prompts from your air fryer to shake its contents, which would only knock off breadcrumbs. Meanwhile, dredge the next batch of rings, stacking them on a plate so that they don’t stick together. Transfer the cooked onion rings to the wire rack, lightly sprinkle with more kosher salt, and keep in the oven to stay warm. In between batches, brush any loose crumbs out of the air fryer basket so they don’t burn. Repeat breading and air frying the remaining rings, being careful when placing the rings in the basket — the basket will be hot! Finely chop 1/4 bunch fresh dill until you have 2 tablespoons. Place the dill, 1 cup sour cream, 1 tablespoon ranch powder, 1 tablespoon water, 1 tablespoon olive oil, a pinch of kosher salt and a few grinds of black pepper in a small bowl and stir to combine. Serve the onion rings warm with the dip. Source: the Kitchn

Lemon Icebox Pie Recipe

A classic old-fashioned treat. This creamy, dense lemon filling on top of a graham cracker crust brings back the nostalgia. It takes about 25 minutes to put together this quintessential traditional pie. Baking and chilling take longer so you’ll want to prepare this pie a day early you anticipate serving it. Prep time: 10 minsCook time: 35 minsChill: 6 hrs 45 minsTotal time: 7 hrs 30 minsServings: 6 to 8 servingsYield: 1 pie Ingredients For the pie 2 egg yolks 1 large egg 2 (14-ounce) cans sweetened condensed milk 1 cup freshly squeezed lemon juice 1 prepared graham cracker crust, store-bought or homemade (cooled for at least 10 minutes if homemade) For the topping 1 1/2 cups sour cream 2 tablespoons sugar 1 teaspoon vanilla extract Directions Preheat the oven to 350ºF: Set a rack in the middle position. Make the filling: In a bowl, whisk the egg yolks and whole egg until thoroughly combined. Stir in the sweetened condensed milk until blended. Add the lemon juice and stir to blend. Pour into the baked pie shell. Bake the pie: Set the pie in the middle of the oven and bake for 25 minutes, or until the outside edges look set and the center still jiggles slightly. Set the pie on a rack to cool to room temperature, then chill in the refrigerator for at least 6 hours, or overnight. Make the topping: In a bowl, stir together the sour cream, sugar and vanilla until blended. Bake the pie with the topping: One to two hours before serving, preheat the oven to 350oF. Set a rack in the middle position.Spread the topping over the pie and bake the pie for 10 minutes to set the sour cream.Remove the pie from the oven, cool briefly, and return to the refrigerator to chill until cold, at least 45 minutes. Slice and enjoy: This pie will keep for up to 24 hours before serving. Source: Simply Recipes

Easy Peanut Butter Banana Smoothie

Smoothies are perfect for a quick healthy snack. This recipe calls for only a few ingredients but has plenty of opportunities for customization. It’s naturally sweet with no added sugar. Try freezing your bananas the night before, it’ll make a huge difference for the texture. Serving: 1 servingYield: 1 (13 ounce) smoothiePrep time: 5 minsTotal time: 5 mins Ingredients 1 cup whole milk 1 medium ripe banana, cut into chunks and frozen 2 tablespoons unsweetened peanut butter A few dashes of cinnamon 2 ice cubes Directions Blend smoothie and serve: Add 1 cup whole milk, banana, peanut butter, cinnamon, and ice to a blender carafe. Start the blender on low and gradually increase to high. Stop and scrape down the sides of the blender as needed. If the smoothie is too thick add additional milk, one tablespoon at a time, to reach desired consistency. Blend until the smoothie is frothy and smooth with ice completely blended. Serve. Source: Simply Recipes

Jicama Fries Recipe

Incorporate more veggies into your diet with this delicious jicama fries recipe. You only need to cut them into thin slices, toss in a couple of spices and bake them until crispy-edged. While jicama doesn’t taste like potatoes, you can still pair them with a fry sauce, garlic aioli or honey mustard. Yield: Serves 2Prep time: 5 minutesCook time: 40 minutes Ingredients 1 medium jicama (about 1 pound) 1 tablespoon olive oil 1/2 teaspoon paprika 1/2 teaspoon garlic powder 1/2 teaspoon onion powder 1/2 teaspoon kosher salt 1/4 teaspoon freshly ground black pepper Directions Arrange a rack in the middle of the oven and heat the oven to 425ºF. Meanwhile, bring a large pot of salted water to a boil. Peel 1 medium jicama, making sure to peel deep enough to get to the white part. Trim off the ends and cut into 1/4-inch-thick slices. Stacking a few slices at a time, cut the slices lengthwise into 1/4-inch-thick matchsticks. Add the jicama to the boiling water and cook until crisp-tender when pierced with a paring knife, about 10 minutes. Drain and pat dry with towels. Place the jicama, 1 tablespoon olive oil, 1/2 teaspoon paprika, 1/2 teaspoon garlic powder, 1/2 teaspoon onion powder, 1/2 teaspoon kosher salt, and 1/4 teaspoon black pepper to a rimmed baking sheet. Toss to coat and spread the jicama into a single layer. Bake until the fries are lightly browned and crisp around the edges, flipping them halfway through, about 30 minutes total. Source: the Kitchn

Mashed Potato Pancakes Recipe

Ring in the new year with these delicious mashed potatoes for breakfast. They’re cheesy and savory with a fluffy interior and a crispy exterior. For frying you can use oil for a crispy pancake or butter for a rich and delicious taste. Be mindful of the butter’s temperature otherwise it will burn. Prep time: 10 minsCook time: 30 minsTotal time: 40 minsServings: 4 servingsYield: 8 potato pancakes Ingredients 2 cups leftover mashed potatoes 1 large egg 1/3 cup all-purpose flour 2 tablespoons minced chives 1 cup grated cheddar cheese 1/2 teaspoon kosher salt 1/4 teaspoon black pepper 1/2 cup neutral oil, or butter, for frying Sour cream, for serving Directions Make the pancake mixture: In a medium bowl, combine the mashed potatoes, egg, all-purpose flour, chives, cheese, salt, and pepper.It’s okay if the mixture is slightly sticky, but it should hold its shape if you form it into a patty in your hand. If it is very sticky or runs at all, then add more flour 1 tablespoon at a time until you reach the desired texture. Set up your cooking station: Place a few paper towels on a large plate. You will transfer the pancakes to the paper towel lined plate as you fry them. Fry the potato pancakes: In a large skillet over medium heat, add the oil.Once the oil reaches 325°F or it sizzles when you sprinkle a little flour into it, start forming your pancakes. You will form and fry as you go.Lightly wet your hands, to prevent the potato mixture from sticking. Measure out about 1/4 cup of the pancake mixture and form it into a disk about 1/2-inch thick in your hands.Place the pancake in the skillet and repeat until you have 4-5 pancakes in the skillet. Fry the pancakes for 3-4 minutes per side until they are browned and crispy.Flip once and cook for an additional 3-4 minutes on the second side. Drain and serve: Transfer the potato pancakes from the pan to the paper towel-lined sheet. Repeat until all the potato pancakes have been formed and fried. Serve warm with a dollop of sour cream. Source: Simply Recipes