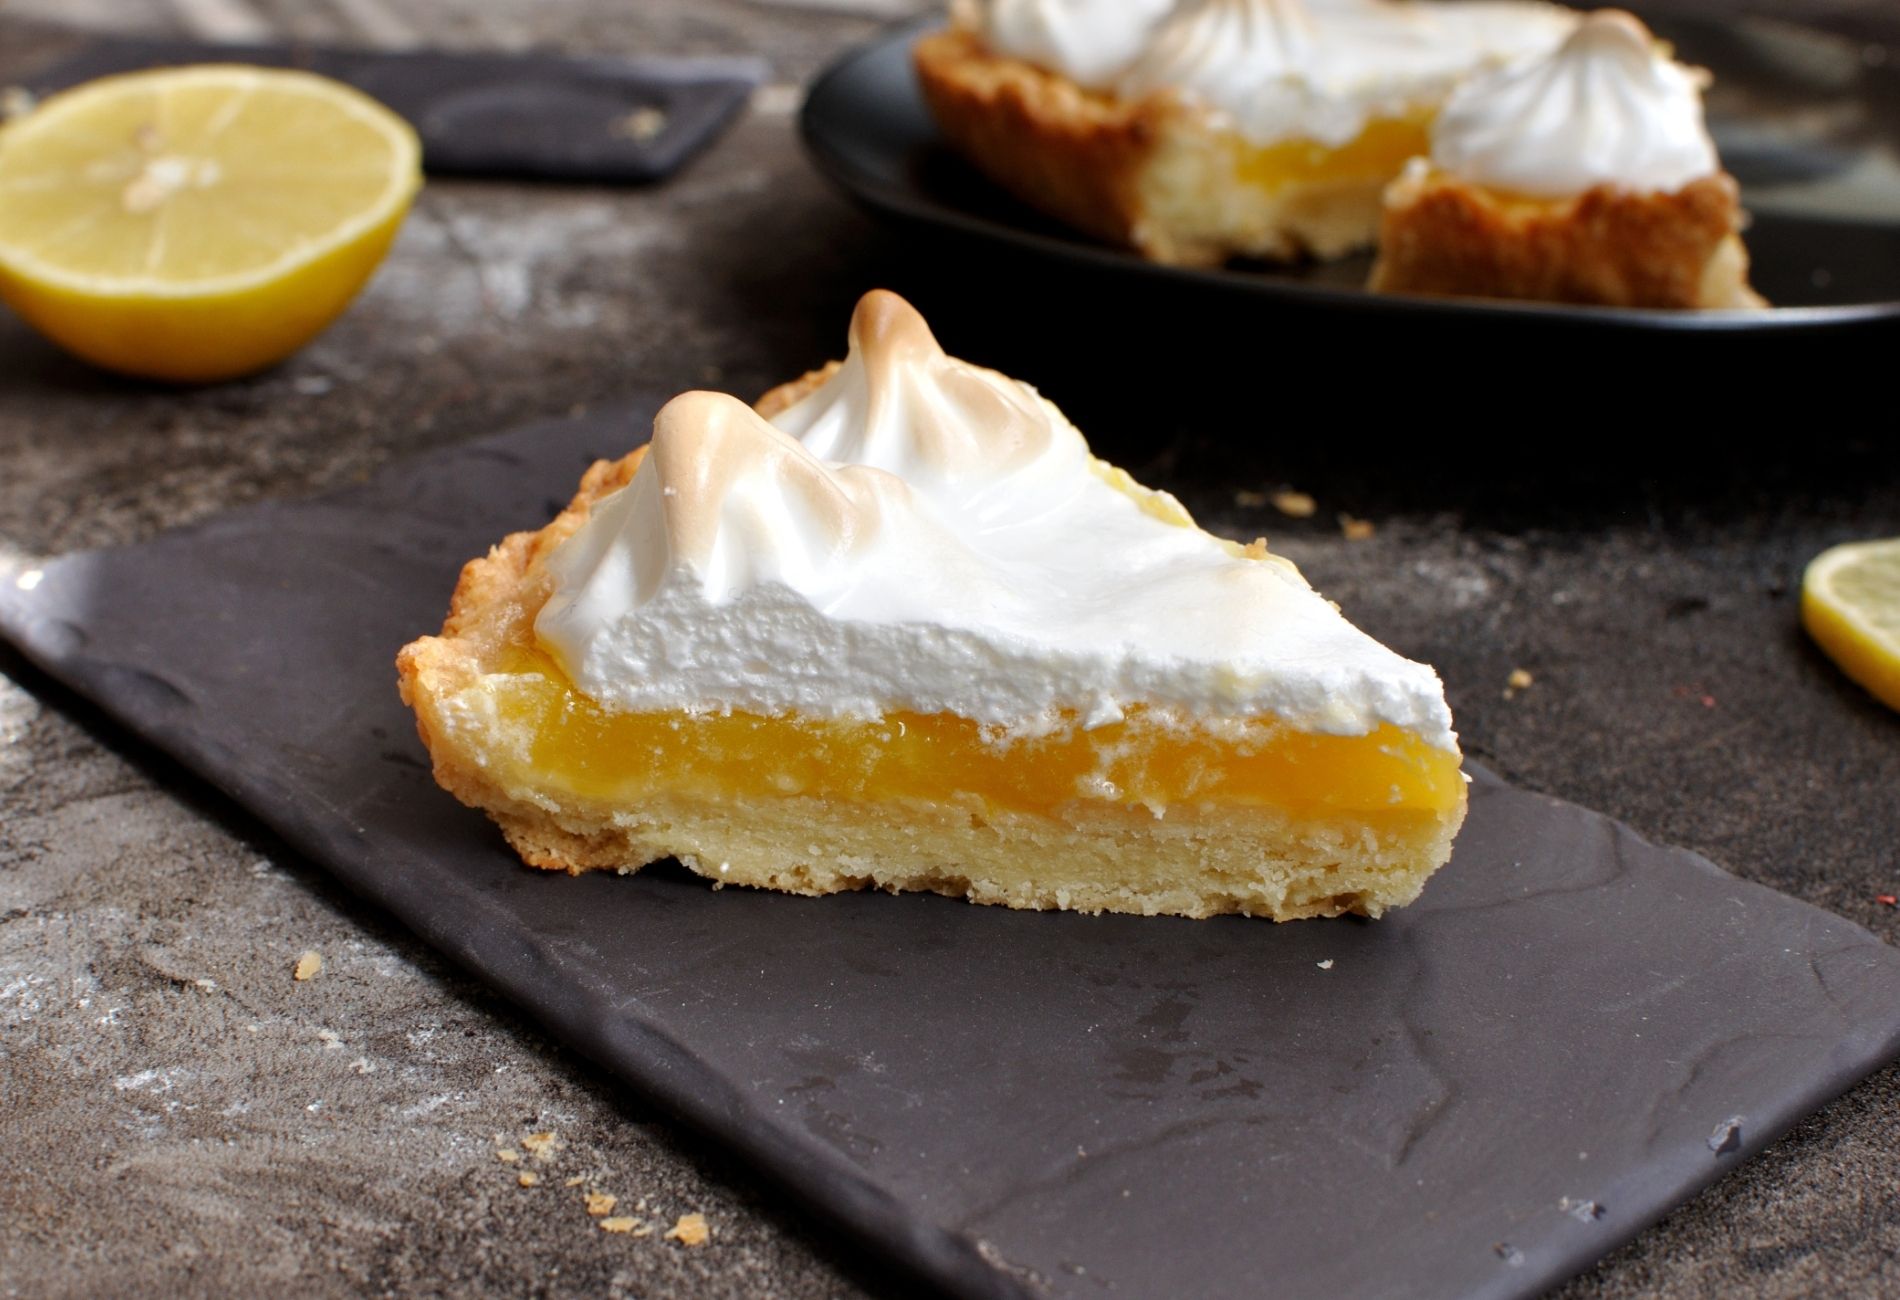
Year: 2021

Lemon Meringue Pie

The three elements for the best lemon meringue are the filling, the meringue topping and the crust. A perfect filling consists of egg yolks, sugar, lemon juice and zest, fortified with cornstarch to hold its shape. The meringue demands attention as the egg whites add extra hold to the shape of the meringue. A gelled cornstarch and water mixture in the meringue allows for “mile-high” lemon meringue pies. Here’s how to achieve it. Prep time: 25 minsCook time: 90 minsTotal time: 115 minsServings: 8 servings Ingredients: 1 (9-inch) frozen pie crust (use a deep-dish pie crust if store-bought) For the lemon filling: 5 large egg yolks 6 tablespoons cornstarch 1 1/3 cup (266 g) sugar 1/4 teaspoon salt 1 1/2 cups water 1/2 cup lemon juice 2 teaspoons lemon zest 2 tablespoons unsalted butter For the meringue: 1 tablespoon cornstarch 1/3 cup cold water 1/4 teaspoon cream of tartar or 1 teaspoon white vinegar 1/2 cup plus 2 tablespoons (128 g) sugar 5 large egg whites, at room temperature 1/2 teaspoon vanilla extract Directions: Pre-bake the pie shell: If you are using a packaged frozen pie crust, follow the directions on the package to pre-bake. If you are using a homemade crust, follow these instructions:Preheat the oven to 375°F. Line your frozen pie shell with aluminum foil so that the foil extends over the edges (will make convenient handles). Fill two-thirds of the way with pie weights or dry beans.Bake for 20 minutes. Then remove the foil and the pie weights. Poke the bottom of the crust in several places with the tines of a fork. This will help prevent the bottom from bubbling up.Put the crust back in the oven and bake for 15 minutes more, or until the crust is lightly browned. Remove from oven and set aside. Make the lemon filling: Whisk the egg yolks in a medium bowl and set aside.In a medium saucepan, add 6 tablespoons cornstarch, 1 1/3 cup sugar, 1/4 teaspoon salt, and 1 1/2 cups water, and whisk to combine. Bring to a boil on medium heat, whisking constantly. Let simmer for a minute or two until the mixture begins to thicken.Once the cornstarch mixture has thickened up well (consistency of Cream of Wheat) remove from heat. Take a spoonful of the cornstarch mixture and whisk it into the beaten egg yolks to temper the yolks. Continue to whisk in spoonfuls of the cornstarch mixture until you’ve used about half of the cornstarch mixture.Then add the egg yolk mixture back to the pot with the cornstarch. Return to a boil, on medium to medium high heat, stirring constantly. Cook 3 to 4 minutes. (The starch will keep the eggs from curdling.)Remove from heat and stir in the lemon juice, lemon zest, and butter. Reduce the oven: Turn the oven temperature down to 325°F. Prepare the cornstarch mixture for the meringue: In a small saucepan, whisk together 1 tablespoon cornstarch and 1/3 cup of cold water until the cornstarch dissolves. Heat on medium heat and whisk until the mixture bubbles and thickens. Remove from heat and set aside. Whisk together the sugar and cream of tartar: Whisk together 1/2 cup plus 2 tablespoons of sugar and 1/4 teaspoon of cream of tartar, set aside. (If you do not have cream of tartar, instead add a teaspoon of white vinegar to the egg whites with the vanilla in the next step.) Make the meringue: Place egg whites and 1/2 teaspoon vanilla extract in the bowl of your mixer. Start beating the egg whites on low speed and gradually increase the speed to medium.Once the egg whites are frothy, slowly add in the sugar and cream of tartar, a spoonful at a time. Beat until the egg whites form soft peaks.Add the cornstarch water mixture (it should look like a gel) a spoonful at a time, as you continue to beat the egg whites. Increase the speed to high and continue to beat until the egg whites have formed stiff peaks. Do not over-beat, or your meringue will be grainy. Fill the pie shell: Heat the lemon filling again, until it is bubbling hot. It’s important that the filling is very hot in order for the meringue to properly adhere.Scoop the steaming hot filling into the pre-baked pie shell, spreading it evenly.Top the filling with meringue: Working quickly, use a rubber spatula to spread the meringue mixture evenly around the edge of the pie.Make sure the mixture attaches to the crust with no gaps. The crust will help anchor the meringue and help keep it from shrinking and weeping.Fill in the center with more meringue mixture. Use the back of a spoon to create peaks all over the meringue. Bake the pie, then cool completely: Bake the pie for 20 minutes at 325°F, until the meringue is golden brown.Transfer to a wire rack and let cool completely to room temperature. If the pie is even remotely warm when you cut into it, the lemon base may be runny. To help firm up the base, after the pie has cooled down, you can place the pie on top of a cooling pack covered with a tea towel.This pie is best eaten the same day you make it. Source: Simply Recipes

Gourmet Air Fried Uncrustables Recipe

No need to run to the store to make this quick and easy snack! These air fried uncrustables can be prepared in about 10 minutes. Use a small cup to cut out the center of the bread for the perfect shape. Ingredients: 2 slices of Brioche bread 1 tbsp of peanut butter 1 tbsp of jelly Non-stick cooking spray Directions: Add the peanut butter and jelly in the middle of each bread. Leave room on the edges. Combine slices and use a small cup to press on one side of the sandwich Flip and repeat to cut out the center until the crust comes off Spray each side with cooking oil Cook at 340 degrees F for 5 minutes. Flip and cook for 5 more minutes.

Socca Recipe

The gluten-free flatbread Socca, also known as farinata and panisse, is easy to make as it only has three ingredients. You won’t need any special equipment, just a bowl and a whisk. It’s a convenient option for weeknight dinners and can be elegantly presented with dips. Use this recipe for the next time you need a hassle-free homemade bread. Prep time: 5 minsCook time: 8 minsRest time: 30 minsTotal time: 43 minsServings: 4 servingsYield: 2 socca flatbreads Ingredients: 1 1/2 cups chickpea flour 3 tablespoons olive oil, divided 1 teaspoon salt 1 cup water Directions: Combine socca ingredients: In a medium mixing bowl, combine the chickpea flour, 2 tablespoons of olive oil, salt, and water. Whisk thoroughly until a smooth batter is formed.If it is thicker than pancake batter, add more water one tablespoon at a time, until pancake batter consistency is reached. When you pull the whisk out of the batter, it should leave a thick ribbon. Let the batter rest: Let the batter rest for 30 minutes before cooking. Heat nonstick skillet or cast iron: Heat a large nonstick or well-seasoned cast iron pan over medium-high heat. Drizzle pan with 1/2 tablespoon of olive oil. Cook the socca: Once hot, using a measuring cup or ladle pour half of the socca batter into the pan, while simultaneously turning the pan in a circular motion to help the batter spread evenly.Cook socca, until the top appears nearly set, about 2 minutes. Similar to pancakes, any bubbles that appeared should have set. There will be a visible firming on top at the edges, but no char spots on top.Flip socca with a large metal spatula and continue to cook, about another minute. It should have some brown spots on both sides. Remove from the pan.Add the remaining 1/2 tablespoon of olive oil to the pan and cook the rest of the socca batter. Serve: Socca is ready to serve as soon as it comes out of the pan. Keep it whole and top with pizza toppings, slice into triangles and serve with dip, or cut in half and fill with sandwich fixings. Source: Simply Recipes  

Air Fried Grilled Cheese Recipe

An already simple snack made easier with the help of an air fryer. Use your cheese of choice on a Brioche or French bread for a delicious treat. The mix of seasoning with butter adds the finishing touch. Ingredients: Brioche or French bread Butter Italian seasoning Garlic salt Cheese Non-stick cooking spray Directions: Butter one side of each slice of bread In a bowl mix 3/4th Italian seasoning and 1/4th garlic salt Coat each buttered side of bread with mixed seasonings and then spray with cooking spray Add cheese of choice on the plain side of the bread Spray air fryer pan with cooking spray Load and bake at 370 degrees F for 4 minutes. Flip and cook for 4 more minutes.

4 Tips to Achieve a Decluttered Kitchen

No matter the kitchen design, endless clutter of jars, spices, dishes and meaningless brushes will ruin the aesthetic. Here are a few tools and tricks you can utilize to keep your dishes and cleaning products in an orderly fashion. Go Vertical. An open shelf designed kitchen is on trend, but towering dishware easily ruins the look. Invest in slotted organizers that will hold everything vertically. This file system easily shows you what you have and can also help to cut down on things you may no longer need. It’s a great way to clear out the clutter in the furthest corners of your cupboards. It also looks far more appealing whenever your baking sheets are standing next to each other instead of in a tower. Cut Down the Kitchen Sink Tools. Your skin may be cluttered from all those various bottles and sponges that are continuing to pile up over time. Look for a multi-purpose tool such as a dishwand that can dispense detergent while also scrubbing. You’ll no longer need several sponges crowding around your sink’s edge and will optimize your dishwashing process. Uniform Storage. A busy pantry with loads of different colors, bags and packages can be an eye-sore. Try investing in quality matching canisters that you can store dry goods such as pasta, nuts and flours. It also helps you visually determine what’s available more quickly. You’ll save money instead of accidentally purchasing the same bag of almonds you missed in the back of the drawer. Label these canisters with matching labels for the perfect finishing touch. Cooktop Cleaners. Induction cooktops are becoming more common as a popular cooking option. These cooktops are prone to spills that can cook-on stains or leave marks over time. There are many internet solutions out there that can leave your kitchen cluttered with tools. Look for cooktop pads that have a special texture that won’t scratch the glass surfaces for a quick one-stop solution. Source: House Beautiful

Air Fried Sweet Potato French Fries

Looking for a quick and easy snack for your air fryer? Try these delicious sweet potato french fries. Be sure to mix in cinnamon and brown sugar for an extra level of sweetness. Ingredients: Large sweet potato Brown sugar Cinnamon Non-stick cooking spray Frosting (optional) Directions: Peel and chop up a large sweet potato Place in a bowl and add cooking spray Add brown sugar and mix well. Add cinnamon and repeat. Place fries in air fryer basket in a single layer for even cooking. Bake at 350 degrees F for 20 minutes. Shake every 5 minutes. Optional: drizzle frosting of your choice

How to Clean a Juicer

Juicers have come a long way, and are best to extract juice from firmer fruits and vegetables. There are three basic types of modern juicers– centrifugal force, masticating or cold press, and triturating. A centrifugal force juicer contains blades in a spinning container. These are the fastest, loudest and least expensive types. A masticating or cold press uses a single spiral auger to masticate the produce. It will mimic the action of chewing. It’s much slower but extracts more juice. The triturating is a professional type that uses two augers to grind the fruit and vegetables into small particles. Cleaning is essential for any kind of juicer, regardless of the type. Without regular upkeep, small bits of pulp can get trapped in the components and decay leading to bacterial and mold growth. Many of these components are dishwasher-safe and can be kept clean with just a few items. Every juicer should be cleaned after every use. Bits that are trapped can harden quickly, making them more difficult to remove later. If the juicer is being used daily, make sure to give it a deeper cleaning weekly. What You’ll Need: 1 Non-abrasive sponge 1 Soft-bristled bottle brush 1 Toothbrush 1 Spatula 1 Microfiber cloth 1 Dishwasher 1 Dishwashing liquid 1 Dishwasher detergent 1 Baking soda 1 Distilled white vinegar Directions: Before you begin the cleaning process, turn off and unplug the juicer from the wall outlet. Remove the juice and pulp collection containers. Disassemble the juicer to access the grinding mechanism, strainer, lid, and plunger. Use a spatula to scrape out the pulp container. The pulp can be used in some recipes, composted, or placed in a trashcan. Fill a sink with hot water and add a few drops of dishwashing liquid. Place the components in the sink and let them soak for two or three minutes. Use a non-abrasive sponge to wash the plastic containers. Use a soft-bristled bottle brush or toothbrush to clean the strainer and around the grinding components. Rinse the clean pieces well with hot water and allow to air-dry or dry with a microfiber cloth to help prevent water spots.Even if you plan to place the parts in the dishwasher, give them a quick rinse to flush out the pulp particles. This is particularly important for the fine mesh of the strainer. Dampen a non-abrasive sponge with water and wipe down the base of the juicer. Never submerge the base that contains the motors in water! Dry with a microfiber towel. Once every component is clean and dry, reassemble the juicer and you’re ready for the next use. Weekly Deep Cleaning: If pulp has been allowed to dry and harden in the juicer components, fill a sink with hot water and a few drops of dishwashing liquid, add the components and allow them to soak for 15 minutes.Dip a toothbrush or bottle brush in dry baking soda and gently scrub the components. The baking soda will act as a gentle abrasive. Rinse the components often and continue scrubbing until they are clean. If the containers have streaks and water spots, fill them with distilled white vinegar and allow them to soak for 15 minutes. Pour out the vinegar and wipe them down with a non-abrasive sponge. Rinse well and dry with a microfiber cloth. Source: the Spruce

Air Fried Cheese Empanadas

Need a quick and easy snack for your air fryer? Try these delicious cheesy empanadas! Be sure to top them with Italian seasoning for the final touch. Ingredients: Goya empanada discs Mozzarella cheese Italian seasoning Egg wash or cooking oil Non-stick cooking spray Directions: Fill empanada disc with mozzarella cheese and fold over in half. Seal edges with a fork. Use egg wash or lather on some cooking oil to the empanada. Coat air fryer pan with non-stick cooking spray. Cook at 350 degrees F for 8 to 9 minutes.

Caramel Brownies Recipe

If you’re searching for another dessert recipe, look no further than these delicious chocolate caramel brownies. They’re topped with a flaky sea salt and are perfect if you ever need a baked good for a holiday event. The brownies can be frozen for up to three months but will lose the creamy texture over time. Prep time: 20 minsCook time: 35 minsTotal time: 55 minsServings: 12 servingYield: 12 brownies Ingredients: 1/3 cup caramel sauce, plus more for drizzling 1 1/4 cup (168 g) all-purpose flour 1/4 cup (24 g) Dutch process cocoa powder 3/4 cup (168 g) unsalted butter 3 ounces unsweetened chocolate, chopped 1 1/4 cups (260 g) granulated sugar 1/4 cup (46 g) brown sugar 1 teaspoon kosher salt 2 teaspoons vanilla extract 3 large eggs 1/2 to 3/4 teaspoon flake salt, for topping (optional) Directions: Prepare the pan: Preheat the oven to 325°F degrees. Coat an 8 x 8 square metal baking pan with cooking spray.Make a parchment sling by lining the pan with parchment paper and leaving an inch overhang on either side. This will make it easier to remove the brownies from the pan. Spray parchment and set aside. Prep dry ingredients: In a small bowl whisk flour and cocoa to break up any cocoa clumps and set aside. Melt butter and chocolate: In a large pot (4 quart), set over medium low heat, add the butter and chocolate. Stir until both are melted and fully combined. Remove from heat. Add sugar, salt, and vanilla: To the pot with the chocolate and butter add the granulated sugar, brown sugar, salt, and vanilla. The batter will look grainy. Add eggs: Add eggs one at a time and stir vigorously after each addition until fully incorporated. The batter will become smooth and shiny. Finish batter: Add flour and cocoa mixture to the batter. Use a spatula to stir it all together. The batter will be thick, and shiny like frosting. Transfer the batter and add the caramel: Scrape batter into the prepared baking dish. Smooth the top with your spatula, if necessary. Measure out about 1/3 cup of caramel sauce into a dish. Your caramel should be able to drizzle off the end of your spoon in thick ribbons. If it’s too cool and thick to drizzle then zap it in the microwave for a few seconds until it is.Using a spoon create nine dollops of caramel evenly over the top of the brownie. Swirl in caramel: Use a knife to swirl the caramel into “S” shapes throughout the batter. The batter is thick, so you are just swirling the very top layer. Leave some pockets of caramel. Sprinkle with flake salt, if using. Bake: Bake for 35-40 minutes or until the brownies reach an internal temperature of 210°F. A toothpick won’t come out clean because of the caramel that melts into the batter and the fudgy nature of these brownies.When baked, the center stays very soft but shouldn’t be wet to the touch. The caramel will look melted and not very visible, but don’t worry, it will firm up as it cools.If you have a glass baking dish, you may need to add 10 to 15 minute to the cook time. Drizzle with more caramel and enjoy: Let brownies cool in the pan on a wire cooling rack until they reach room temperature. Drizzle with 3 to 4 tablespoons of additional caramel and another light sprinkle of sea salt. Serve and enjoy! Source: Simply Recipes

English Scones Recipe

Pair English scones with a cup of tea for the perfect afternoon. They are light, flakey and mildly sweet. Serve these with clotted cream and strawberry or raspberry jam. Prep time: 10 minsCook time: 20 minsFreezing time: 15 minsTotal time: 45 minsServings: 8 to 10 scones Ingredients: 2 cups (257 grams), all-purpose flour, plus more for dusting surface3 tablespoons (39 grams) granulated sugar1 tablespoon (15 grams) baking powder1/2 teaspoon (2 grams) kosher salt4 tablespoons unsalted butter, frozen2/3 cup plus 1 tablespoon whole milk, dividedClotted cream and jam, for serving (optional) Directions Line a baking sheet: Line a rimmed baking sheet with parchment paper. Combine the dry ingredients: In a large bowl, whisk together the flour, sugar, baking powder, and salt. Grate the butter: Place a box grater over the prepared baking sheet. Grate the butter on the large holes of a box grater. When you get down to a small nub of butter, chop that nub into a few small pieces. Add the butter to the dry ingredients: Use the parchment paper as a sling to transfer the butter to the dry ingredients in the large bowl.Then, return the parchment paper to the baking sheet. Use your fingers to toss the butter in the flour, breaking up any clumps, until evenly coated. Add milk and form rough dough ball: Drizzle about half of the whole milk over the butter-flour mixture. Use a fork or your hands to combine and lightly mix. The mixture will start to look sandy.Add the remaining half of the reserved milk 1 tablespoon at a time, as needed, continuing to combine with a fork or your hands, until a rough and lumpy, but cohesive, dough ball forms. You may not use all the remaining milk. Shape the dough: Turn the dough out onto a floured work surface and pat it into a rough 1-inch-thick circle about eight inches in diameter. Cut dough into scone rounds: Use a 2-inch biscuit cutter to cut the dough into rounds. Cut them as close together as possible. You want to get as many rounds as possible on your first pass through the dough. Gently press the scraps back together and cut out additional rounds.You should have 8 to 10 rounds, depending on how diligent you are with pressing the scrapes together. Transfer scones to prepared baking sheet, refrigerate, and preheat the oven: Transfer the scone rounds to the prepared baking sheet, spacing them about 1 inch apart.Refrigerate the unbaked scones while you arrange a rack in the middle of the oven and preheat the oven to 400°F. Brush scones with milk and bake: Once the oven has preheated, using a pastry brush, brush the scones with the remaining 1 tablespoon of milk and bake until golden brown, 18 to 22 minutes. Cool and serve scones: Let the scones cool for 5 minutes on the baking sheet before enjoying warm or transferring to a cooling rack to cool completely. Serve with clotted cream and jam, if desired. Directions: Simply Recipes