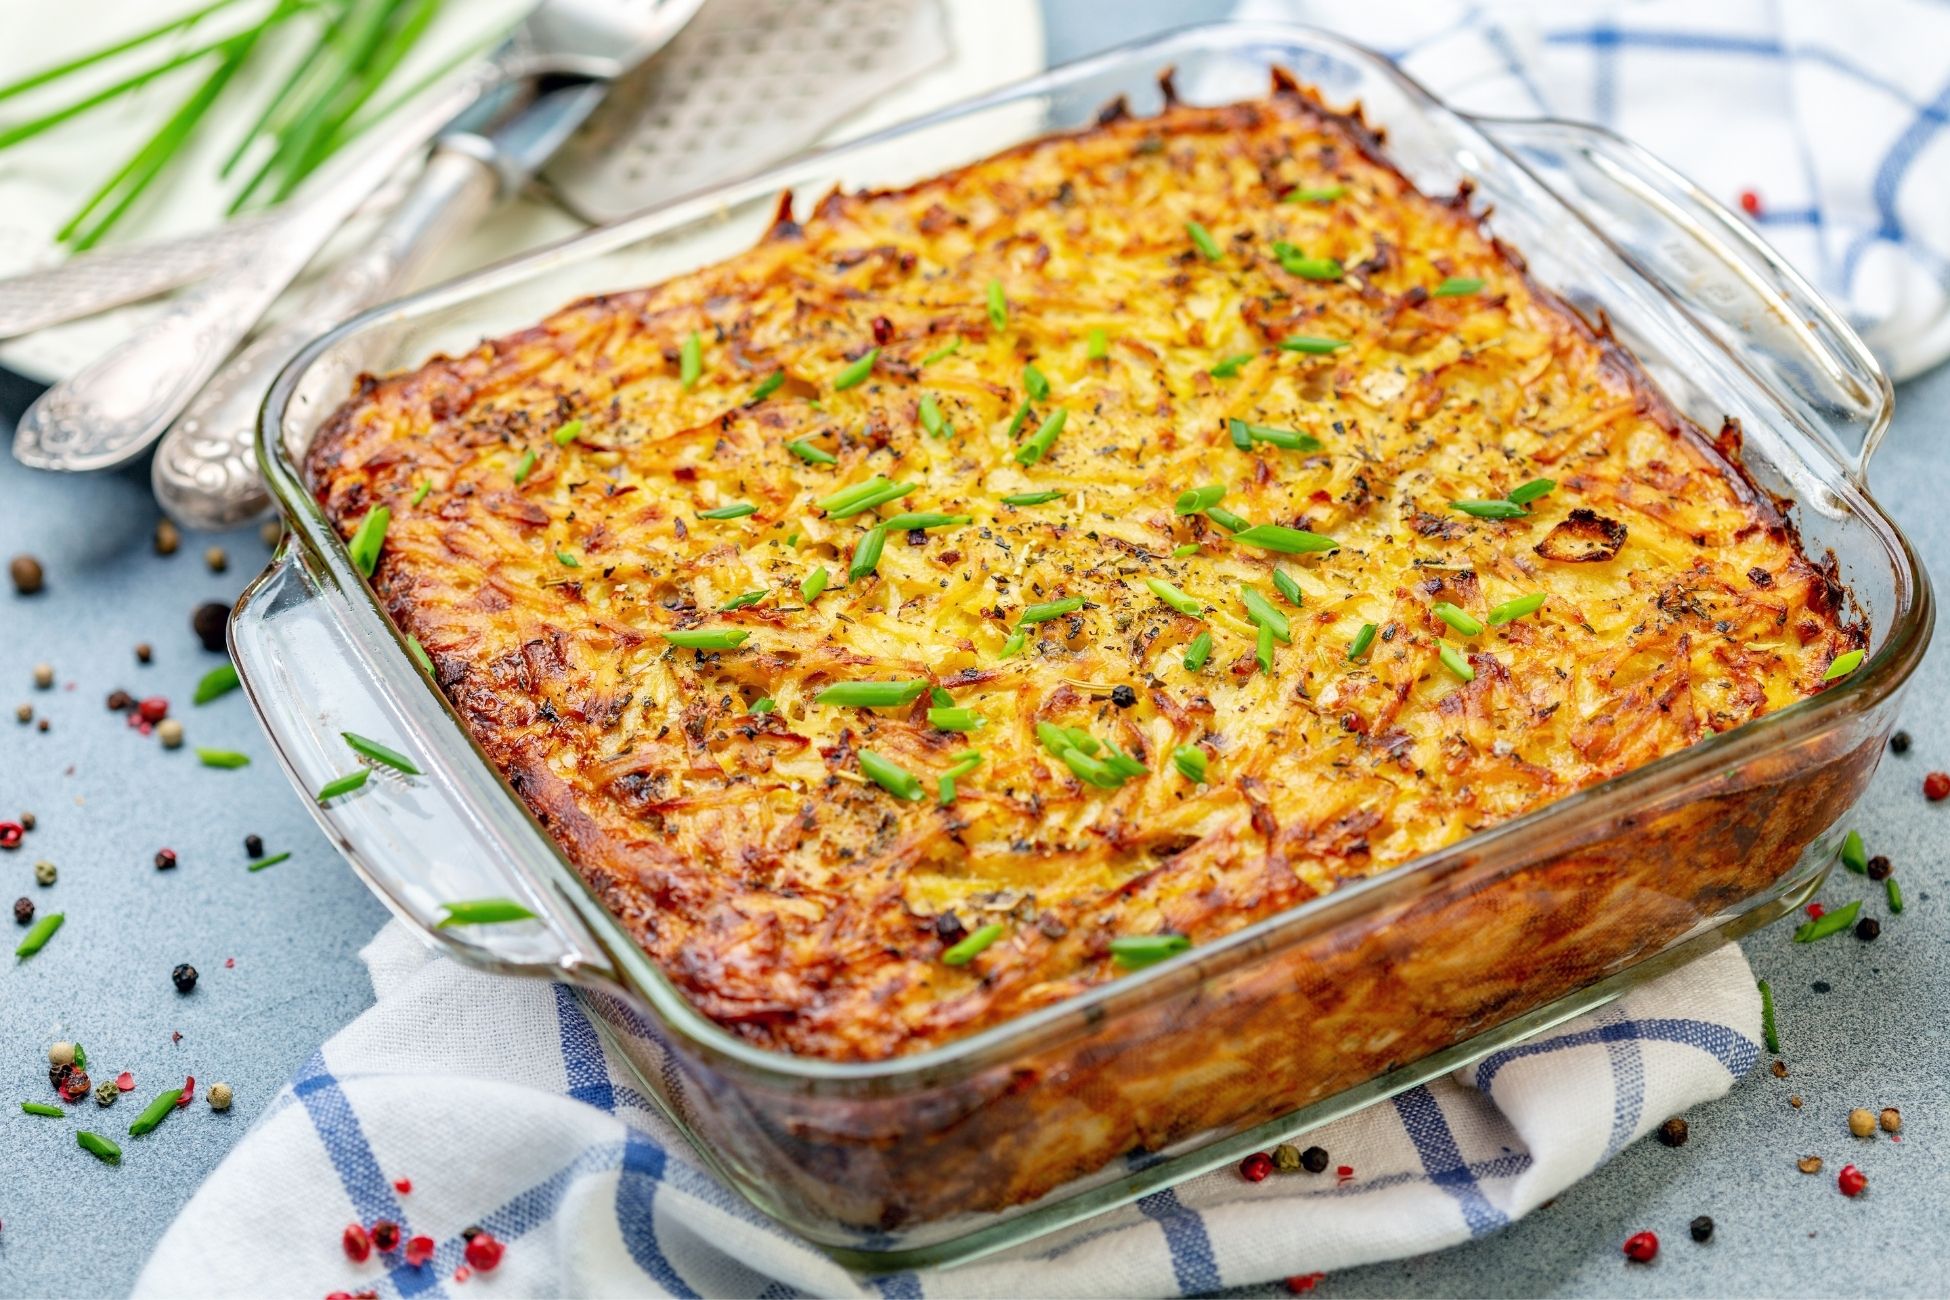
Recipes

Red Velvet Cake Recipe

An all time classic, red velvet has its own characteristic flavor because of the tart buttermilk and vinegar. It’s an eye-catching cake with subtle chocolate and vanilla notes for a pleasant tanginess. Red velvet cake is perfect for special occasions and can be prepared in a couple hours. When frosting, make sure all the cakes have cooled completely or else you’ll risk melting the frosting. Try using an offset spatula for the most control when spreading frosting for a smooth, straight side. Prep time: 90 minsCook time: 35 minsTotal time: 2 hrs 5 minsServings: 16 servingsYield: 1 (8-inch) two-layered cake Ingredients For the red velvet cake 2 2/3 (320g) cups cake flour 3 tablespoons (16g) unsweetened cocoa powder 1 teaspoon baking soda 1/2 teaspoon kosher salt 1 cup (240ml) buttermilk, at room temperature 1 tablespoon distilled white vinegar 2 teaspoons vanilla extract 1 tablespoon red gel food coloring 1/2 cup (113g) unsalted butter, softened 3/4 cup (180ml) vegetable oil 1 1/2 cups (300g) granulated sugar 2 large eggs, at room temperature For the cream cheese frosting 2 (8-ounce) packages full-fat cream cheese, softened 1/2 cup (113g) unsalted butter, softened 5 cups (568g) powdered sugar 1 tablespoon vanilla extract Special Equipment Offset spatula 2 (10-inch) cardboard cake round 2 (8-inch) cake pans Directions Preheat the oven: Preheat the oven to 350°F. Prepare the pans: Grease two 8-inch round cake pans with butter. Line the pans with parchment paper and grease the parchment. Dust the bottom and sides of the pans with flour and tap out the excess. Sift the dry ingredients: In a medium bowl, sift together the flour, cocoa powder, baking soda, and salt. If you don’t have a sifter, whisk the ingredients together instead. Cake flour and cocoa powder tend to clump, and sifting helps ensure a smooth batter. Measure the wet ingredients: Measure the buttermilk in a liquid measuring cup or small bowl. Add the vinegar, vanilla extract, and red food coloring and whisk to combine. Beat the butter, oil, and sugar: In the bowl of a stand mixer fitted with the paddle attachment, or in a large mixing bowl with a hand mixer, beat the butter, vegetable oil, and granulated sugar on medium-high speed until very pale and fluffy, about 4 minutes. The mixture will have doubled or nearly tripled in volume. Add the eggs: Add the eggs, one at a time, beating until fully combined after each addition. Scrape down the bottoms and sides of the bowl with a rubber spatula. Combine the wet and the dry: Add one third of the flour mixture into the butter mixture and mix on low speed until incorporated. Pour in half of the buttermilk mixture and continue mixing on low speed just until combined. Continue alternating the dry and wet ingredients, making sure to end with the dry ingredients and mixing until just combined. Use a rubber spatula to scrape down the bowl in between additions to ensure the batter mixes evenly. Divide cake batter and bake the red velvet cake layers: Divide the batter evenly between the two prepared cake pans. Bake for 30 to 35 minutes, or until a toothpick inserted in the center of the cake comes out clean. The cake will have deepened in color to brick-red, the edges of the cake will have begun to pull away from the sides of the pan, and the cake should spring back when gently poked with your finger. Cool the cakes: Let the cakes cool in the pans for 15 minutes, then turn them out onto a wire rack to cool completely before frosting. Beat the cream cheese and butter for frosting: To make the frosting: In a stand mixer fitted with the paddle attachment, or in a large mixing bowl with a hand mixer, beat the cream cheese and butter on medium speed until smooth, about 2 minutes. Add the powdered sugar and vanilla: Add the powdered sugar and vanilla extract and continue beating on medium speed until smooth and creamy, about 2 minutes. The frosting will be much thicker than standard buttercream frosting.If the frosting seems too soft, place it in the refrigerator for 10 minutes to stiffen. If it still seems too runny, add more powdered sugar, 1/2 cup at a time, until you reach the desired consistency. Trim the red velvet cake layers: Depending on your cake pans, the red velvet cake layers may have domed while baking. It’s not a problem if they have. Use a large serrated knife to remove the domes. Optionally, you can save the trimmings to make crumbs to sprinkle on the cake. Assemble the cake: Place one of the cake layers right-side-up on a large plate or a 10-inch cardboard cake round. Use an offset spatula or a butter knife to spread a thick layer of frosting, 1/2 to 1 cup, evenly over the layer. Top with the remaining cake layer, placed up-side-down, so the top of the cake is smooth and flat. Check that the cake layers are centered and that the top of the cake is level. Gently adjust accordingly. Apply the crumb coat: Spread a generous amount of frosting over the top and sides of the cake using an offset spatula or the straight edge of a large butter knife. Use the spatula to spread the frosting into a thin, even layer. You should be able to see the cake through the frosting.This thin layer of frosting is called the crumb coat and helps catch any loose crumbs on the outside of the cake so that the final layer of frosting doesn’t have any bright red crumbs caught in it. Refrigerate the cake and frosting: Place the cake in the refrigerator for 30 minutes for the frosting to set. Cover and refrigerate the bowl of frosting. Frost the cake: Remove the cake and the bowl of frosting from the refrigerator. Stir the frosting a few times until smooth.Spread a generous amount of frosting over the top and sides of the cake as before,

Candied Bacon Roses Recipe

Valentine’s Day is upon us! Create a new and thoughtful treat with these candied bacon roses. It’s packed with all the flavor from the garlic salt, paprika, cinnamon and chili powder. To finish everything off, place the roses on a plastic bouquet to finish off the look. Everything’s prepared conveniently in an air fryer for an easy clean up afterwards. Ingredients: Garlic Salt Black Pepper Paprika Ground Cinnamon Chili Powder Bacon Non-stick Cooking Spray Directions: Toothpicks Plastic Flowers Directions: Mix the brown sugar, garlic salt, black pepper, paprika, ground cinnamon and chili powder in a bowl Coat the bacon and wrap into a pinwheel shape. Use toothpicks to hold its shape Spray air fryer pan with non-stick spray. Load the bacon and air fry at 400­°F for 10 to 13 minutes Place them on plastic flowers for decoration (don’t eat the plastic) Serve and enjoy! Shop Our Air Fryers Air Fryer Giveaway

The Technique For Better Brownies

Brownies typically fall into one of two categories, cakey or fudgy. If you’re looking to perfect a fudgy brownie, there’s one technique that makes the biggest difference and it doesn’t involve changing the ingredients or ratios. Rapping is an old-school baking technique that forces the air out of baked goods by lifting up the pan and dropping it during baking, causing the batter to deflate. For other baked goods such as cakes or muffins this would be the last thing you want. You’d lose all the structure for a cake. However for brownies, it removes tiny air pockets making it more dense, which gives a more fudgy texture.You only need to lift up the pan about two inches then let it drop against the oven rack. You don’t need to repeatedly bang or smack the brownies. It’s best to do this when the brownies are about half-cooked. You’ll end up with perfectly fudgy brownies! Source: the Kitchn

Cheese and Egg Biscuit Bake Recipe

Create a perfect breakfast biscuit in no time with this recipe. Feel free to customize and add your own favorite ingredients such as bacon or ham to the egg and cheese. When creating the slits on the dough, make sure you try to make them as even as you can so they overlap neatly. Ingredients: Pillsbury Grand Egg Cheese Non-stick Cooking Spray Directions: Flatten a Pillsbury Grand biscuit into a flat shape. Cut diagonal slits on each side Fill the center with egg and cheese Braid the biscuit flaps over each other to wrap Spray air fryer pan with non-stick spray. Load the biscuit and air fry at 350­°F for 10 minutes Serve and enjoy! Shop Our Air Fryers Air Fryer Giveaway

Roasted Cabbage Steak Recipe

Perfect for a weeknight meal ahead! Cabbage steak is an easy vegetarian dish with plenty of flavor and crisped to a golden brown. It has a lightly sweet, mellow flavor from the olive oil, soy sauce, lemon juice, smoked paprika and honey. Make sure to add the garlic breadcrumbs over top to give it a satisfying crunch. Prep time: 10 minsCook time: 25 minsTotal time: 35 minsServings: 4 to 6 servings Ingredients 1 (2- to 3-pound) green cabbage 2 1/2 tablespoons olive oil, divided 2 teaspoons soy sauce 1 teaspoon fresh lemon juice 1 teaspoon smoked paprika 1/2 teaspoon honey 1/2 teaspoon kosher salt, divided 1/4 teaspoon freshly ground black pepper 1 clove garlic, minced 1/2 cup panko breadcrumbs 1/4 teaspoon red pepper flakes (optional) 2 tablespoons finely chopped fresh parsley Directions Prepare the oven and baking sheet: Preheat the oven to 450°F. Line a large, rimmed baking sheet with parchment paper. Prepare the cabbage: Peel off and discard any dried and browned outer leaves of the cabbage. Place it on a cutting board on its side, with the stem end facing your left or right.Use a sharp chef’s knife to slice it into 1-inch cabbage steaks. Handle them gently so that they don’t fall apart. You should get 4 to 6 slices, depending on the size of your cabbage. Discard the end with the tough stem.Place the cabbage steaks in a single layer on the prepared baking sheet. Their sides can be touching. If there isn’t enough space, you can use two baking sheets. Make the sauce: In a small bowl, combine 1 1/2 tablespoons olive oil, soy sauce, lemon juice, paprika, and honey. Use a fork to whisk until the honey is fully dissolved.Brush the sauce over the slices of cabbage, using half of the sauce. Gently flip the cabbage steaks and brush the other side, using the remaining sauce. Sprinkle the cabbage steaks with 1/4 teaspoon kosher salt and black pepper. It’s okay to season only one side. Roast the cabbage steaks: Place the cabbage steaks in the oven and turn the temperature down to 400°F. Bake until the edges are browned, the center is crisp-tender, and it can be easily pierced with a fork, about 25 minutes. Meanwhile, make the topping: In a small skillet over medium heat, add the remaining 1 tablespoon olive oil. Once the oil shimmers when you tilt the pan, add the garlic and sauté for about 30 seconds. It should sizzle and be fragrant but not brown.Add the panko breadcrumbs, red pepper flakes (if using), and the remaining 1/4 teaspoon salt. Toss to coat the panko well in the garlic oil. Toast the panko, stirring constantly, until golden brown, about 3 minutes. Remove from the heat and stir in the parsley. Plate and serve: Use a large spatula to transfer the roasted cabbage steaks onto a serving platter or plates and top each with the garlic breadcrumbs just before serving. Source: Simply Recipes

Apple Pie Dumplings Recipe

Make an easy dumpling recipe with a classic apple pie flavor. Dumplings are simple when you use a Pillsbury grand as the base. You’ll want to chop the apples into small enough pieces for easier folding. Raisins are optional for this recipe but add another layer of flavor and texture. Load these in your air fryer for a quick clean up afterwards. Perfect for a weekday dinner! Ingredients: Apples Brown Sugar Pillsbury Grand Raisins (optional) Non-stick Cooking Spray Directions: Chop the apples and add to the flattened Pillsbury grand with brown sugar Pin the Pillsbury grand up and around the ingredients into a ball Add non-stick cooking spray to the air fryer pan, then load the dumplings Air fry at 360­°F for 10 to 12 minutes or until golden brown Serve and enjoy! Shop Our Air Fryers Air Fryer Giveaway

Tips for Making Better Smoothies

Smoothies seem like they should be easy to pull off, but you may be wondering why yours don’t taste quite like the ones you get at your local juice bars. Here are a few ways to perfect your smoothie making skills for a delicious and vibrant smoothie every time. Frozen Foods. Don’t fall under the impression that frozen foods aren’t as nutritious for you. They’re easy to store, especially if they’re out of season. Keep smoothie ingredients on hand with this method. Try freezing your bananas next time, they taste like ice cream and have a super creamy texture when blended. Look at Your Blender. If you’re ending up with chunky and lumpy smoothies, it may be time to invest in a good blender. Blenders come at many price points with plenty of differing features. Some may have a more powerful motor but too noisy for a family home. Shop around for what’s best for you and your needs. Vegetables. Try incorporating at least one veggie when you can. Frozen cauliflower is easy since you won’t taste it and makes smoothies super creamy. Sweet potatoes, kale and spinach are all great vegetables to add into your next smoothie. Make It Effortless. Once you have your essentials covered, make smoothies to your liking. Try adding a fruit, a veggie and protein so you know you have all your bases covered. After that, do what tastes best to you. Maybe you want to add some protein powder or a new veggie to shake things up. The options are limitless! Source: Simply Recipes

Chicken and Cheese Air Fryer Dumplings

An easy dinner recipe with just a few ingredients. These dumplings combine chicken and cheese for the perfect filling on a Pillsbury biscuit. You’ll want to spread out the biscuit with a thicker edge to close later on. This recipe calls for mozzarella cheese but feel free to experiment with your own ingredients. Ingredients: Pillsbury Biscuit Chicken Mozzarella Cheese Non-stick Cooking Spray Directions: Spread out a Pillsbury biscuit with a pocket in the center Add the chicken and cheese, then close up the edges to form a ball Add non-stick cooking spray to the air fryer pan, then load the dumplings Air fry at 360­°F for 10 to 12 minutesServe and enjoy! Shop Our Air Fryers Air Fryer Giveaway

Cauliflower Nuggets Recipe

Make a delicious and healthy dish with these cauliflower nuggets. Be sure to use bite-sized cauliflower, chopping in half when necessary. The mixture of flour, milk, paprika and other seasonings add all the flavor to this recipe. Load these in your air fryer for a quick and easy clean up afterwards. Perfect for a weekday dinner! Ingredients: Cauliflower 3/4 Cup of Flour 3/4 Cup of Milk 1 Tsp. Paprika 2 Tsp. Garlic Powder 1 Tsp. Salt 2 Tbsp. Coconut Oil Non-stick Cooking Spray Directions: In a bowl mix the flour, milk, paprika, garlic powder, salt and coconut oil Add in the cauliflower and coat evenly Add non-stick cooking spray to the air fryer pan, then load the cauliflower Air fry at 400­°F for 15 minutes Serve and enjoy! Shop Our Air Fryers Air Fryer Giveaway

French Bread Pizza Recipe

Make pizza easier in an air fryer! This French bread variation couldn’t get easier with just a few ingredients. You’ll end up with a delicious pizza you can create in your air fryer for just a few minutes. Make this for tonight’s dinner! Ingredients: French Bread Mozzarella Cheese Pizza Sauce Pepperoni Directions: Cut the French bread in half, lengthwise On both sides add the pizza sauce, mozzarella cheese and pepperoni Load the pizza and air fry at 400­°F for 7 to 9 minutes Serve and enjoy! Shop Our Air Fryers Air Fryer Giveaway