Year: 2021

Choosing the Color of Your Kitchen Appliances

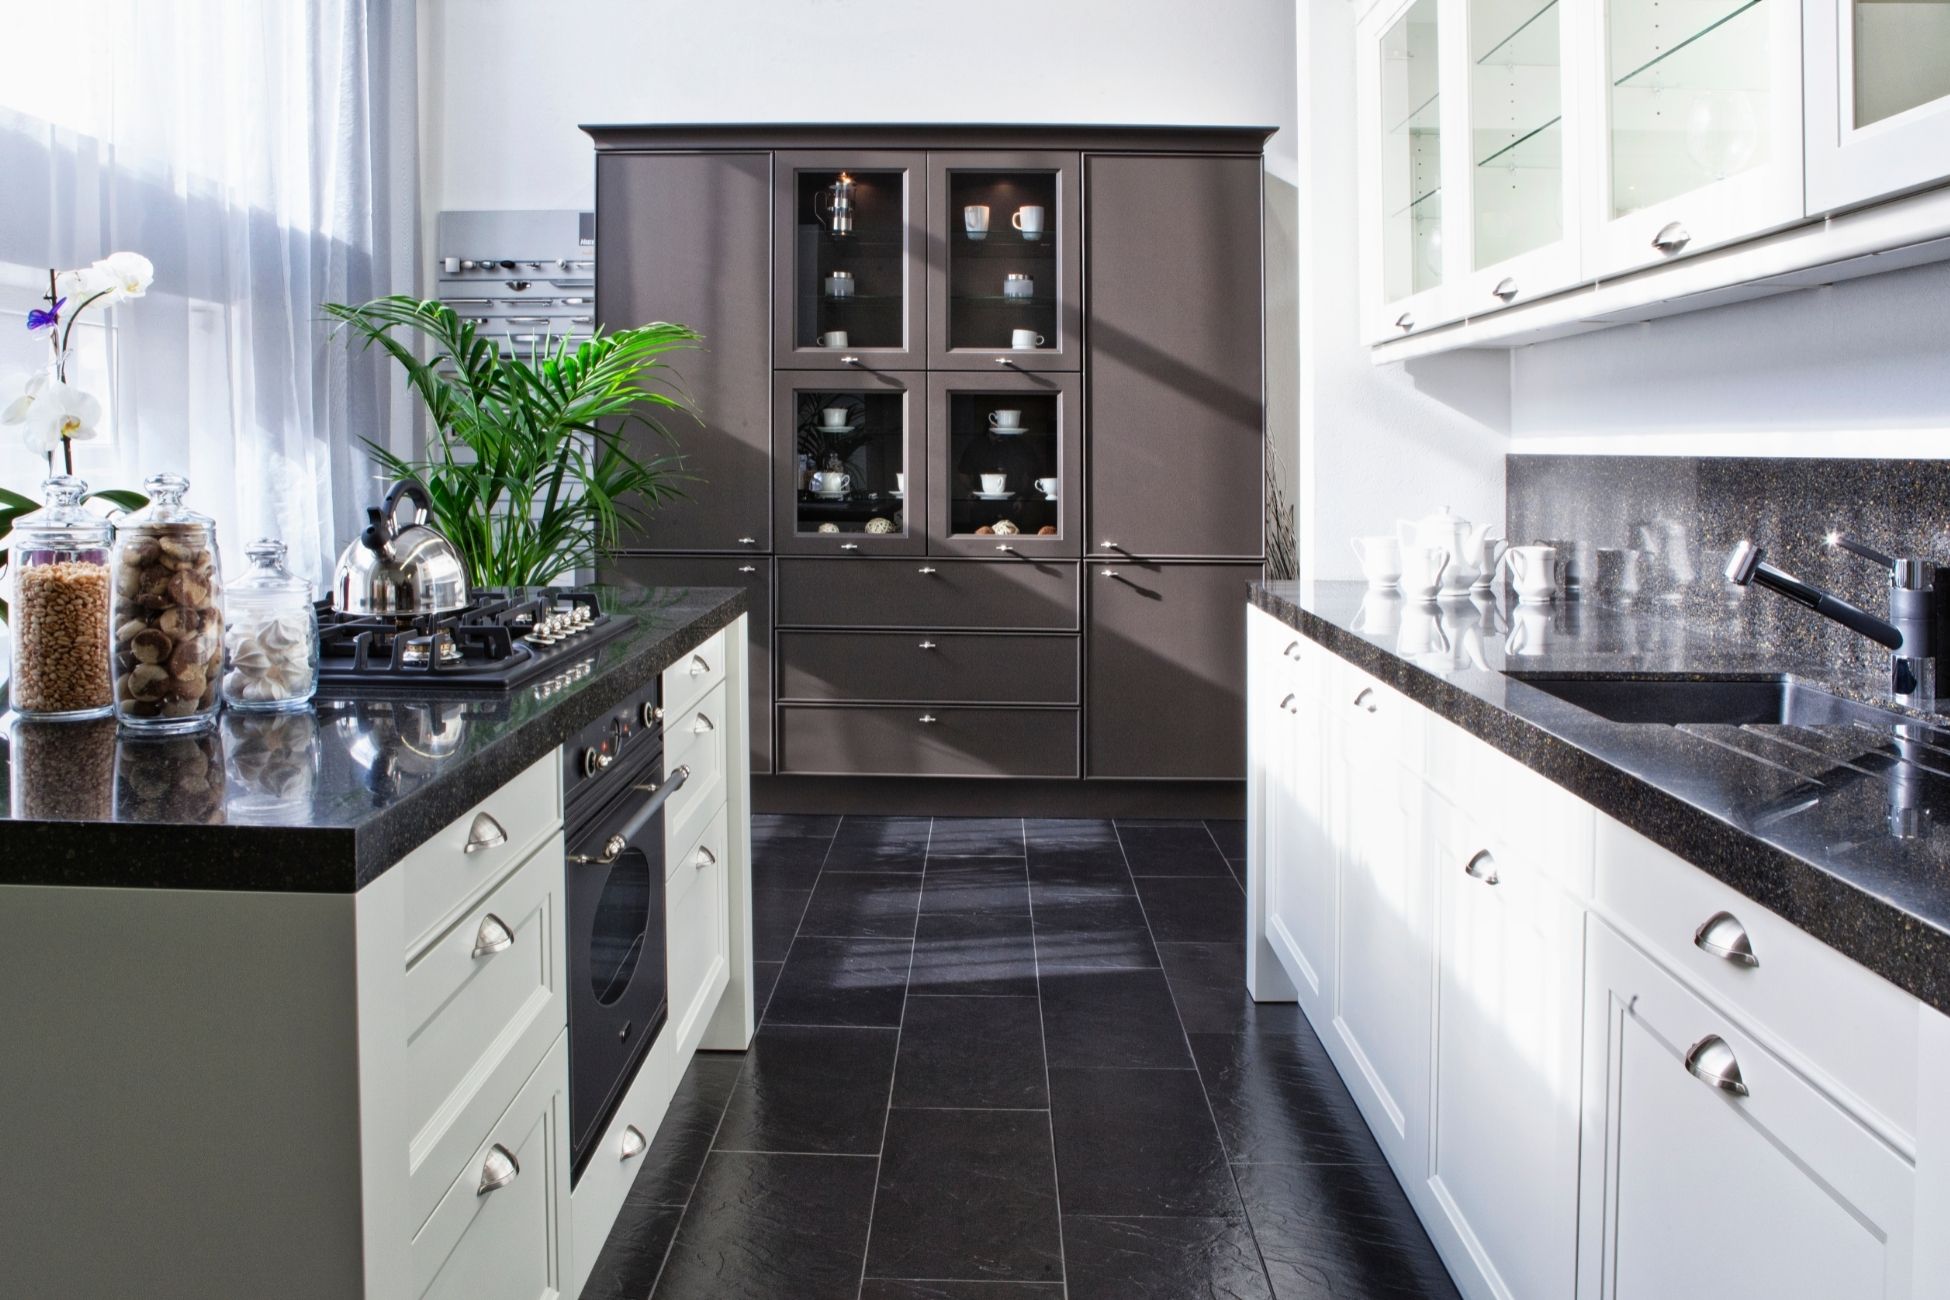
Kitchen appliances come in all sorts of colors and finishes. However, the cost of home appliances can mean these are long-term investments for your home. The choice is ultimately dependent on your decor tastes, the reason for buying the appliance, and your living situation. Here are a few tips you can follow when deciding on their color. Colorful Appliances If you’re looking to get a colorful refrigerator or microwave, it’s important to weigh the pros and cons. A bright color will quickly date the appliance. Over time these appliances will go out of style much faster than expected. It may seem appealing to go for a trendy kitchen, but neutrals are more likely to seem timeless. When picking these appliances, remember that these colors usually go out of stock more often than stainless steel. If one appliance needs to be replaced, it may be difficult to find the same color or you’ll have to settle for mismatched appliances. Décor Preferences When deciding on an appliance’s color, ask yourself if it complements the rest of decor that won’t be changed anytime soon, such as flooring, counters and backsplashes. Stainless steel tends to be the most neutral of all finishes since they fit with both warm and cool color schemes. Stainless steel is more difficult to keep clean, as fingerprints show more easily compared to other finishes. Black appliances tend to blend with other stainless steel appliances and are harder to date than color finishes. If you’re looking for a customized look, the hidden-appliance look involves cabinet panels that virtually hide appliances within cabinetry. This will be the most expensive option but can greatly enhance the selling feature of your kitchen. Source: the Spruce

Shakshuka Recipe

Shakshuka is a great meal that works for breakfast, lunch or dinner. It consists of eggs and peppers simmered in a tomato sauce infused with cumin and smoked paprika. It’s all prepared in a large skillet for the ultimate comfort food. Serve the shakshuka straight out of the skillet on the dinner table. Pair it with plenty of crusty bread or pita. Prep time: 20 minsCook time: 30 minsTotal time: 50 mins Servings: 4 servings Ingredients: 2 tablespoons olive oil 1 teaspoon smoked paprika 1 teaspoon ground cumin 1/4 teaspoon Maras or Aleppo pepper flakes, or 1/8 teaspoon crushed red pepper flakes 1 large yellow onion, halved and thinly sliced 2 cloves garlic, thinly sliced 1 red bell pepper, seeded and thinly sliced 1 yellow bell pepper, seeded and thinly sliced 1 can (28 ounces) whole peeled tomatoes, preferably San Marzano 1/2 teaspoon salt, or to taste 4 ounces feta cheese, crumbled 1/3 cup pitted Kalamata or other olives in brine 4 large eggs For garnish: 1/4 bunch cilantro, leaves coarsely chopped (for garnish) Directions: Cook the onion and peppers: In a large skillet over medium heat, heat the oil. Add the paprika, cumin, and pepper flakes and cook for 30 seconds to a minute to bloom the spices.Add the onion and cook, stirring occasionally, for 3 minutes. Add the garlic, red pepper, and yellow pepper and cook, stirring occasionally, for 15 minutes, or until the vegetables soften. Crush the tomatoes and simmer them with the peppers: In a bowl, break up the tomatoes with your hands. Add them to the skillet with the salt and cook for 5 minutes. Taste and add more salt, if you prefer. Cook the eggs: With the back of a spoon or a ladle, make 4 indentations in the sauce.Break an egg into a cup and carefully pour it into and indentation, being careful not to break the yolk. Repeat with the remaining eggs. (You can crack the egg directly into the sauce and skip the cup, but it’s easier to get a an errant egg shell or protect the dish from a bad egg if you use the cup method.)Sprinkle the feta and olives around the eggs. Cover the pan and simmer over medium heat for 8 minutes, or until the whites are set and the yolks are still soft. (If you like your eggs well done, cook for a minute or two longer.) To serve: Garnish with cilantro leaves and a sprinkling of red pepper flakes. Bring to the table and serve from the pan. Source: Simply Recipes

Air Fried Avocado Recipe

Looking to mix up how you prepare avocados? Fry them in an air fryer instead! This recipe leaves the avocados delicious and flavorful with minimal effort needed. Pair these with your favorite dipping sauce as a side dish along with your dinner. Ingredients: Avocado 2 eggs 1/2 cup panko mix 1/4 cup flour 4 tablespoons Italian seasoning Olive oil cooking spray Directions: Chop an avocado into fry size sticks In a bowl mix the eggs. In another bowl mix the Panko mix, flour and Italian seasoning Dip the avocado into the egg wash and then coat with the mix Coat pan and fries with olive oil spray Cook at 350°F for 8 minutes. Flip, spray and cook for another 5 minutes.

Salmon Avocado Poke Bowl

A poke bowl is a Hawaiian dish served with diced fresh fish on top of a bowl of rice with plenty of toppings such as avocado, radishes and cucumbers. The fish is tossed with a simple dressing of soy sauce, rice vinegar and sesame oil. When shopping for salmon be sure you’re purchasing the highest quality salmon since you’ll be eating it raw. In Japanese supermarkets the fish labeled sashimi is safe to eat raw. Prep time: 20 minsTotal time: 20 minsServings: 2 to 3 Servings Ingredients: For the poke bowl: 1 cup short-grain white rice 1 pound sashimi-grade salmon 1/4 cup soy sauce 1 1/2 tablespoons rice vinegar 1/2 tablespoon sugar 1 teaspoon toasted sesame oil 1/4 teaspoon garlic powder 2 scallions, thinly sliced Other toppings for your bowl: Sliced cucumber Sliced radish 1 large avocado, cubed Furikake Red pepper flakes Directions: Cook the rice: Start the rice first and prep the rest of the ingredients while it cooks. Rinse the rice a few times under cool water, rubbing it gently with your hands, until the water isn’t quite so cloudy. Then cook the rice according to package instructions or in a rice cooker. Fluff and keep covered until ready to eat. Prepare the salmon: Gently pat the salmon all over to make sure that there are no pin bones still lodged in the fillet; if there are, use needle-nosed pliers to remove them. Cut the salmon into 1/2-inch cubes. Add the salmon into a medium bowl and set aside. Make the dressing: In a small bowl, stir together the soy sauce, rice vinegar, sesame oil, sugar and garlic powder. The garlic powder and sugar will not dissolve completely, but that’s fine. Combine the salmon and the dressing: Add the sliced scallions to the bowl with the salmon, saving 1 to 2 tablespoons for garnish. Add the soy sauce mixture to the salmon and scallions. Using a large spoon or a rubber spatula, gently mix the salmon with the soy sauce mixture. Serve: Divide the rice between each bowl and then the salmon. Top with the rest of the sliced scallions, sliced cucumber, sliced radishes, diced avocado, furikake and red pepper flakes, if you like. The poke bowl is best enjoyed immediately. Source: Simply Recipes

How to Achieve a Clear Stock

Stock recipes tend to involve simmering bones and/or meat with some aromatics for a few hours, then strained. The technique transforms food scraps into a flavorful ingredient for sauces, soups and stews. You should always watch out to not let it boil, or else the stock could come out cloudy. However, there’s another technique for a clear, clean-tasting broth known as blanching. Blanching is when you drop something in boiling water briefly, usually done with vegetables to pre-cook them. You can apply the same technique to stock, by blanching the bones and meat in water before you add the aromatics and simmer. While it may seem counterintuitive to cook the meat and bones twice, the initial boil is important because it helps the proteins clump together. This will prevent any residue that can cloud the water and give the stock a muddy flavor. It’ll minimize any scum in your final stock. The French Method. This technique involves putting bones in a pot with cold water and bringing it up to a simmer. Afterwards, pour out the water and rinse the bones. The Chinese Method. With this method, you bring the water to a boil, then blanch the bones and meat for 10 to 15 seconds. Then, fish them out and rinse them. Afterwards, the blanched bones and the aromatics are added to fresh, cold water and then simmered to make the final stock. Source: the Kitchn

Flourless Peanut Butter Chocolate Chip Cookies Recipe

Prepare cookies with just a bowl and a fork. They’re flourless, gluten free and easily accessible for new bakers. The cookies come out crunchy on the outside and chewy on the inside. Enjoy a balance of sweetness, chocolate chips and rich peanut butter taste. Try using a no-stir natural peanut butter that is minimally processed for the best results. Prep time: 10 minsCook time: 14 minsTotal time: 24 minsServings: 30 servingsYield: 30 cookies Ingredients: 2 cups (480g) peanut butter 2 eggs 1 cup (201g) granulated sugar 1 cup (213g) brown sugar, firmly packed 1 teaspoon (6 grams) salt 1 teaspoon (4.8g) baking soda 2 cups (320g) chocolate chips Directions: Preheat oven and line baking sheets: Preheat your oven to 375° F. Line two large baking sheets with parchment paper and set aside. Mix cookie dough: Combine peanut butter, eggs, sugar, salt, and baking soda in a large mixing bowl. Stir to combine with a fork until the mixture is uniform in texture. There should be no sugar visible, and the eggs should be fully incorporated. Fold in chocolate chips using a rubber spatula. Shape cookie dough: Use a spoon to scoop about two tablespoons of dough out onto your hand. Roll the dough into a ball and flatten slightly.Place about 15 cookies on each lined baking sheet, leaving one inch of space around each cookie. They will spread significantly while baking. Bake and cool cookies: Bake until cookies have cracked, about 13-15 minutes. Cool and store cookies: Let them cool on the cookie sheet for five minutes before transferring to a cooling rack. Store the baked and cooled cookies in a tightly sealed container at room temperature. Source: Simply Recipes

Cinnamon Apple Air Fried Recipe

Prepare extravagant desserts with nothing more than an air fryer! This cinnamon apple air fried empanada recipe checks all the boxes for a sweet and comforting treat. Make these with the help of your family or friends for a fun weekend night in. Sprinkle them with powdered sugar for the finishing touch. Ingredients: Apple Corn Starch Cinnamon Powdered Sugar Brown Sugar 1 tbsp. Butter Canola Oil Cream cheese (optional) Empanada discs Non-stick cooking spray Directions: Chop an apple into squares Mix with ⅛ cup of corn starch, cinnamon, butter and canola oil Spray with non-stick spray and cook at 400°F for 3 minutes In another bowl mix apple with ⅛ cup powdered sugar and ⅛ cup brown sugar Place 2 tbsps. of apples and cream cheese (optional) on empanada disc. Seal edges with your hand or fork Spray outside of empanada with cooking oil and sprinkle cinnamon Cook at 350°F for 10 minutes. Flip and cook for another 10 minutes. Sprinkle with powdered sugar

Dishwasher Mistakes to Avoid For Longevity

All major appliances have proper maintenance protocols to ensure it offers years of reliable use. Dishwashers are no exception. Mold, mildew, inefficient cycles and malfunctioning mechanics can disturb your kitchen’s flow for meal prep and cleanup. These repairs can also be costly. It’s important to prevent these issues by avoiding some common mistakes. As with any appliance, it’s best to refer to your product’s manual for the most accurate information. Running short, cold cycles. Many dishwashers can come with different cleaning options, such as cold washes or short rinses. However, it may be in the best interest of your appliance to stick to the standard full, hot cycles. A cold and short cycle can cause sludge and slime buildup. To ensure your dishwasher’s water is truly hot, try briefly running the hot water from the faucet closest to the dishwasher (typically your kitchen sink) before starting a cycle. Skipping heated dry. Similar to the previous rule, your dishwasher does need an extra hot cycle to burn off any lingering dampness and humidity. Not doing so can lead to mold and mildew. Use the heated dry option to give your unit a little more power to do its job. Using detergent pods. Most of the time detergent pods are more convenient, but may not be as effective as liquid detergent. Most newer dishwashers don’t get the water hot enough to completely dissolve the pods. Look out for any half-dissolved pods in the dishwasher door or residue on glassware. A detergent pod could be the culprit. Not cleaning filters daily. You may be unaware of the fact that your dishwasher has a filter food debris. This filter traps larger food particles, similarly to a basket drain in your kitchen’s sink. Leaving these filters dirty or clogged with food can lead to inefficient water flow and ultimately a less effective dishwasher. Avoiding maintenance. Anytime you notice your dishwasher working less efficiently than normal or leaving food residue behind on dishes, it may be time to schedule an inspection or maintenance. Sometimes sensors can malfunction and the dishwasher will stop heating water properly, no matter the way it’s set. It’s best to always take note of these issues sooner rather than later. A technician will be able to identify and fix any obstructed or faulty sensors before the appliance breaks down completely. Source: the Kitchn

Classic New England Lobster Rolls Recipe

A classic summer feast. New England lobster rolls contain just a few ingredients: large chunks of lobster, mayonnaise and celery, stuffed into a grilled hot dog bun. It’s enjoyed best on a hot summer day for added comfort. The rolls are easy to prepare since you can use frozen lobster, no need to fret with live lobster! Prepare these for your next weekend meal along with a side of chips. Prep time: 10 minsTotal time: 10 minsServings: 4 to 6 servings Ingredients: For the filling: 1 pound cooked lobster meat, cut into 1-inch pieces 3 tablespoons lemon juice 1/4 teaspoon salt 1/8 teaspoon black pepper 1/2 cup finely chopped celery 1/3 cup mayonnaise For the buns: 4 to 6 New England style split-top hot dog buns 2 to 3 tablespoons soft butter For serving: Lemon wedges Potato chips Directions: Make the lobster salad: In a bowl, stir the lobster meat, lemon juice, salt, pepper, celery, and mayonnaise together. Taste and add more salt, pepper, or lemon juice, if you like. Toast the buns: Spread the outsides of the buns with softened butter. Set a skillet or cast iron pan over medium-high heat. Toast the buns for about 30 seconds on each side, or until golden brown. Assemble the lobster rolls: Fill each bun with lobster salad. Serve with potato chips and a wedge of lemon. Source: Simply Recipes

Air Fried Cinnamon Peaches Recipe

Take your fruits to the next level! Enjoy these carnival style peach fries. They’re great as an appetizer or dessert for their sweet delicious flavor and quick preparation. These fries can be cooked in just about 3 minutes. Easily prepare these with common pantry ingredients such as cinnamon, sugar and cornstarch. Ingredients: Peach Corn Starch Cinnamon Brown Sugar Butter Olive Oil Non-stick cooking spray Directions: Chop a peach into french fry pieces Mix fries with ⅛ cup of corn starch, cinnamon, butter and olive oil Spray air fryer pan with non-stick spray and load fries Air fry at 400°F for 3 minutes In another bowl mix 2 tbsp cinnamon and ⅓ cup brown sugar Mix fries with mix and serve