Month: June 2020

Fire Up the Grill for Father’s Day

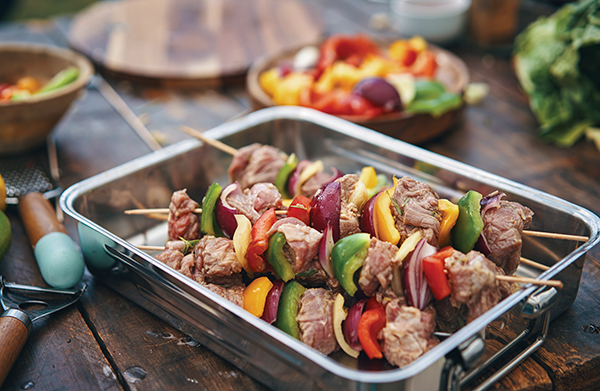
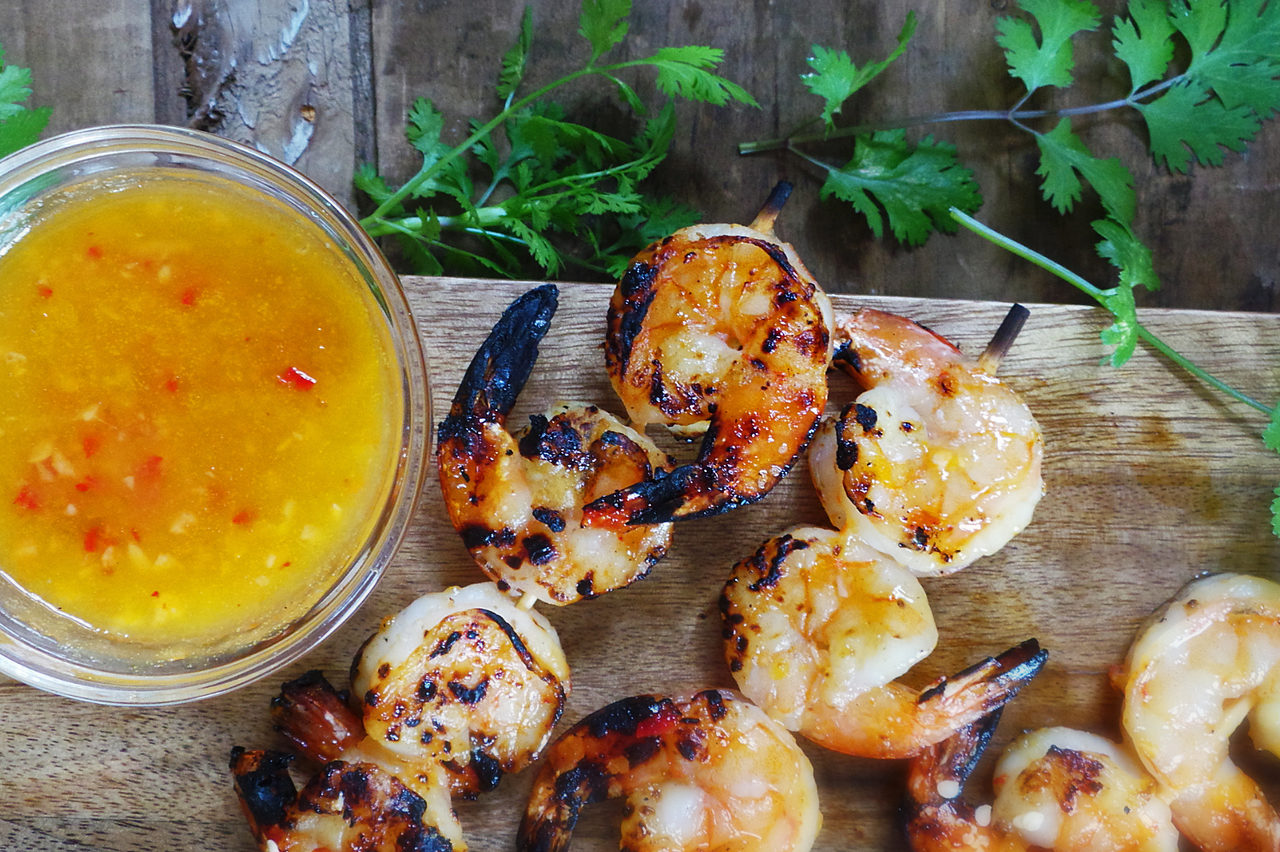
It’s a time to fire up the grill, slow down and enjoy father’s day. When you’re thinking about what to feed your family off the grill, it should be a breeze, and you shouldn’t have to choose between good and good for you. Consider these tips for creating healthier, flavorful meals you can feel confident serving. Keep it simple. Skip the complicated recipes that call for a wide variety of ingredients, a multitude of steps and long cook times. Instead, seek out products and dishes that are made with ingredients you recognize and have just a handful of instructions. This will ensure less time in the kitchen and more time with loved ones. Focus on seasonal, clean ingredients. Get inspired by your local farmer’s market. One of the best parts about summer is the abundance of fresh fruits and vegetables that can add flavor and nutrients to your plate. Don’t forget the sides. To balance your spread of burgers and hot dogs, consider serving fresh asparagus or sweet corn in place of other salty, processed options. Fruits like peaches and pineapple work well on the grill, too, but remember to group produce by similar cooking times. Aim for a quick and fun cleanup. Perhaps one of the most overlooked secrets to a stress-free meal is to cut down on cleanup. A backyard barbecue can be one of the easiest messes to maintain as most of the prep is done outside on the grill. Try setting up a buffet line on your deck or patio where your family can build their burgers with customized toppings, like cheese, veggies and sauces. Then add a little bit of fun by putting on your favorite music playlist to help make a simple, everyday meal feel even more special. Burger with Grilled Pineapple and Honey Garlic Barbecue Sauce Total time: 30 minutesServings: 2 2 rings freshly cored pineapple 2 Burger patties, thawed salt, to taste freshly ground black pepper, to taste1 cup baby arugula2 sesame seed burger buns, lightly toasted1/4 cup crispy fried onions2 tablespoons honey garlic barbecue sauce Heat grill to medium heat. Grill pineapple slices 4-5 minutes per side until grill-marked and slightly caramelized. Cut slices in half and set aside. Wipe down grill to cook burger patties.  Season burger patties with salt and pepper, to taste. Grill 4-5 minutes per side until burgers are evenly browned with internal temperature of 165 F. To assemble, layer handful of baby arugula leaves on toasted bottom buns, top each with burger and two cut slices each of grilled pineapple. Sprinkle on crispy fried onions, drizzle with honey garlic barbecue sauce and place toasted sesame seed bun on top. Asian Marinated Grilled Shrimp Skewers 1 Pound large shrimp, shelled and de-veined (you can leave the tails on if you like, I took them off so we could shovel them in our mouths faster, ha!)3 Tbls unsalted butter2 Tbls soy sauce2 tsp lime juice, fresh squeezed1 tsp ginger, grated2 cloves garlic, minced1 1/2 Tbls sugar2 green onions, bruised but not chopped Place all ingredients except for the shrimp in a sauce pan over medium heat. Let come to a simmer then take off the heat and let cool on the counter. Place shrimp and marinade in a bag or bowl covered in plastic wrap and marinade for at least an hour in the fridge. Try to let marinade around 3-5 hours but not longer. Take shrimp out of marinade and place on skewers. If using wooden skewers, let these soak overnight in water. Grill over high heat until just cooked. Do not overcook or shrimp will become rubbery. This will only take about 3-4 minutes per side, depending how big the shrimp are. You can baste the shrimp with the marinade when they first hit the grill but after that, toss out the marinade. Serve and enjoy! These don’t need any condiments, they are super flavorful and moist on their own! Happy Father’s Day!

Appliance Talk: Difference Between a Rangetop & Cooktop?

When remodeling your kitchen, or designing a brand new one, then you’ll need to think about which appliances you need. There are essential appliances every well designed kitchen needs and this includes a cooking appliance such as you range or a cooktop to cook on. Will you choose a range top or cooktop? To make your purchase with confidence we have decided to break it down for ya! In this comparison between the range top vs cooktop, you will discover the similarities and differences between these two kitchen applications. First, Let’s discuss the similarities. Rangetops and cooktops have either gas or electric models, and either one offers the ability to have a more flexible kitchen layout, so oven and rangetop or cooktop can be placed separately. Now, on to the differences. The major difference between rangetops and cooktops is the control features and installation method, which will determine how your countertop and cabinets are designed. The Pros of a Range Top These are the perks: A rangetop is very much like a hybrid of a range and a cooktop. rangetop slides into an opening directly into your countertops Range tops are sturdy and can handle heavy use. Range tops can either be powered by electric or gas. Range tops have knobs and controls on the front, which come in handy when trying to manage you’re cooking with multiple items on the burners. Range tops have a larger cooking surface. Range tops typically come with more professional features than others of its kind on the market. Like the sound of these Pros? CLICK HERE The Cons of a Range Top These aren’t exactly cons but these are a few things to consider. The front knobs and controls of the range top may be a safety concern where small children are concerned.  Range tops may be too large and bulky for smaller kitchens. The Pros of a Cooktop Cooktops have their pros too that make them a popular choice among many people. Cooktops are available in electric, gas, or induction cooking methods.  In general a Cooktop are smaller than Rangetops so they take up less space in your kitchen. The knobs and controls of cooktops are found on top of the unit. This allows an increased level of safety since they are more difficult for young kids to reach. Cooktops are often easier to clean. Like the sound of these Pros? CLICK HERE The Cons of a Cooktop Cooktops have they’re drawbacks, too! Cooktops are more compact, with less room or space to move around. Cooktops often come with less professional features than range tops do. Rangetops are going to require more space but they are perfect for those who do a lot of cooking and want the normal grates and feeling of a stove top. On the other hand, if space, efficiency, and simple is what you are after, then a cooktop may be your ideal appliance. When determining which one is right for your kitchen before you waste your money, consider the following: The size of your kitchen is going to have a great impact on which one you choose. You will need to determine the space available and how much of it you are willing to give up. Determine the amount of cooking you typically do you are going to need something hefty, sturdy, and large to withstand your level of use. Think about the method of cooking electric, gas, or induction? What level of professional features are you looking for, do you prefer something simpler or more advanced for your needs? Getting a new appliance for your kitchen is always exciting. However, it is important to remember that appliances are not the type of item you buy on a whim. They require installation and space, in addition to the purchase itself.

Father’s Day Gifts for the Man Who Loves to Cook

Hey Family, Father’s Day is coming up. Yey! Sure, typical Father’s Day gifts generally get the job done – think golf clubs, tool set and even a stylish tie – but what about the dad who enjoys spending time making magic in the kitchen. Don’t forget him. Give him the tools he needs to succeed, whether he’s baking for the big game, preparing a meal for the family, trying out a new recipe or seeking to master the perfect steak. Reaching one’s fullest potential in the kitchen requires the right equipment, so put the best gear in his hands (or on his counter) and up his culinary experience with these ideas from Cosmo Appliances. From a Portable Induction Cooktop Burner to an Airfryer turn his Kitchen countertop into a versatile powerhouse, give your food-savvy dad what he needs to up his culinary game. For more Father’s Day gift inspiration visit cosmoappliances.com. A Super Range for a Super Dad Dad deserves tools as bold and innovative as his culinary creations. Featuring Gas or Dual Fuel Ranges that combine modern styling with high-performance cooking technology. Dad will appreciate the authentic professional appearance with a robust profile. With high performance sealed burners that deliver exhilarating precision while the convection oven provides consistent heat for perfect roasting, baking, and broiling. These one-of-a-kind Ranges are sure to take his culinary prowess to a whole new level. Previous Next BUY THIS RANGE Chef on the Go For those warm summer weekends, camping is a fantastic activity that provides hours of enjoyment and a welcome opportunity to connect with loved ones and nature. After a day full of outdoor activities, Dad will want to prepare something easy, simple and very fast. Upgrade your camping cuisine with a portable Induction cooktop. Thanks to induction technology, electromagnetic currents generate heat from within the metal in the cookware for extremely fast and even heating. Boasting impressive safety features unlike burners with flammable and combustible vapors, our system remains cool to touch until cookware is placed on it. It’s sleek, compact design allows him to enjoy cooking anywhere he goes. BUY THIS COOKTOP Guilt-Free Crispy Fried Food  Made popular by claims air frying is a healthy alternative for frying food; because it replicates the wonders of deep-frying in a healthier way so Dad can still indulge in his fave fried foods like French fries. The Air Fryer, uses rapid air technology to fry, bake, roast or grill your food with only a tablespoon or less of oil. Think of it as a hi-tech counter-top convection oven. For recipe ideas click here BUY THIS AIR FRYER Bonus Gift for Dad who Loves Wine For those wine enthusiasts that insist on professional grade wine refrigeration, for at home use Cosmo has combined advanced technology and our signature sleek appearance for you to enjoy quick access to cold drinks and your favorite wine. Our 24 inch wine cooler delivers exactly the right temperature, with a single zone temperature that can be set at an ideal temperature to allow your wine to mature properly. BUY THIS WINE COOLER

Sensational Summer Recipes to Try this Weekend

Whipping up a fresh cooked meal is one of the true joys of weekend summers, especially when grilled grub is paired with tantalizing sides and tempting desserts. Spice things up with Mexican Beef Sliders with Jalapeno Salsa and Avocado Cream coupled with a side like Roasted Potatoes then cap off a filling meal with these sweet and decadent Strawberry Cream Cheese Tartlets. If you’re looking for ways to mix meat and veggies all at once, these ideas for kebabs are a surefire way to please a variety of palates. Find more summer meal ideas at Culinary.net. Cook Up Kebabs As one of the most versatile main courses that can be grilled, kebabs offer nearly endless opportunities for customization. From protein to veggies, soaked wooden skewers can be loaded with just about any favorite flavors before hitting the grates. Consider these options for kicking your kebabs up a notch: Steak, cut into chunks Chicken, cut into chunks Bratwurst or sausage, cut into slices Ground beef, shaped into balls Lamb Shrimp Salmon, cut into chunks Bacon, cut into small pieces Sliced onions Sliced bell peppers Sliced jalapenos Sliced mushrooms Sliced cucumbers Cherry tomatoes   Summer Sliders with a Spicy Kick Summer calls for firing up the grill for a fresh-cooked meal, and sliders are an ideal way to enjoy a downsized version of a warm weather favorite. These Mexican Beef Sliders with Jalapeno Salsa and Avocado Cream are perfect for summer with their spicy kick of salsa and bright, cooling cream. Made with grass-fed beef, these mini burgers boast a lean, finely textured meat that tastes just as nature intended.   Mexican Beef Sliders with Jalapeno Salsa and Avocado Cream Prep time: 20 minutesCook time: 15 minutesServings: 4 Patties: 1 1/3 pounds lean grass-fed ground beef 1 clove garlic, crushed 1 medium onion, grated or finely chopped 1 egg, lightly beaten 3/4 cup red kidney beans, rinsed and drained 2 tablespoons tomato paste 3 teaspoons dried oregano, chopped 2 teaspoons mild smoked paprika 2 teaspoons ground cumin 1 teaspoon ground coriander 1/2 cup Parmesan cheese, grated salt, to taste pepper, to taste olive oil Jalapeno Salsa: 1 cup cucumber, thinly sliced into long ribbons 3/4 cup fresh cilantro leaves, chopped 1 red onion, finely sliced 1/2 cup pickled jalapenos, finely chopped salt, to taste pepper, to taste olive oil lime juice Avocado Cream: 1 avocado, mashed 1/2 cup sour cream 1 lime, juice and zest only salt, to taste pepper, to taste 8-12 slider buns, halved 2-3 cobs sweet corn, cooked and sliced into shards 8-12 small bamboo skewers To make patties: In bowl, combine beef, garlic, onion, egg, kidney beans, tomato paste, oregano, paprika, cumin, coriander, Parmesan cheese, salt, to taste, and pepper, to taste. Shape into 8-12 small patties. Cover and refrigerate 15 minutes. Heat grill or frying pan to medium heat. Brush patties with oil on both sides. Cook 2-3 minutes on each side, turning once to brown both sides evenly, until cooked through. To make Jalapeno Salsa: In bowl, combine cucumber, cilantro, onion and jalapenos; season with salt and pepper, to taste. Drizzle with olive oil and lime juice. To make Avocado Cream: In bowl, combine avocado, sour cream, lime juice and lime zest; season with salt and pepper, to taste. Spread Avocado Cream on bottom buns and place patties on top. Top patties with Jalapeno Salsa, corn and top buns. Press down gently and poke in skewers to secure sliders. A Sweet Summer Treat Sweet flavors and warm weather go hand-in-hand, and many summer occasions and get-together call for dessert. Take advantage of warm weather favorites like strawberries and raspberries with these Strawberry Cream Cheese Mini Tarts. Made using the best berries nature can provide, these bite-size tarts feature a graham cracker crust base and an indulgent cream cheese filling flavored with sliced strawberries, honey and lemon topped with sweet, juicy strawberries and raspberries.   Strawberry Cream Cheese Tarts Makes: 24 tarts (4 ounces each) 1/2 cup water 2 tablespoons lemon juice 3 tablespoons lemon zest 2 tablespoons gelatin 4 cups Well•Pict Strawberries, sliced, divided 1/3 cup honey 2 packages (8 ounces each) cream cheese 1/2 cup sour cream 1 cup ice cubes 2 cups graham cracker crumbs 1/2 cup melted butter 1 cup  Strawberries, rinsed, for garnish 1 cup  Raspberries, rinsed, for garnish In blender, mix water, lemon juice, lemon zest and gelatin until frothy. Add 2 cups strawberries and honey; blend until smooth. Pour into bowl and chill mix 15 minutes. In blender, mix cream cheese, sour cream and ice cubes while incorporating strawberry mixture. Mix in remaining strawberries. In blender or food processor, mix graham crackers and melted butter to crumb consistency. Lightly grease two medium muffin pans and pack graham cracker mixture at bottom of each opening. Pour strawberry mixture over graham cracker mixture and chill until set. Gently pull tarts from muffin tins and place on serving tray. Garnish with strawberries and raspberries. Roasted and Ready to Serve Summer meals centered around grilled fare call for a complementary pairing that completes the classic profile of warm weather food. Using a versatile vegetable like potatoes allows you to think up different methods of cooking for a new flavor each time. While you’re focused on the main dish being grilled, these Roasted Potatoes can bake away indoors for a simple side that requires little attention. Roasted Potatoes 1 pound potatoes, chopped into 1-inch cubes 1/2 cup onion, chopped into 1-inch cubes 1/2 cup green pepper, chopped into 1-inch cubes 1 teaspoon garlic, finely chopped 1 teaspoon vegetable oil 1/4 teaspoon salt 1/4 teaspoon pepper 1 tablespoon parsley, finely chopped 1/2 teaspoon paprika Preheat oven to 350° F. In medium bowl, mix potatoes, onions, green peppers and garlic. Add vegetable oil, salt, pepper, parsley and paprika. Mix well. Cover bowl and refrigerate 15 minutes. Spread potato mixture evenly on cookie sheet. Bake about 35 minutes. Photos courtesy of Getty Images (Kebabs and Roasted Potatoes)

Kitchen Ventilation: Downdraft vs. Island Hood

Before you decide which type is best for your home it is important to learn about the difference between downdraft vs. hood fan ventilation. Island Hoods Island hoods are installed in a space where the stove does not have any adjacent walls. The vent is connected to a duct that is fixed to the ceiling — thereby transferring the smoke away. If you have an island layout for a kitchen, these are the best options. They look good and give your space an aesthetic appeal. There are different styles like these units by Cosmo Downdrafts A downdraft ventilation system, or pop-up vents use proximity ventilation to pull smoke and grease downward, versus traditional ventilation which captures exhaust as it goes up. Downdrafts look different than a larger hood aesthetically. You can see the whole kitchen. Downdraft vs. Island Hood Functionally, island hoods are considered to be better for a few reasons. What are the pros of an Island hood fan? More effective: Island Hoods are generally larger and more powerful and clean the air better, especially if you cook large meals often. Keep in mind, smoke rises so it simpler to redirect where it is already headed Visual interest: Today’s range hoods are not only functional, but they are beautiful as well. Oftentimes, a stylish, stainless-steel range hood can be the focal point of your kitchen.  CFM: The max power on a downdraft is 1,000 CFM versus 1,500-1,800 on an island hood. There are limitations because Downdraft vents only work for cooktops unless you specifically buy a downdraft range.          Capture area: Smoke is first channeled, filtered and then exhausted. An island hood has plenty of capture area, but there is almost none in a downdraft. If you grill or wok, the downdraft will not be able to handle the smoke and grease. What are the pros of downdraft ventilation? While downdraft vents aren’t the ideal ventilation system for all kitchens, they can be an effective solution for certain situations. People like downdraft ventilation ranges for these reasons: No ductwork needed: You simply install the range and you’re done. Downdraft ventilation is invisible: Except when in use, a simple push of a button makes the vent rise and fall. Those looking for a sleek, minimal kitchen vibe will enjoy this feature. Pop-up vents take up less space: In a small kitchen, they can make room for more upper cabinets. Easy to Clean: Downdraft vents are easier to clean than full range hoods. In conclusion, adequate ventilation helps to remove excess heat and moisture from the room for superior comfort and temperature control.  Downdraft ventilation is discreet, sophisticated, and effective in some instances. It’s perfect for those looking for an uncluttered seamless kitchen, and for providing ventilation for kitchens where traditional ventilation isn’t possible. There’s no denying that Island Range Hoods provide many important benefits like protection from toxins and unpleasant odors. An Island hood is an important asset to your home and your health. Shop Island Hood

5 Pro Tips for Remodeling Your Home

Due to the COVID-19 pandemic many Americans have spent a lot of time at home over the past few months, there have been plenty of opportunities to think about how that living space could be improved. While this may not be the ideal time to tackle a full gut and renovate project, it may still be possible to do some smaller scale remodeling projects that update and improve your home. For example, simple cosmetic repairs like painting and replacing vanities can make a noticeable difference with minimal work or investment. Or if you’re hesitant about bringing contractors into the house, outdoor projects like replacing fencing, adding paver stones or constructing outdoor living spaces may be a benefit for your family. Before you take on a project, consider these tips from Robi Kirsic, MCKBR, UDCP, chairman of the board of the National Association of the Remodeling Industry and co-CEO of TimeLine Renovation & Design. Define the Purpose The first consideration whether you’re making changes for yourself or for future resale is the purpose of your project. This determines everything from the budget to the materials you select. Remember projects in the kitchen and bathroom typically bring the greatest return on investment. It’s also a good idea to plan how you’ll use the renovated area. When possible, incorporate elements of universal design that don’t change how the space looks but will change how it works. For example, in the bathroom, install a curbless shower, taller toilet and block in walls to allow future installation of grab bars. Stick to a Budget Another early decision is your budget. It’s fruitless to spend time looking at materials and making design decisions based on products that exceed your budget or, conversely, fall below the quality level you prefer. Having a professional involved can help keep you from overspending and identify areas you may want to splurge or pull back. Select a Remodeler Friends and family can be great resources when it comes to choosing a remodeling contractor since they’re likely to give detailed and candid opinions about their experiences. When you begin interviewing companies yourself, verify they’re licensed and insured, and ask what they offer above those minimum requirements. Are they certified or accredited? Do they specialize in the type of work you’re considering? Also be sure to request and check references and search online for reviews. Conduct Virtual Meetings While some projects may require an in-person assessment, many planning sessions can be conducted virtually. You can even shop products to be used in your project virtually since online catalogs typically show a variety of colors and finishes along with prices. For items you need to see or feel to choose, like flooring, request samples to test in your home. To make your virtual meetings most productive, prepare by providing a detailed scope of work and be ready to provide measurements and show the space cleared of clutter. Keep it Safe For some families, sticking to outdoor projects may be more comfortable in the short term. For those who are ready to bring contractors inside, there are numerous steps you can take to create a safer working environment. Examples include asking everyone involved to wear face masks and gloves and using plastic at doorways to keep the work area separate from the living area. Regular disinfecting and a thorough cleaning at the end of the project are also important preventive steps. Find more remodeling resources, including certified contractors in your community, at RemodelingDoneRight.com SOURCE: National Association of the Remodeling Industry

How to Load a Dishwasher 101

There are several essentials tips to keep in mind for the best way to load a dishwasher. Depending on the brand a dishwasher has different racks and internal workings, meaning each has a unique loading pattern. Consult your manufacturer’s instructions about how to load your dishwasher to ensure you get the most effective cleaning. Pre-rinse any dishes that will sit in the dishwasher for a while before you run a cycle. Some items — like cast iron cookware — should never go in this machine. Make sure you know what not to put in the dishwasher. Don’t stack dishes, as this prevents the sprayer from reaching everywhere. Make sure plastic items are secure, so they don’t get knocked loose. If they are unsettled and get too close to the heating element, they can melt. Avoid crowding the dishwasher, as this can lead to dishes getting broken or not being washed effectively. Loading Silverware in a Dishwasher Loading silverware in the dishwasher should be a no brainer, You just drop it in, right? Well, there’s a bit more to it. When possible, mix forks, spoons and knives to prevent them from nesting. Load some utensils — like forks and spoons — with handles facing down. Knives should be loaded with the handles facing up so that you don’t cut yourself. Keep silver-plated utensils and stainless steel utensils separate to prevent damage to your good silver. How to Load Large Items Larger dishes like plates, casserole dishes, dishwasher-safe baking sheets and mixing bowls should be loaded on the bottom rack. But there are a few things you might not be aware of. Make sure the largest items are positioned towards the sides and the back of the rack. (This will allow the water to circulate more evenly.) Load dishes so that the side that is dirty faces the sprayer. Space out larger items to ensure they’re properly cleaned. . Many non-stick pots and pans should be washed by hand, don’t assume they are dishwasher safe, it’s best to always consult the care instructions. How to Load Smaller Items in Your Dishwasher As it goes, the top rack is reserved for smaller items, such as coffee mugs, small bowls and glasses. Make the most of each dishwashing cycle with these tips. Place items in between the tines on the rack to prevent water spots. Load cups and mugs at an angle — with the inside of the cup facing the sprayer — to help limit pooling. Unload the bottom rack first so that any liquid that has puddled in cups or mugs doesn’t splash on clean dishes. Skip the dishwasher when it comes to cleaning wine glasses, as their delicate globes and stems can easily break. Load dishwasher-safe plastic food storage containers and other plastic items on the top rack — and far away from the heating element — to help prevent warping and buckling. Need to upgrade your current dishwasher? Consider the Cosmo Built-in Dishwasher. SHOP HERE For more great recipes, tips and appliance news, follow us on Facebook or Instagram.

Quarantine Cooking-Insanely Good-for-You Treats

While eating healthy and enjoying sweets seldom go hand-in-hand, choosing the right combination of nutritious ingredients can allow for guilt-free indulgences that shirks conventional dieting wisdom. In fact, some eating plans take it a step further by actually encouraging eating big in the evening when you’re naturally hungriest to help achieve your weight loss goals. Fruit Tarts Recipe courtesy of “Always Eat After 7 PM”Prep time: 40 minutesCook time: 1 hour, 20 minutesServings: 20 Custard: 8  egg yolks 1 cup raw honey 1 tablespoon coconut flour 3  cans (13 2/3 ounces each) full-fat coconut milk 1 teaspoon vanilla extract 1/4 teaspoon lemon zest Sugar Cookie Crust: 1/2 cup coconut oil, plus additional for greasing 1/2 cup palm shortening 1 cup coconut palm sugar 1 teaspoon baking soda 1 teaspoon cream of tartar 1/4 teaspoon salt 3  egg yolks 1⁄2  teaspoon vanilla extract 1  cup blanched almond flour 1⁄4   cup coconut flour 2 tablespoons arrowroot starch Toppings: 2 kiwis, peeled and sliced 1 mango, peeled, pitted and sliced into 1/2-inch strips 1/2 cup raspberries 1/2 cup blackberries 1/2 cup blueberries 1/2 cup red grapes 1 cup strawberries, thinly sliced fresh mint leaves, for garnish To make custard: In saucepan, whisk egg yolks and honey until smooth. Mix in coconut flour. In medium saucepan over medium heat, combine coconut milk, vanilla extract and lemon zest; bring to boil then remove from heat. Pour hot milk mixture into egg yolk mixture, stirring while pouring. Over low heat, simmer 5 minutes, stirring constantly. Remove from heat and let cool, continuing to stir occasionally. Once cooled to room temperature, pour into individual custard cups. Chill in refrigerator 30 minutes, or until serving. To make crust: Heat oven to 350° F. Line bottom of pie pan with parchment paper and grease with coconut oil. In large mixing bowl using electric mixer on high, beat coconut oil and palm shortening 30 seconds. Add coconut palm sugar, baking soda, cream of tartar and salt; beat until combined, scraping sides of bowl occasionally. Beat in egg yolks and vanilla until combined. Beat in almond flour, coconut flour and starch. Chill dough in refrigerator 15 minutes. Press chilled cookie dough into bottom of pie pan and 2 inches up sides. Bake 12 minutes, or until crust is golden and browned on top and edges. Remove from oven and cool 10 minutes. Place cooled crust in refrigerator 30 minutes or overnight before assembling. To assemble fruit tarts: Spread custard over chilled crust. Decorate top in circular pattern with kiwis, mango strips, raspberries, blackberries, blueberries, grapes and strawberries. Before serving, chill at least 30 minutes or freeze 1 hour to help keep toppings in place. Remove from freezer and set out at room temperature 20 minutes before slicing. Garnish with mint leaves. Nutritional information per serving: 192 calories; 14 g fat; 16 g carbohydrates; 61 mg sodium; 2 g fiber; 1 g protein; 9 g sugar. Cherry Garcia Ice Cream Recipe courtesy of “Always Eat After 7 PM”Prep time: 10 minutesServings: 4 1/4 cup fresh Bing cherries, pitted and halved 1/4 cup stevia-sweetened dark chocolate bar, chopped 3 overripe frozen bananas, peeled and cut into 1-inch pieces 1/4 cup unsweetened coconut milk 1 pinch sea salt Chill cherries and dark chocolate. In food processor, pulse frozen bananas, milk and salt until smooth, creamy consistency of soft serve is achieved. Stir in cherries and chocolate. Serve immediately or place in freezer-safe container and freeze until serving. Nutritional information per serving: 165 calories; 7 g fat; 27 g carbohydrates; 134 mg sodium; 6 g fiber; 2 protein; 12 g sugar. No Bake Salted Caramel Bars Recipe courtesy of “Always Eat After 7 PM”Prep time: 30 minutesCook time: 40 minutesServings: 30 Cookie Layer: 2 1/2 cups raw pecans 8 pitted dates, soaked in hot water 10 minutes then drained 2 tablespoons blanched almond flour 1 teaspoon coconut flour 1/4 teaspoon sea salt 1/4 cup granular zero-calorie, natural sweetener 3 tablespoons coconut oil, melted Caramel Layer: 1/2 cup coconut palm sugar 1/2 cup granular zero-calorie, natural sweetener 2 tablespoons full-fat coconut milk 2 tablespoons coconut oil 1 pinch sea salt 1 tablespoon vanilla extract 1/2 teaspoon baking soda Chocolate Layer: 2 cups stevia-sweetened chocolate chips 2 tablespoons coconut oil coconut oil 1/3 cup dry roasted macadamia nuts, chopped coarse sea salt To make cookie layer: Place large skillet over medium heat. Spread pecans over skillet and toast, stirring often, 8-10 minutes until golden. Remove from heat. Transfer toasted pecans to food processor and pulse until fine. Add dates, almond flour, coconut flour, sea salt, sweetener and coconut oil; pulse until dough forms. To make caramel layer: In skillet over medium heat, combine coconut palm sugar, sweetener, coconut milk, coconut oil, sea salt and vanilla extract; bring to boil. Once boiling, decrease heat to low and cook 5 minutes, stirring often. Remove skillet from heat; whisk in baking soda. Return pan to low heat and cook 2 minutes, stirring often. Remove caramel from heat and let cool and thicken 5 minutes. To make chocolate layer: In double boiler, melt chocolate chips and coconut oil. Stir until mixture is smooth then remove from heat. To assemble salted caramel bars: Line bottom and sides of 9-by-9-inch baking pan with parchment paper, leaving some hanging over sides. Lightly rub parchment paper with coconut oil. Press cookie dough into bottom of pan to create even layer. Place in freezer 5 minutes to harden. Pour caramel over cookie layer and spread to coat evenly. Place in freezer 5 minutes. Pour chocolate over caramel and spread to cover evenly. Sprinkle with macadamia nuts and coarse salt. Place in freezer 10 minutes until chocolate sets. Use overhanging parchment paper to ease set mixture out of pan. Transfer to cutting board and slice into bite-size bars. Nutritional information per serving: 180 calories; 15 g fat; 15 g carbohydrates; 56 mg sodium; 4 g fiber; 2 g protein; 4 g sugar.

High-Powered Kitchen Ventilation with Cosmo’s QS75 Under Cabinet Range Hood

Why is it on So Many Best of 2020 Lists? “A convertible model that features a digital control panel and remote control.” Spruce.com #3 on Review Tube’s Range Hood: Best Range Hood 2019 (Buying Guide) watch here  “The Cosmo QS75 is another model that got included primarily for two reasons: power and no noise. The little machine has many surprises hidden inside it.” –architecturelab.net The QS75  modern professional under cabinet range hood perfect for homeowners and builders with limited space. Fits easily into an existing cabinet, has premium brushed stainless steel that matches seamlessly with existing kitchen appliances for a modern upscale look.  Let’s start with what most people say they love about this range hood. Rapid ventilation with seamless and noise-free operations, the Cosmo QS75-30 is certainly a little beast.  Its twin centrifugal motors in the unit provide an impressive airflow of 900 CFM. Its power can remove all the pungent and heavy smells from the kitchen within minutes after the cooking.  A key feature of this model is that it is convertible that means it can also be used ductless. An optional Carbon Fiber Kit that’s required as a substitute can be bought separately.       Overall the QS75 is a user-friendly kitchen appliance. It comes  with easy-to-operate 3-speed option controls. Operating this system is clean, safe, and convenient. The unit has Arc Flow permanent filters that save you money year after year and are dishwasher-safe for added convenience, the process of cleaning is a breeze. Even installing this unit is far less of a hassle compared to the average under-cabinet range hoods. The QS75 Range Hood offers many design features including energy saving 3 Watts LEDs that illuminate the cooktop surface, It has a modern design that gives your kitchen a sleek edge. The canopy design on this under cabinet is also elegant. Premium 430-grade stainless steel makes way for a durable and aesthetically pleasing kitchen range hood.  PROS POWERFUL YET QUIET: 500 CFM range hood with backlit touchscreen, remote control, 4-speed fan, twin centrifugal motors. Quickly ventilate your kitchen without the noise of competing range hoods EASY TO CLEAN FILTERS: Cosmo’s ARC-FLOW Stainless Steel Permanent Filters are dishwasher-safe and extremely durable. Range hood can be used ductless with optional Carbon Filter Kit (Purchase Part # CFK5) POWERFUL ENERGY EFFICIENT LIGHTS: The energy-efficient, 1.5-watt LEDs are long-lasting and provide bright, high lumen LED lighting for better visibility at night CONTEMPORARY MODERN DESIGN: Commercial pro-style canopy range hood is both elegant and powerful adding sophistication to your kitchen. Made of premium 430 grade, 18-Gauge thickness stainless steel. 7.5″ Round Top Vent 5 YEAR LIMITED : Our customer support team is based proudly in the USA. Product Dimensions: 29. 5 x 22 x 10 inches Electrical Requirements: 120V/60Hz, 3 Prong Plug. Round duct 7. 5 inch I WANT THIS RANGE HOOD