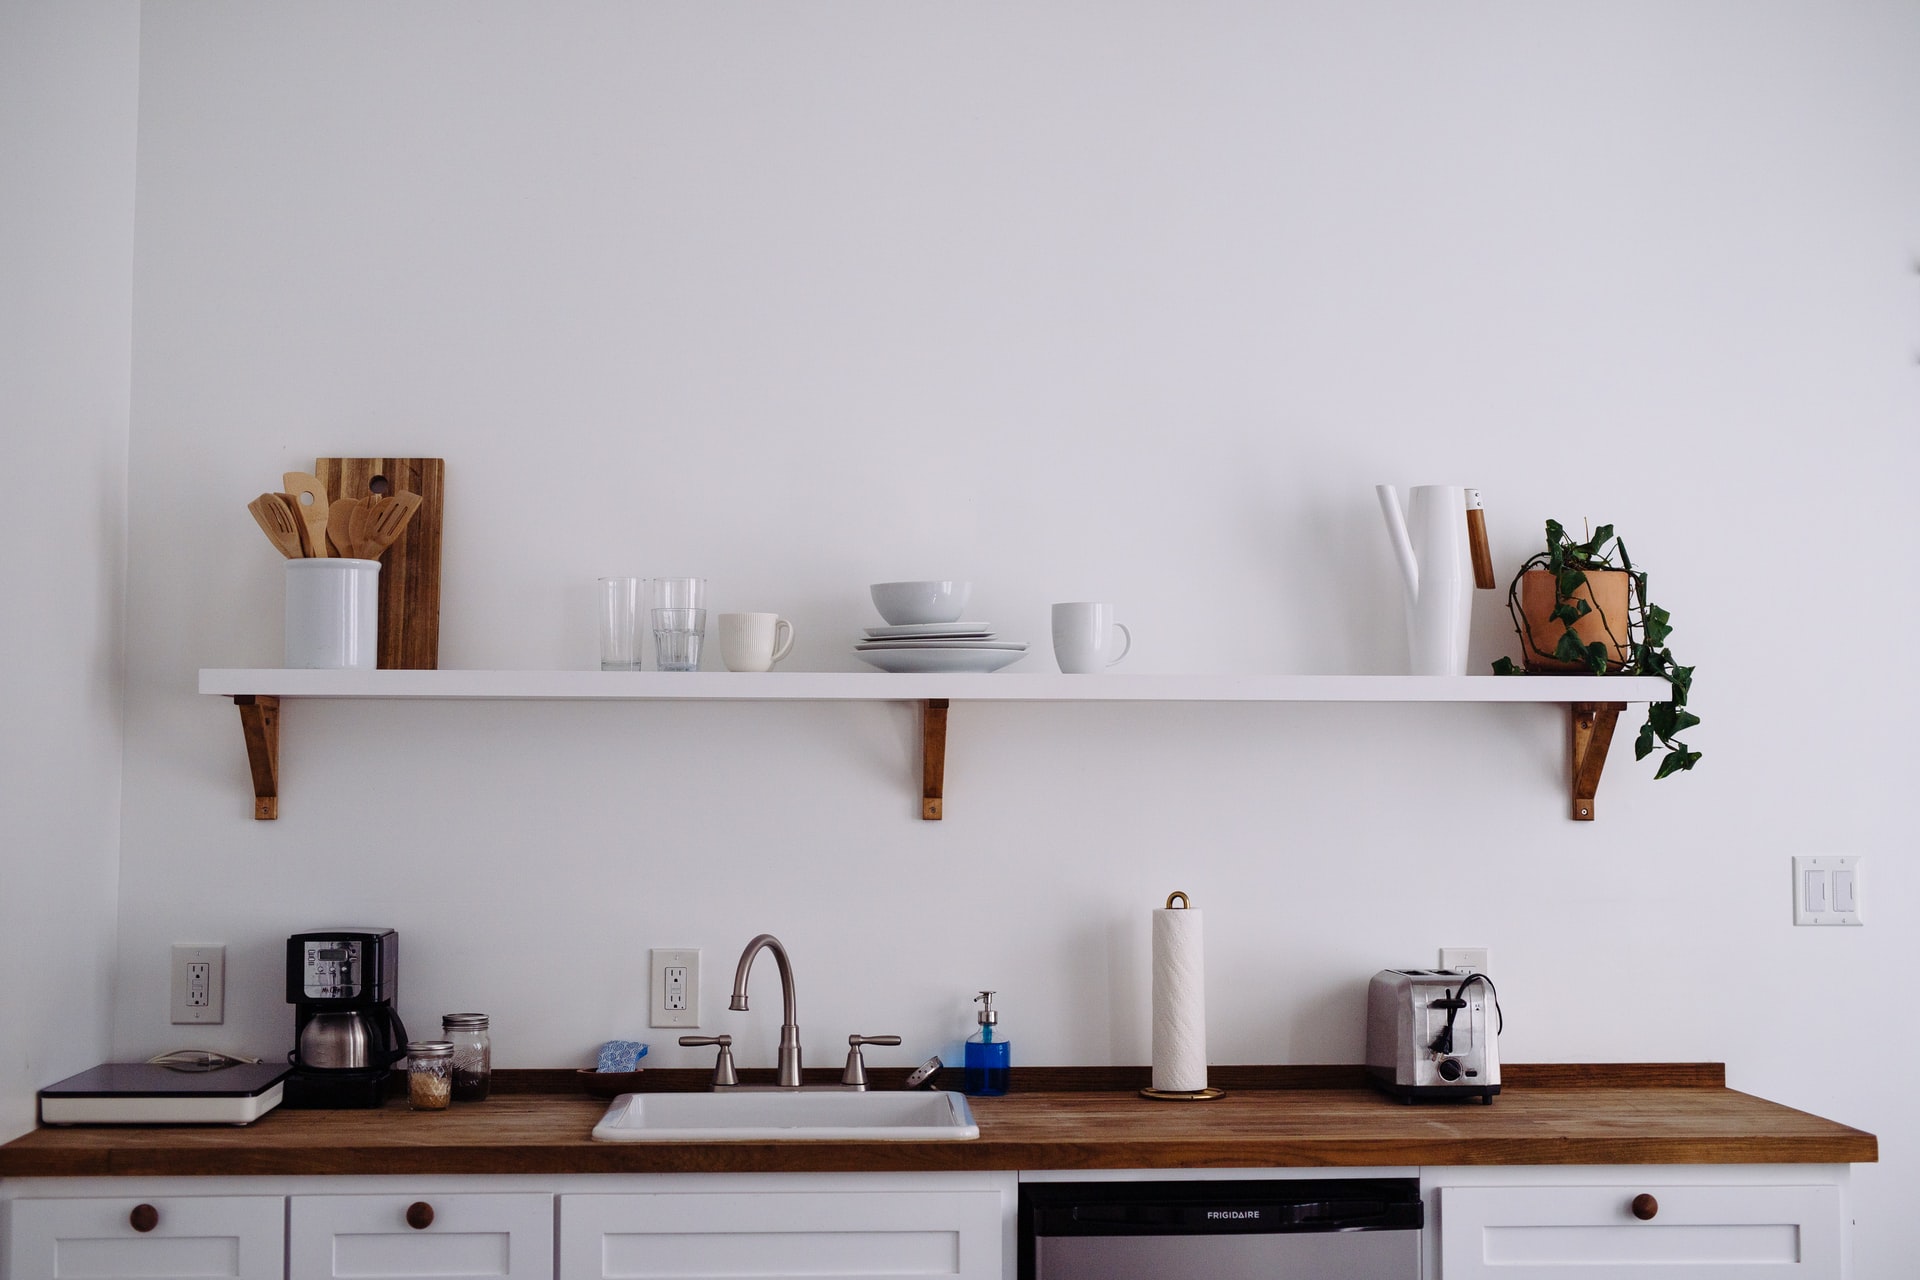
Home

How to Pick the Best Kitchen Sink and Faucet

Sinks and faucets are essential to any kitchen. Recent trends may influence your decision for your next upgrade, but it’s important to choose a sink that will work well for your needs and withstand years of use. Material Options. Sinks come in many different materials such as stainless steel, enamel-coated cast iron, and solid surfaces. If you tend to throw dishes into your sink, then stainless steel may be better for you, due to its tougher construction. Stainless steel is also an attractive choice when paired with solid surface counters like granite or engineered stone because of its undermount capability. Solid surface sinks are easier to clean due to their smoother area but can be chipped or damaged with hot pots and pans. Number of Sinks. Double-bowl sinks are the most common kitchen feature, but may not be necessary if you don’t wash as many dishes. Dishes may not always be hand washed when dishwashers are available, so the extra space isn’t always needed. Larger pots and pans may fit better in one large oversized sink bowl. The need for space differs from household to household, so recognize your needs when deciding on a sink construction. Faucets. There are many faucets to choose from on the market. Most use cartridge, ball or ceramic disc valves. These valves prevent water from leaking and control the water pressure.  A ceramic disk valve and solid brass base materials will be the most durable. A faucet with a spray arm is useful for filling pots with water or cleaning the sink afterwards. Other features to consider are garbage disposals or hot water dispensers. It’s best to avoid brass finishes as these faucets aren’t as suitable for high use areas like a kitchen. Instead opt for materials like chrome, polished nickel, brushed nickel or pewter. Sources: HGTV

Tea or Coffee in the Morning?

Coffee and tea are the most common drinks in the world. The debate of the health benefits between the two is ever evolving. It’s hard to distinguish which drink may be best to start your day with all the cluttered information. Here’s the key differences that can help you decide which one to sip on the next time you need a boost of energy. Caffeine Coffee and tea both contain the same stimulant: caffeine. But they differ in the way that they’re metabolized in our body. On average, a cup of coffee contains 80 to 100mg of caffeine. Tea on the other hand has 30 to 50mg per cup. This can vary across types of teas and brewing methods. Caffeine affects everyone differently and personal tolerance also plays a role. An excess of caffeine can lead to negative side effects such as insomnia, anxiety or elevated heart rate. It’s recommended to not consume more than four or five cups of coffee a day. Energy Tea differs from coffee in that it contains the chemical, L-theanine. This chemical metabolizes caffeine over a longer period of time which can lead to sustained energy. Coffee can provide a quicker buzz, but tea enhances cognitive performance and attention. Antioxidants Antioxidants are chemical compounds that may reduce the risk of health conditions such as cancer or diabetes. Both coffee and tea contain antioxidants, but coffee has more. Some common antioxidants found in coffee are chlorogenic, ferulic, caffeic and n-coumaric acids. The major antioxidant in tea is catechin which has anti-inflammatory properties. These antioxidants can help prevent degenerative diseases such as heart disease or stroke. It’s important to note that although coffee contains more antioxidants, exceeding recommended daily caffeine amounts can lead to health risks like insomnia and nausea. Sources: Insider 

Kitchen Design Mistakes to Avoid

Kitchen design can be daunting. It’s best to learn the biggest mistakes people often make before designing your own. Check out these tips below! Inconsistent Layout The placement of appliances and cabinets is crucial. Good organization goes a long way. First decide, what kind of kitchen works for you? Are you somebody who entertains in the kitchen? Maybe you’ll need an island with extra seats. You could need extra counter space if you love to bake and cook for all your ingredients. Putting all your appliances in one counter may not be the most aesthetically pleasing idea. These questions will help map out your space more effectively. Cabinets and the Color Choices You Make Cabinets can be one of the most expensive items in your kitchen. When deciding on your cabinets it’s important to keep two things in mind–versatility and durability. You won’t be replacing your cabinets all the time and these decisions can carry a hefty cost. Look for solid wood construction cabinets that are at least ½ inch thick with well finished surfaces. Pay attention to any imperfection such as wood knots or bad sanding. Countertops Marble counters may look beautiful at first, but these surfaces easily stain from certain drinks and dyes. Other acidic ingredients such as vinegar or lemons can actually erode marble quickly, making it less practical in a kitchen. Affordable and durable counters such as quartz or granite are safer choices for kitchen counters. Empty Spaces Above Cabinets Having a large empty space between cabinets and the ceiling leads to kitchens feeling empty and dust buildup. These spaces are hard to reach and clean. Consider placing a soffit here. A soffit is a decorative architectural feature that can fill up these areas in an appealing way. Thinking over how you can improve your kitchen with these tips? Show us over on our Facebook and Instagram and be sure to tag us! Source: Insider

Tips on Lighting Your Kitchen

Let there be light! Kitchen lighting often comes as an afterthought or disregarded completely. Well balanced kitchen lighting brings both functionality and aesthetic to a home. While there may be a plethora of different lights you can buy such as pendants, strip lights or recessed lighting, it’s important to understand the function of light and the role it plays in any room. It’s easier to think of light in layers. Light, like anything else in the kitchen, should have a purpose. Ambient – Ambient lighting will be the main source of lighting. It should be applied in an even layer to the entire room. An example would be natural sunlight. This can be accomplished with various kinds of lights as long as it’s filling the space. Task – The lighting that illuminates cooktops or surfaces you will need to use when preparing meals, as the name implies. It can be the lights you need to look through a pantry or read labels. Accent – Accent lighting emphasizes various places in the kitchen such as cabinets or counters. It should be the cherry on top that adds depth and dimension. Did you know color plays an important role too? According to Jeff Dross, director of education and industry trends at Kichler Lighting, you should look out for three qualities when picking lights for energy efficiency. Color Temperature. Look for lights that are in between 2700 to 3000 Kelvin. This will closely resemble incandescent lamping which would perfectly fit in any residential environment. CRI Rating. This stands for Color Rendering Index, and determines the way the light is interpreted. Low CRI can result in lights looking gray. Jeff recommends your lights have at least 80 CRI to see better color renders. Energy Star. Lights should have this certification to ensure the bulb has gone through longevity testing and has a minimum 80 CRI. What kind of lights do you have in your kitchen and is there any way you can add more? We’d love to see your design and style! Follow us on Facebook and Instagram, tag us and join our Cosmo community. Sources: YLighting , HGTV

Father’s Day Gifts for the Man Who Loves to Cook

Hey Family, Father’s Day is coming up. Yey! Sure, typical Father’s Day gifts generally get the job done – think golf clubs, tool set and even a stylish tie – but what about the dad who enjoys spending time making magic in the kitchen. Don’t forget him. Give him the tools he needs to succeed, whether he’s baking for the big game, preparing a meal for the family, trying out a new recipe or seeking to master the perfect steak. Reaching one’s fullest potential in the kitchen requires the right equipment, so put the best gear in his hands (or on his counter) and up his culinary experience with these ideas from Cosmo Appliances. From a Portable Induction Cooktop Burner to an Airfryer turn his Kitchen countertop into a versatile powerhouse, give your food-savvy dad what he needs to up his culinary game. For more Father’s Day gift inspiration visit cosmoappliances.com. A Super Range for a Super Dad Dad deserves tools as bold and innovative as his culinary creations. Featuring Gas or Dual Fuel Ranges that combine modern styling with high-performance cooking technology. Dad will appreciate the authentic professional appearance with a robust profile. With high performance sealed burners that deliver exhilarating precision while the convection oven provides consistent heat for perfect roasting, baking, and broiling. These one-of-a-kind Ranges are sure to take his culinary prowess to a whole new level. Previous Next BUY THIS RANGE Chef on the Go For those warm summer weekends, camping is a fantastic activity that provides hours of enjoyment and a welcome opportunity to connect with loved ones and nature. After a day full of outdoor activities, Dad will want to prepare something easy, simple and very fast. Upgrade your camping cuisine with a portable Induction cooktop. Thanks to induction technology, electromagnetic currents generate heat from within the metal in the cookware for extremely fast and even heating. Boasting impressive safety features unlike burners with flammable and combustible vapors, our system remains cool to touch until cookware is placed on it. It’s sleek, compact design allows him to enjoy cooking anywhere he goes. BUY THIS COOKTOP Guilt-Free Crispy Fried Food  Made popular by claims air frying is a healthy alternative for frying food; because it replicates the wonders of deep-frying in a healthier way so Dad can still indulge in his fave fried foods like French fries. The Air Fryer, uses rapid air technology to fry, bake, roast or grill your food with only a tablespoon or less of oil. Think of it as a hi-tech counter-top convection oven. For recipe ideas click here BUY THIS AIR FRYER Bonus Gift for Dad who Loves Wine For those wine enthusiasts that insist on professional grade wine refrigeration, for at home use Cosmo has combined advanced technology and our signature sleek appearance for you to enjoy quick access to cold drinks and your favorite wine. Our 24 inch wine cooler delivers exactly the right temperature, with a single zone temperature that can be set at an ideal temperature to allow your wine to mature properly. BUY THIS WINE COOLER

The Magic of Cooking with A Portable Induction Cooktop

Curious about induction cooking? There’s a lot to love about induction cooking and cooking with a portable cooktop has some real advantages. These fancy, futuristic looking and almost magical appliances offer sleek designs, with a smooth glass surface. Loved by chefs and food stylist, the portable induction cooktop is changing the cooking game- with its many time-and money-saving benefits. Portable induction cooktops are an excellent option for cooks looking to add extra cooking surfaces, when there are extra mouths to feed during the holidays, parties and when catering for other large gatherings.  If you have a small kitchen and need to maximize your space, you can easily tuck it away in a cabinet when you’re not using it making it the perfect space saving appliance for dorms, boats, patios, and RVs.  Unlike stovetops that rely on a gas burning flame to provide heat, an induction burner contains an electric coil that produces a magnetic field when turned on to directly and quickly heat the pan. The induction burner will only heat induction compatible cookware.  Induction cooktops use about 10 percent less energy because only the metal of the pan will heat up so all the energy goes directly into the cookware. Therefore, induction cooking is more energy efficient than cooking with a standard gas or electric cooktop.  Unlike stovetops that rely on a gas burning flame to provide heat, an induction burner contains an electric coil that produces a magnetic field when turned on to directly and quickly heat the pan. The induction burner will only heat induction compatible cookware.  Induction cooktops use about 10 percent less energy because only the metal of the pan will heat up so all the energy goes directly into the cookware. Therefore, induction cooking is more energy efficient than cooking with a standard gas or electric cooktop.  Another reason for its efficiency is the induction burners’ ability to reach precise temperature quickly. The heat created is instantaneous. It heats a pan to temperature in under a minute, and will boil water right before your eyes!  Induction cooktop burners offers a rapid response to cooking that offers almost 30% quicker heating time. Not only is it powerful, its scientifically precise temperature control means everything cooks perfectly. We are fans of the portable induction cooktop when safety is concerned- especially with kids and pets in the home.  The lack of an open flame and the fact the burner almost immediately cools down ensures its safety factor. Induction cooking is inherently safer than other methods because the burners don’t get hot, only the pan does. Plus, induction cooktops have several safety features like child-safety lock, pan detection and auto-shut off increasing their safety. Another great perk of the portable induction cooktop is its sleek surface that is easy to clean.  Because it generates little heat, there’s less cooking splatters and food doesn’t bake into the surface. Plus, with zero nooks to scrub, cleaning is simply a breeze.  Last but not least, its incredible function is matched by its aesthetic. The induction cooktop is an attractive addition to any kitchen.   While this form of cooking is more popular in Europe, its popularity is growing in the U.S. and justifiably so. Induction cooking is faster, safer, cleaner and more efficient. Considering adding a portable induction cooktop to your kitchen? Click here for more information and product features. 

How To Clean Stainless Steel Appliances the Natural Way

Instructions Check the manual: Before you clean a stainless steel appliance, it’s a good idea to check the manufacturer’s recommendations.  Gather your supplies: Cleaning is easier when you have all of your supplies together and ready to go. Determine the direction the grain: Like wood, Stainless steel also has a grain. Look closely. It will either be running horizontally or vertically. To clean your stainless steel, rub in the direction of that grain. To get your stainless steel appliances and fixtures sparkling clean here are some great DIY stainless steel cleaner recipes you can make at home.  Try vinegar: Wet a soft cloth (microfiber works best) with a diluted solution of 2 parts water to 1 part of vinegar. Wipe the entire surface from top to bottom, in a clockwise motion.  Follow with a dry cloth to wipe the area until completely dry. Polish with Olive Oil: To prevent smudges and fingerprints use olive oil. Apply a few drops of olive oil on a soft microfiber cloth. Wipe your stainless steel appliances in the direction of the grain.  A Baking Soda Scrub: Stainless steel pots and pans or countertops typically need a bit more attention. Make a soft paste out of baking soda and water and apply to the stain, allowing it to sit for about 20 minutes. Then, scrub the area with a cloth dampened in a solution of water and dish soap. It’s important to use a soft cloth and work parallel with the grain to avoid scratches. Be sure to fully rinse and dry. Add Shine with Coconut Oil: A small amount of coconut oil will give your stainless steel a nice shine. Use a soft cloth to buff. The Steam Clean: To sterilize stainless steel, you can also use a steam cleaner with a nozzle attachment. The steam will disinfect the surface, which can then be wiped dry with a soft cloth. Stainless steel can scratch easily so avoid using a brush attachment or any stiff cleaning tools.  For more recipes, ideas and inspiration follow our Facebook page For product information visit our website

Maximize Your Family Time

Now as much as ever, close family ties can make a significant impact on young lives. Constantly emerging technology sometimes limits personal interaction, while many school-age children experience unprecedented stress levels. Building strong connections with trusted adults can give kids a sense of security and a better foundation for achieving their potential. Make spending time together a priority with these engaging activity ideas that allow the whole family to get in on the fun. Plan a Movie or Game Night Kids thrive on routines and clear expectations, so a regular special event like a movie or game night can give them something to anticipate each week. Watching TV at home may not be a novelty, but you can make it an occasion to celebrate by adding special touches like dimming the lights to mimic a theater, pulling out cozy blankets and preparing popcorn or other treats. If you opt for game night instead, keep the enthusiasm strong week after week by creating long-range tournaments or allowing kids to rotate game selection privileges. Read Together Sharing books together not only creates an opportunity for bonding, it’s a way to give your child an academic boost outside the classroom. Studies show that daily reading promotes literacy, helps kids build their vocabulary and improves overall academic achievement. Also, the benefits don’t end with elementary-age children. Parents can connect with older kids through books that carry important lessons about life and relationships. Reading books individually then coming together to discuss them, similar to a book club, can provide the chance for thoughtful talks about difficult topics.  Cook Meals Together Eating together is a goal for many families, but preparing meals together takes those benefits even further. Engaging kids in meal preparation creates a sense of cooperation and instills pride for a successful project. It’s also a chance to share family traditions and pass on recipes that have traveled through generations. Enjoy a Craft Day Kids need the chance to let their imaginations soar, and arts and crafts projects can provide the perfect outlet for creative expression. An art session may be as simple as enlisting everyone’s help to make decorations for an upcoming event. Another thoughtful way to channel all that creative energy: have little artists make cards to deliver to a local senior or retirement community. For more life hacks, ideas and inspiration follow our Facebook page  For product information website

Spring Cleaning 101: 5 Steps to Deep Clean Your Oven

From bubbled over sauces to burnt cheese, your oven is the canvas for all kinds of spills and splatters. Ovens seem to present the most anxiety when it comes to cleaning kitchen appliance. With the right knowledge and basic tools, oven cleaning doesn’t have to be an overwhelming chore.  So, what is the best way to clean an oven? In the spirit of spring cleaning we have a two safe, natural, and effective methods to get the job done.  How to Clean the Oven: What You Need: Baking soda Water Rubber gloves Magic Eraser Damp dish cloth Spray bottle White vinegar Essential Oil (Optional) STEP ONE: Empty the oven, remove your oven racks, pizza stone, oven thermometer, and anything else you have inside the oven. Set aside. STEP TWO: Start by vacuuming out the dirt, dust, crumbs, and debris. You can use the vacuum hose, or if that feels too powerful, try the crevice attachment. How to clean with Baking Soda  Make a baking soda paste. This is a timelessly classic way to clean your oven. With a little elbow grease your oven will sparkle like new again. In a small bowl, mix a 1/2 cup of baking soda with a few tablespoons of water. If you’re adding any essential oils, 2-3 drops will be sufficient, but add more if desired. Adjust the ratio of both baking soda and water as needed until you have a spreadable paste. Distribute the mixture throughout the interior of the oven, except for the heating elements.   Let mixture sit overnight in the oven for at least 12 hours. The following day, spread vinegar over the surface and allow it to react with the paste, which will make the debris much easier to scrub off.   How to DIY Steam Clean with Water and Vinegar Place a large oven-proof dish, filled with a solution of water and White Vinegar on your bottom rack, then heat your oven to 350°. Bring this solution to a boil.  Turn off the oven and let it cool.  Open the doors and spray the inside with a solution made of water and vinegar and allow this mixture to sit for 30 minutes. Once the oven has completely cooled down, wipe away all food residue. STEP FOUR: Soak racks in dishwashing liquid for a few hours, scrub with a scouring pad, and then rinse well and dry.  If racks need heavy-duty cleaning, apply the paste. Note* Only use stainless steel racks; baking soda can discolor aluminum.  STEP FIVE: Use a magic eraser to easily wipe away grease on your oven glass.  Are you due for a brand new oven?  If your oven is on it’s last legs and cleaning it just won’t do the trick- Cosmo Appliances has a premium selection of wall ovens that are easy to clean and maintain with self cleaning feature.   Making Your Home Appliances Brand New Again With the right cleaning method you can have your oven appliance sparkle like new again. Just remember to always consult the instruction manual with each of your appliances. Although vinegar and other mild detergents are generally safe on appliances, there are always some exceptions to the rule. For more recipes, ideas and inspiration follow our Facebook page. For product information visit our website.

Sweet and Savory Brunch Recipes

Many spring celebrations and gatherings have been canceled due to the corona-virus outbreak. So people are getting creative and finding new ways to connect and spend quality time with their favorite people. From virtual concerts to happy hours and Netflix parties there’s something fun for everyone. A  group of friends I know are planning a virtual “Sunday brunch” over the weekend and because I love a good brunch that’s the  inspiration for  this recipe post. Springtime brunches call for fabulous food.  A wide variety of recipes may fit the occasion, but a combination of comforting bites with sweet and savory flavors is perfect for appeasing all appetites. This menu of morning recipes includes Chive and Orange Blossom Honey Waffles and Spicy Garlic Honey Chicken as a filling option to base the meal around with Breakfast Casserole as a more traditional dish. For a sweet sendoff, this Brown Sugar Bundt Cake is best served warm as a midday dessert or can be added to your plate as a simple side. Add flavor to your brunch with the sweet taste of honey as part of a remade rendition of a breakfast favorite: chicken and waffles. This recipe for Chive and Orange Blossom Honey Waffles and Spicy Garlic Chicken combines sweet with savory to shine as the main course for your gathering Chive and Orange Blossom Honey Waffles and Spicy Garlic Honey Chicken Servings: 4 Chicken: 8 boneless, skinless chicken thighs 2 cups buttermilk 2 tablespoons kosher salt, divided 3/4 teaspoon ground black pepper, divided 1/4 teaspoon rosemary, chopped 2 tablespoons orange blossom honey 2 cups all-purpose flour 2 teaspoons cayenne pepper 1 teaspoon garlic powder 1 teaspoon onion powder 2 teaspoons paprika 1/2 teaspoon ancho chile powder vegetable oil, as needed Waffles: 1 1/2 cups all-purpose flour 2 teaspoons orange blossom honey 1 teaspoon orange zest 1 teaspoon kosher salt 1 teaspoon baking powder 1 1/4 cups whole milk 2 large eggs 1/4 cup fresh chives, chopped 3/4 cup sharp cheddar cheese, shredded honey To make chicken: Rinse chicken thighs and pat dry with paper towels; place in large bowl. In separate bowl, combine buttermilk, 1 tablespoon salt, 1/4 teaspoon black pepper, rosemary and honey. Pour buttermilk mixture over chicken; cover and let marinate 8 hours or overnight. In separate mixing bowl, combine flour, remaining salt, remaining pepper, cayenne, garlic powder, onion powder, paprika and ancho chile powder; stir. Remove each piece of chicken from buttermilk, shake to remove excess liquid and dredge in flour mixture. Shake off excess. In deep fryer, heat oil to 375° F. Fry chicken until internal temperature reaches 175° F or juices run clear, approximately 5 minutes per thigh. Drain on paper towels. To make waffles: In large mixing bowl, mix flour, honey, orange zest, salt, baking powder, milk, eggs, chives and cheese until combined. Use waffle maker to cook four waffles in batches. Place chicken on waffles and drizzle with honey. A Traditional Brunch Dish Whether it’s just part of a brunch spread or the focus of your meal, an egg-based casserole is a perfect way to appease a morning crowd. This version of Breakfast Casserole calls for potatoes, ham, eggs, milk and cheese for a simple dish that requires little preparation before popping in the oven. Breakfast Casserole Prep time: 25 minutesCook time: 45 minutesServings: 6 1 pound red or white potatoes, scrubbed and cut into 1/2-inch pieces water 1/2 small onion, coarsely chopped (about 1/2 cup) nonstick cooking spray 1/2 teaspoon salt, divided 1/4 teaspoon pepper 1 cup reduced-fat and reduced-sodium, chopped, cooked ham (about 4 ounces) 1 cup (4 ounces) shredded Swiss or cheddar cheese 4 eggs 1 1/2 cups skim milk 1 tablespoon mustard Heat oven to 350° F. In large saucepan, cover potato pieces with enough water to just submerge. Bring to boil. Reduce heat; simmer, covered, 5 minutes. Add onion. Return to simmer, covered, about 5 minutes, or until potatoes are just tender. Drain well. Cool slightly. Coat 8-by-8-by-2-inch baking dish with nonstick cooking spray. Place potato-onion mixture in baking dish. Sprinkle with 1/4 teaspoon salt and pepper. Gently stir to combine. Sprinkle ham and cheese on top. In medium bowl, lightly beat eggs. Whisk in milk, mustard and remaining salt. Pour over layers in baking dish. Bake, uncovered, 40-45 minutes, or until knife inserted near center comes out clean. Let stand 5 minutes before serving. A Bundt Cake for Brunch Many brunch festivities may center around classic breakfast foods like quiches and fresh fruits, but you can take your gathering to the next level with a treat to pair with nearly any dish. This Brown Sugar Bundt Cake can be the simple, sweet side your guests crave as a complement to the savory recipes on the table. Made using just a handful of household ingredients it can be created in about an hour and served warm during your next brunch gathering. Brown Sugar Bundt Cake Prep time: 15 minutesCook time: 50 minutes Nonstick cooking spray 2 cups all-purpose flour, spooned and leveled 1 teaspoon baking powder 1/2 teaspoon baking soda 1 teaspoon kosher salt 10 tablespoons unsalted butter, at room temperature 1 3/4 cups packed Golden Brown Sugar 1/4 cup Granulated Sugar 2 large eggs, at room temperature 1 1/2 teaspoons vanilla 1 cup full-fat Greek yogurt Confectioners’ Sugar, for dusting Heat oven to 350° F. Grease 10-cup bundt pan with nonstick cooking spray. Set aside. In medium bowl, whisk flour, baking powder, baking soda and salt. In bowl of stand mixer fitted with paddle attachment, beat butter, brown sugar and granulated sugar until light and fluffy. Add eggs, one at a time, mixing well after each addition. Add vanilla and mix on low speed. With mixer on low, add flour mixture in three additions, alternating with yogurt. Begin and end with flour mixture. Mix until just combined. Pour batter into prepared bundt pan and use offset spatula to level batter. Bake 50-55 minutes, or until cake is golden brown and toothpick inserted in center of cake comes out