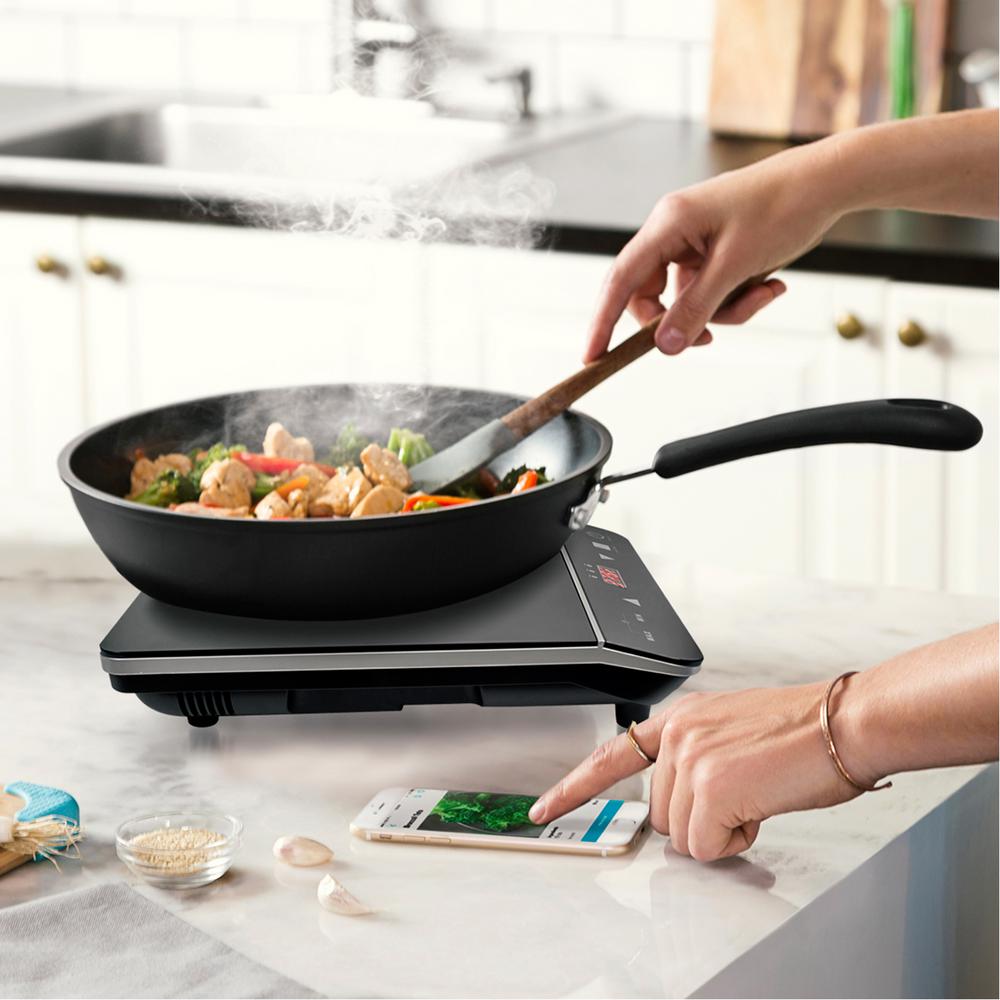
Home

Stuck-at-Home Easy Meal Hacks

Not sure what’s for dinner tonight? You’re not alone.  After weeks on lockdown and exhausting your favorite go-to meals you’re probably working extra hard to be creative in the kitchen. Even if you’re stuck at home your meals don’t have to be boring, with a little meal planning your family can enjoy healthy, flavorful meals during the coronavirus quarantine. More cooking can also mean more time spent preparing meals so innovation and technology can make meal prep easier, and kitchen hacks like turning to ready-to-heat meals that take just minutes can enhance your productivity. Consider these simple ways to rethink your dinner routine in an effort to create more moments with loved ones: Look for recipes with as few ingredients as possible. Dishes that include longer ingredient lists typically require more legwork in the kitchen, which usually involves additional prep steps and sometimes longer cook times. Plus, you’re more likely to already have the necessities on-hand for recipes that call for 5-10 ingredients rather than lengthy lists.   Buy pre-cut vegetables to trim time spent on prep work. One of the processes that can surprisingly consume more time than you realize is cutting, chopping and dicing veggies prior to even really diving into a recipe’s instructions. If you’d still prefer prepping your own fresh produce, try completing your work the night before when it doesn’t interfere with quality time spent with family.   Meal kits certainly save time in the store, but be careful to avoid options that still include a lot of prep and cleanup. Focus on frozen kits that contain pre-chopped and measured ingredients that are ready to go.   Stock your pantry with the basics to make cooking quicker and easier. From condiments and canned goods to seasonings and spices, keeping the essentials on-hand means less time scrambling for a quick run to the store and more moments spent at home.   For one of the ultimate comfort foods that’s simple to make, try thischeesy baked potato casserole. Stock Up on Pantry Essentials Running to the store every other day isn’t an option when you’re on lock down, so try to keep your pantry stocked with non-perishables that are often necessary in a variety of meals. Seasonings and spices (salt, pepper, dried herbs, cumin, chili powder, paprika, onion powder, etc.) Canned goods (tomatoes, beans, corn, broth, cream of mushroom, cream of chicken, etc.) Grains (flour, pastas, breadcrumbs, rolled oats, instant rice, etc.) Condiments and oils (olive oil, canola oil, ketchup, mustard, vinegars, barbecue sauce, butter, cooking wines, etc.)

7 Best Kitchen Garden Herbs for 2020

If the dishes you’ve been cooking feel bland and boring, fresh herbs are a great way to give them some liveliness- but herbs can be hard to keep and store in the fridge, and always seem to wilt just when you want to use this.  If you want fresh herbs easily accessible year round, you can start a small kitchen garden in a sunny window, and with our top seven picks, you’ll be covered for a variety of cuisines with no worries. Oregano: A far cry from the dried flakes you can find in pizza parlors, fresh oregano packs a punch. This earthy herb pairs well with boldly flavored dishes, proteins, especially poultry, and vibrant veggies like bell peppers. Cilantro: This staple of Mexican food can taste soapy to some, but for others, it’s a welcome addition to tacos, rice and other foods. Parsley: Not just the weird green decoration on the sides of your plate, parsley can add a clean, fresh flavor to almost any dish. It plays especially well with citrus and fish. Chives: This kissing cousin to onions pairs with nearly anything. It’s a friend to baked potatoes, soups and more- chop it up and sprinkle on top for a sweet, almost delicate onion flavor Rosemary: A bush rather than a plant, rosemary is a friend to proteins and potatoes. This woodsy herb is best left on the stem and removed before serving, or chopped finely enough that its sometimes tough texture isn’t a problem. Thyme: Indispensable in so many cuisines, Thyme is commonly used in French, Italian, Greek, Cajun and Creole food. It blends beautifully with other herbs to make wonderful seasonings. Basil: With so many varieties, basil compliments cuisines from Italian to Thai and even more. Pair sweet basil with tomatoes, fresh mozzarella and quality olive oil for a dreamy Caprese salad. The best time to have started a kitchen garden would have been a few weeks ago, but the second best time is now. Put your planters together and assemble this all-star team to liven up your foods in no time.   For more recipes, ideas and inspiration, visit our website at https://www.cosmoappliances.com or follow our Facebook page at https://www.facebook.com/cosmokitchenappliances

Spring Cleaning 101: 5 Tips for Quick Pantry Organization

Circumstances may have you feeling overwhelmed with a lot of cans and dry goods you wouldn’t normally be dealing with all at once. Conquer your clutter with these five easy tips from Cosmo Appliances to help organize your pantry. Utilize the Door The backs of your pantry doors may all be dead space. If you’ve got a gap between door and shelving, consider hanging a wire rack with smaller items that otherwise get easily lost or shuffled to the back. Stack Food Containers If you can never find the matching lids to your Tupperware, this one’s for you! Take five minutes to organize your storage containers by size on the shelf, then make a vertical rack to store the matching lids.  (Have a lid for a container that’s MIA? you have our permission to repurpose it or get rid of it. We won’t tell anyone.) Sort by Category Keeping shelves to a theme can help you find things faster. Group your granola bars, and stash your salty snacks together so they’re easy to find when you have a craving Cycle your shelves As you’re buying new boxed goods, take the extra second as you’re putting away groceries to pull the oldest boxes forward, and put the new box behind them. That way you’re not left with expired food. Hang it up If you have wire shelving in your pantry, you can use hooks and chip clips to hang up small items and lightweight bagged goods, freeing up shelf space, and, as a bonus, keeping you from accidentally crushing your chips. We hope these tips help you keep your pantry feeling fresh!  For more recipes, tips and ideas, visit us at cosmoappliances.com, and like our Facebook page athttps://www.facebook.com/cosmokitchenproducts

Spring Cleaning 101: 6 Easy Steps to Clean Your Refrigerator

Spring cleaning your refrigerator is about more than tossing old stuff and restocking it with fresh food. There’s more involved than just that, you’ll need to deodorize and disinfect, then take steps to ensure your refrigerator runs well and use less energy. Follow these 6 simple steps to clear it out, clean it up and restock the fridge. Gather your Supplies: Here’s what you’ll need Old towel for floor Bucket  Baking soda   Paper towels or rags  Sponges, dishcloths or rags Toothbrush  Multi-purpose surface spray Cooler Trash bags Vacuum Turn Off the Refrigerator To conserve energy it’s a good idea to turn your refrigerator off unless you have removable shelves and you’re good about keeping the door shut, then it’s okay to keep it plugged in. It’s safer to have the fridge unplugged when dusting the coils and cleaning the drip pan. If you can’t easily move the fridge or access the plug, turn off the circuit breaker that serves the refrigerator.  Empty the Refrigerator  The refrigerator completely of all items. Put any perishables like milk and meat in a cooler and leave other items on the counter. Do not leave food out for more than an hour. Go through the contents of your refrigerator and remove all expired or spoiled food. Compost old produce and recycle containers when possible. Clean the Removable Refrigerator Parts Take out all the removable shelves, drawers and door inserts; you can clean them more thoroughly when they’re outside the fridge, and this gives you better access to clean the inside of the refrigerator. Mix fragrance-free dish soap with warm water in the sink. Wash the items with a dish soap sponge, as you would hand-wash dishes. Once the removable parts are washed make sure they are completely dry before putting them back in place. Clean the Inside The good news is there’s a variety of cleaning solutions you can use to clean the interior of the fridge. While the choices for what you can clean with are flexible, we recommend making your solution instead of a harsh cleaning spray. You can use baking soda and water mix (1 tablespoon of baking powder per cup of water) or a mild soap and water mix to wash the counters and bins. Thoroughly wash the built-in fixtures, the bottom of the fridge, and be sure you get in the cracks. An old toothbrush is handy for the nooks and crannies. Wipe the inside of the freezer just as you did in the fridge. Wash ice cube trays and replace the ice with fresh water. Thin rags are great for cleaning the rubber seal around the door- one of the grimiest areas of the fridge where crumbs and debris end up. Clean the Outside The exterior of your fridge use microfiber cloths to clean, they’re great at eliminating the streaks and fingerprints on stainless steel. Carefully pull the fridge out from the wall, then vacuum the coils to remove dust that’s collected. Keeping your coils dirt-free can help your fridge run better. If your fridge has a drip tray, remove it and clean it like you did the shelves and place it back. Refrigerator Cleaning Hacks To absorb odors, keep a box of open baking soda in the fridge — don’t forget to replace it every one to three months. Wipe stainless steel in the direction of the grain. Clean your fridge right before a big grocery shop.Clean shelves and drawers in the dishwasher. Tell us: Do you do spring cleaning?

The Ultimate Kitchen Spring Cleaning To-Do List

Spring is here! Warmer weather, longer days, and thanks to that extra dose of Vitamin-D we’re feeling more energetic. It’s the perfect time for some spring cleaning and we’re ready to make our homes sparkle and shine! The kitchen is one room in the house that gets messy fast, and since it’s our favorite room, that’s where we’ll start our spring refresh.  Here’s a simple deep cleaning step-by-step routine for the kitchen.  Having an order in which to clean your kitchen makes getting the job done much simpler and faster. Everything seems easier when you have a plan. PRE-CLEAN: Wash, dry and put dirty dishes  away any. Quickly clear counter tops and wipe clean. Clear any clutter that does not belong in the kitchen. Determine if you need new kitchen supplies. Clean under the sink and eliminate the unnecessary. Clean and organize plastic ware and storage containers.  GATHER KITCHEN CLEANING MATERIALS Get all of your kitchen cleaning materials so you have everything on hand. Running around looking for cleaning supplies e.g. cloths, sponges etc. wastes time. Here’s a list of suggested items you might need:  Sponges.  Cleaning cloths.  Gloves.  Toothbrush.  All-purpose, non-abrasive cleaner.  Stainless steel cleaner, if you have stainless steel appliances.  Glass cleaner.  Lysol wipes.  Caddy or basket for cleaning supplies.  Telescoping duster.  Steam mop or conventional mop and bucket.  Vacuum or broom and dustpan  Empty basket or box. PANTRY When you’re getting things organized in the kitchen the pantry is one area that needs some special attention. To begin, check labels and toss expired, stale and empty items also, go through and top up old herbs and spices. Consider donating unopened items that you won’t use before they expire.  Wipe down all shelves with soapy water or kitchen cleaner. After wiping down the shelves, create a separate area for open items, arrange like items together with the oldest items in front; newest in back.  MICROWAVE  Simply, place a bowl filled with water and slices of lemon into the microwave and heat for 5 minutes. The lemon water boils like a sauna, loosening up all the caked on bits. The inside of your microwave gets dirty with splatters and splashes but cleaning it is “easy peasy lemon squeezy” with this cleaning hack. THE FRIDGE Like the Pantry, the refrigerator gets filled up quickly so first thing to do is go through the contents of your refrigerator and remove all expired or spoiled food. Wipe down the shelves with a soft rag and a non-abrasive all-purpose cleaning agent. Work from top to bottom. Place the crisper drawer in the sink to soak, if you need to. If not, just wipe it out and replace it. For a deep clean, unplug the fridge, pull it out, sweep and mop.   Finish with a new box of baking soda stuffed in the back.  STOVETOP No kitchen spring clean is complete if you don’t tackle the stovetop.  Using a dry cloth, brush loose crumbs to the ground. Remove the grates, if your stove has them, and wipe the stovetop with a non-abrasive cleaning agent. OTHER APPLIANCES Clean and/or polish exterior of dishwasher.   For the interior of your oven follow the manufacturer’s instructions to run self-cleaning cycle, if you don’t have this feature Baking soda and vinegar will do the trick. Then clean and polish the exterior of oven. Don’t forget to clean your small countertop appliances, e.g. coffee maker, toaster and toaster oven. CLEAN SINK, COUNTERTOP & CABINETS Free counter space is hard real estate to come by, especially in a smaller kitchen, so get rid of all the clutter from countertops first; try to get them as clear as possible, including countertop appliances. Only keep items out that you  use regularly.  Spray countertops with kitchen cleaner and wipe them clean. Tip! to make granite shine you can use glass cleaner. Wipe down cabinet exteriors and polish wood cabinet doors with furniture polish. Remember to clean inside cabinets and drawers, they tend to gather dust and crumbs. FLOORS Start by removing any movable furniture, then sweep the entire floor. Spot clean sticky or dirty areas with stains. Mop the floor with a heavy duty floor cleaner or use a solution of equal parts vinegar and hot water. The vinegar acts as a natural disinfectant and odor remover. THE WALLS Wipe down the walls, determine if the walls need spot washing in dirty spots don’t forget to clean air vents, doorknobs, doors, and switch plates. DUST Use a telescoping duster and dust the entire kitchen, starting up high and working your way down. Don’t forget light fixtures, the top of cabinets and the fridge. LINENS You may regularly launder your dish towels, but things like runners, oven mitts, and aprons get overlooked, so this is a good opportunity to throw them in the washing machine. GARBAGE DISPOSAL This spot is generally full of germs and can emit all sorts of odors! Give it a thorough flush with hot water, ice cubes, and lemon peels. THE SINK  Fill your sink with hot soapy water and pour in 1 cup bleach. Let stand for about an hour, then empty and scrub clean using a paste made from water and baking soda. Rinse well. EMPTY TRASH Finally, wipe down the outside of the bin and lid. Lysol wipes are excellent for this purpose. Place a fresh garbage bag in the bin. FINAL TOUCHES  You’re all done! Your kitchen is spotless and boy, does it sparkle!  Now add pretty touches with these quick and easy fresh Spring decor ideas. Because kitchen countertops are already at a premium to make the most of your décor, use a tray or cake stand to display smaller decorative items.  Remember to include soft spring colors and fruit & flowers of the season are perfect counter pieces.  We like fresh flowers and greenery because they look amazing on a kitchen counter. Other decorative pieces we like are wooden cutting boards,  you can lean them against your backsplash or stack them under decorative pieces.

Put Your Convection Oven to the Test with These Delicious Recipes

If you’re trying to figure out how best to cook with your convection oven, we’ve got some helpful advice and delicious recipes to get you started. Cooking Tips: Cooking simple dishes (like cookies) or shorter cooking times, lower the expected temperature by 10-15 percent. Cooking complex dishes (like roasts) that require a lot of time, lower the temperature by as much as 30 percent. Convection is good for: Roasting ham, turkey, roast-ready beef cuts, and similar meats Roasting vegetables and potatoes for an extra crisp Cookies and muffins—especially when you have a big batch to bake at once.  Pies and pastry Casseroles—when covered they won’t lose much moisture. Toasting breads or buns   Maple Balsamic Roasted Vegetables Vegetables roasted with rosemary and olive oil, then finished with a drizzle of maple balsamic reduction. These vegetables are a must for your next dinner party. Prep Time: 20 minutes Total Time: 1 hour 10 minutes Recipe by foodnessgracious Ingredients 1 1/2 pounds whole thin rainbow carrots 1 1/2 pounds sweet potatoes peeled chopped into 1 inch cubes 2 small red onions cut into thick chunks 1/2 pound rutabagas peeled and diced 1 1/2 pounds parsnips peeled and sliced thinly 1/3 cup olive oil 2 tsp sea salt 2 tsp black pepper 1 tsp fresh chopped rosemary 1 1/2 tbsp dry herb de provence 1 cup maple syrup 1/4 cup balsamic vinegar Instructions Preheat the oven to 350 degrees F. In a large bowl combine all of the vegetables. Add the oil, salt, pepper, herbs and rosemary and toss to coat well. Place the vegetables on a large roasting pan or two baking sheets, making sure they are all level and not on top of one another. Place in the oven and cook for about 45 minutes, checking that the point of a sharp knife spears the vegetables easily. When the vegetables are cooking in the oven, place the maple syrup and balsamic vinegar in a pan and bring to a boil. Reduce the heat and simmer slowly until it has reduced by about half and is nice and thick. Once the vegetables are ready, lightly drizzle some of the syrup over them and return to the oven for 5 more minutes. Serve warm or store in the refrigerator until ready to use. HOMEMADE ROTISSERIE CHICKEN  Who loves Rotisserie Chicken? just about everyone. Rotisserie Chicken is so tasty, juicy, convenient, and it’s just the recipe you need to keep in your arsenal.Chicken rotisserie marinade 4+ pound Whole chicken .5 bottle lemon juice .25 cup white wine .25 cup extra virgin olive oil Chicken rotisserie rub 1 tablespoon Honey 3 tbsp unsalted butter 1/4 cup brown sugar 4 tsp garlic powder 1/2 teaspoon dried oregano 1/4 teaspoon dried thyme 1/4 teaspoon dried basil Kosher salt and freshly ground black pepper Marinade instructions Clean cavity of whole chicken, wash and pat dry. Combine all marinade ingredients and mix. Pour into a large freezer bag and add the whole chicken. Refrigerate for 4-6 hours. Rub instructions Remove chicken from the marinade. Melt the butter and honey in the microwave and mix. Evenly brush the butter and honey mixture on and inside the chicken. Mix all of the dry ingredients and apply it to the entire chicken. Tuck wings underneath chicken and truss the legs together with twine. Run rotisserie rod through the cavity of chicken and insert the rotisserie forks into the skin of the chicken. At 350 degrees F, a whole chicken takes about 20 to 30 minutes per pound to cook. Therefore, a 4-pound chicken should take 1:20 – 2 hours to cook. Use a meat thermometer to test the internal temperature. When chicken reaches 175 to 180 degree F, it is done. Old Meatloaf  Perfect the preparation of a meatloaf by combining  conventional and convection oven performance for the perfect meatloaf dish.  Prep Time: 45 minutes Cook Time: 1 hour 30 minutes Recipe by Scott Basye  Ingredients 1 cup fresh bread crumbs(soft white bread) 1/3 cup milk 1 1/2 pounds ground chuck (85/15) 1/2 pound ground pork (not lean) 2 tablespoons butter 1 large onion, diced 2 celery stalks, diced 1 medium carrot, diced 2 garlic cloves, minced 1/2 cup creme fraiche 2 eggs, beaten 2 teaspoons Worcestershire sauce 1 teaspoon dry mustard powder 1 teaspoon paprika 2 tablespoons fresh parsley, chopped 1 1/2 teaspoons kosher salt 1 teaspoon freshly ground black pepper 6 slices bacon 1 cup ketchup 2 tablespoons brown sugar 1 tablespoon Dijon mustard 1/4 teaspoon freshly grated nutmeg Instructions Preheat oven to 350°F. In a small bowl place bread crumbs and drizzle the milk over the top. Set aside. Melt the butter in a large skillet, add the onion, celery and carrot. Sprinkle with a pinch of salt and cook, stirring occasionally until vegetables are soft, but not browned. Add garlic and cook for another 2-3 minutes. Remove from heat, scrape into a small bowl and allow to cool to room temperature (about ten minutes). In another bowl, whisk together the beaten eggs, creme fraiche and Worcestershire sauce. In a large bowl place the beef and pork, add the breadcrumb mixture, vegetables, egg mixture and the rest of the ingredients except the bacon, ketchup, brown sugar and mustard. Use your hands to thoroughly combine the meatloaf ingredients and then place into an large ovenproof baking dish. Lay five strips of bacon lengthwise over meatloaf; cut the remaining bacon strip in half and place at each end of loaf. Place in oven and set timer for 45 minutes. Meanwhile combine Ketchup, Brown Sugar, Mustard and Nutmeg and set aside. At the end of 45 minutes, set oven to convection and cook meatloaf for another 15 minutes. When completed, remove meatloaf from oven and pour or brush glaze all over the surface of the bacon (it’s ok if some drizzles down into the pan). Place back in over and bake for an additional 15 minutes until the glaze is bubbling. Remove from oven and let sit for 15 minutes. Serve! Huevos Rancheros Bake This is a flavorful dish that checks all the boxes for a  yummy weekend brunch, or a breakfast-for-dinner moment.  Prep Time: 35 minutes Total Time: 1 hour 45 minutes Recipe by Tablespoon Kitchens Ingredients

How to Elevate Your Cooking Experience with a Convection Oven

Why are Convection ovens becoming more and more popular with home cooks? Primarily because they’re faster, more efficient, and they make more delicious results than regular ovens. Even though a lot more homes have convection-capable ovens, many cooks still don’t know how to use them. So we’ve compiled some information that will help you feel confident using your convection oven. Understanding Your Convection Oven First, “convection” is a setting on your oven and your oven has a button that enables the convection feature.  Convection ovens can be gas or electric, so when the convection setting is off, you’ll experience all the advantages and disadvantages of cooking in those respective ovens. What happens when that convection setting is on? The oven uses fans to circulate hot air and cook food more rapidly than a traditional oven. Instead of relying on radiated heat from heating elements, a convection oven spreads the hot air so it envelopes food and cooks it from all sides. There are different types of convection: Convection and True Convection. Convection is your normal oven, but with an added fan on the back to circulate air. When shopping confirm that the oven has this third heating element around the fan. True Convection or ‘European convection,’ features a heating element behind the fan, allowing for better cooking results than standard convection.   Tips for getting more out of convection Adjust the Recipe Follow the rule of 25, when using True convection experts recommend adjusting any recipe in two ways.   1. Lower the oven’s temperature by about 25 degrees and 2. Expect the food to be ready about 25% faster than the recipe suggests, so reduce the cooking time by roughly 25%. Keep in mind variables such as initial oven temperature, quantity of the food, desired level of doneness, and oven model will all affect cooking time. Experiment with the temperature or cooking time, also start checking early and often until you get used to cooking the convection way. Air Supply To be effective air must circulate over and around the food when using your convection oven. Use trays and baking pans with lower sides that allow hot air to flow freely. You should place trays and pans in a way that they don’t hinder effective circulation. Use shallow roasting pans and rimless cookie sheets when possible. Try to keep a two-inch clearance on all sides. Do not cover the ovens shelves with aluminum foil. Avoid overcrowding the oven Remember, convection relies on air being able to circulate air, avoid overcrowding the oven and blocking the flow of air.  When you use multiple racks try not to fill the racks wall-to-wall and make sure you monitor the dishes for browning. When to Use the Convection Setting When you’re roasting Foods like meat and vegetables, convection immediately sears the food, locks in juices and continues to cook it faster, more evenly, and the drier environment yields crispy skin and caramelizes much better. When baking convection heat melts fat and forms steam quicker, which helps create more lift in pies and pastries. When baking a big batch of cookies, with convection you’re not limited to making one tray at a time.   When you’re toasting or dehydrating, convection is efficient at removing moisture as quickly as possible. When Not to Use the Convection Setting Not all foods are suited for convection cooking method. The fan disrupts delicate dishes that start out as batter and set while cooking like cakes, soufflés, breads, and custard. Blowing air on these foods can create lopsided results. Don’t use convection when making these foods: *While some argue that convection creates even browning and a great crust, others say that it dries out the interior of bread. The choice here is really up to you.

Bakers Edition: How to Create a Better Kitchen

Whether you’re whipping up a big batch of extra fudgy brownies for a school bake-sale or crafting a delicate three-tier Orange Cardamom Cake with Rose Buttercream for a special occasion, we have practical tips and advice for the ultimate kitchen layout, tools, and equipment so you can turn your kitchen into a bakers dream. Do you love to bake? Here are some great ways to make your kitchen work for you. Custom Counter Heights  Different tasks call for different countertop heights. Home cooks serious about baking may want to consider custom countertop heights to achieve the most comfortable height. A counter-height surface works fine when mixing or assembling recipes. For kneading or rolling out dough, most bakers prefer a lower surface to get the right amount of leverage. To achieve this, you can Install countertops at a custom height or lower a section of an island so it’s the right height.  For a simpler solution, stand on a step stool and use a counter or use a kitchen table to achieve the most comfortable height. Previous Next Turn to Your Pantry  Baking often requires lots of ingredients and bulky countertop equipment, so pantry organization is the key to maintain a pristine kitchen. Install pull-out and horizontal pantry drawers that help you easily access your baking supplies. If you have enough space, consider putting your baking station inside your pantry. Also consider extra shelving for mixer storage. Organizing the pantry into specific sections and using bins with airtight lids allow for easier access when you need the basics – flour, sugar, brown sugar, chocolate chips, etc. Previous Next The Right Work Station  Granite and marble stay cool, making pastry dough easy to roll and clean up easily. Other baker-friendly countertops that can accommodate rolling, cutting and direct heat with no fuss are Quartz and Corian. If you can’t afford to install a whole slab, purchase a small marble section specifically for baking, or place marble on the kitchen island. Previous Next Double Ovens If what you are looking for is more baking and less waiting, double ovens are a bakers dream. They’re Spacious and versatile enough to accommodate your needs and allow a baker to cook two dishes at different temperatures at the same time. The double ovens, with convection are a must as the Convection ovens work with fans that recirculate heat, which evenly bake cookies and crusts. Even baked goods such as croissants develop a crispy, even texture with convection heat. An oven with a warming drawer or built-in Proof mode create the perfect oven environment for proving dough, you can also cook a variety of dishes in the warming drawer like meringues or melt chocolate. Extra Deep Sink  The sink is an essential element to keep the kitchen clean. Clean-up will be a whole lot easier with a deep, wide more functional kitchen sink since baking often involves using odd-shaped pans, oversized cookie sheets and large mixing bowls – many of which can’t go in the dishwasher. Previous Next Stand Mixer Serious bakers have more than one, and double or triple up on the bowl attachments so they don’t have to stop to wash them before moving on to the next phase of a baking project. Previous Next Baking Supply Cart It’s easy to run low on countertop space and having your supplies within reach is essential when baking. With a rolling cart you can move around your kitchen more easily and have your baking essentials wherever you’re working. Tech Corner There are thousands of recipes and how-to videos online to access these you can wire in a TV, desktop or laptop computer or an iPad in a small corner next to your countertop. A kitchen desk area works well for multi-tasking bakers so you can monitor the oven when working or catching up on emails and social media.

Kitchen Remodel Ideas for Small Spaces

Learning how to optimize your cooking space is the first step to remodel your kitchen cost-effectively. With limited space, trying to update your kitchen with quality products that work and fit into your home can be a difficult task to accomplish.    Maximizing your kitchen space is a lot easier when you choose the right cabinet and appliance options. Kitchen cabinets can be the most cluttered space in any kitchen because of all the utensils needed for cooking. This is especially true with confined drawers because you end up putting all your eggs in one basket-so to speak! The good news is that there are simple and efficient ways to maximize your cabinet space.  For quick and easy access having food items next to your cooking area is a must! With a spice filler kit, you can neatly place your spices in your drawers at any angle to see each spice or any other food items for easy identification and removal.  Another useful way to organize your kitchen is with swing-out shelves that offer great visibility and easy access. These handy shelves remove the pain of having to search for hard to reach cookware and containers. Finding a place to store small appliances in small kitchens can be a huge challenge when you don’t want your counter space overrun with kitchen devices, you’ve got to get nifty. A kitchen with clutter-free counters is not only more aesthetically pleasing but also offer you the most cooking space possible.  Over-the-range microwaves are the ideal choice for small kitchens, but very few can fit in a compact space. The perfect over the range microwave for limited spaces is the COS-2413ORM1SS by Cosmo without having to settle for low power. This microwave has an impressive 1000 watts for precise control to give you excellent results with a range of touch presets and 10 power levels and sensor cooking to prepare your favorite meals and snacks. Eliminate smoke, steam, and cooking odors from your kitchen with built-in exhaust fans. This OTR microwave’s sleek black glass finish brings an ultra-chic look to your kitchen, and it’s wonderfully complemented by convenient functions like the ability to disable the glass turntable and child locks for safety. To seal the deal it boasts a very affordable price tag.  The refrigerator is the safeguard of produce, frozen foods, meat, dairy products to maintain the freshness of our food items 24 hours a day, but can also take up most of your kitchen space. For small kitchens, our French Door Refrigerator can make your cooking space feel larger and help improve mobility to be at eye-level with your food items. Here is a refrigerator to meet your everyday grocery demands, Cosmo’s FDR225RHSS 22.5 cubic feet 4-Door French Door Refrigerator. A Modern refrigerator that will make a statement but still takes up less space in your kitchen, so you’ll walk through it with ease. This refrigerator provides better storage for oversized and small items, its total storage capacity includes 15.9 cu. ft. fresh food capacity provides ample interior space, while 6.6 cu. ft. freezer capacity allows you to store plenty of your frozen foods with easy access. Sophisticated aesthetic features like a stainless steel finish that’s fingerprint resistant to keep your fridge looking spotless, and digital temperature controls and display for accurate monitoring. Our intelligently crafted refrigerator is here to provide you with easy access to your food items, ample kitchen space, and an automated ice-maker. A kitchen renovation is a formidable undertaking on its own with multiple areas to touch base. Especially choosing what appliances fit best with your cooking space. Cosmo offers a variety of products that make renovating for space easier with appliances that fit each unique kitchen area to maximize the utility and spaciousness of your kitchen.

Sustainable Cooking – 6 Seasonal Farmers Market Recipes

Farmers’ markets have grown in popularity thanks in part to the movement towards healthy, local, and organic food. Farmers’ markets pop up during the summer and fall with fresh-from-the-farm favorites. Here are some flavorful recipe ideas that let fresh fruit and vegetables play a starring role.  What You Might Find at a Farmers Market: Seasonal fruits and vegetables Dried fruit and nuts Dips and sauces Meat, fish, and eggs Prepared foods Freshly squeezed juices, coffee, and tea Fresh bread Fresh flowers and potted plants Honeys, preserves, and jams Cream of Zucchini Soup Prep time: 5 minutes Cook time: 20 minutes Servings: 4 Ingredients 1/2 small onion, quartered 2 cloves garlic 3 medium zucchini, skin on cut in large chunks 32 oz reduced sodium Swanson chicken broth, or vegetable 2 tbsp reduced fat sour cream kosher salt and black pepper to taste fresh grated Parmesan cheese if desired for topping, optional  Instructions Combine chicken broth, onion, garlic and zucchini in a large pot over medium heat and bring to a boil. Lower heat, cover, and simmer until tender, about 20 minutes. Remove from heat and purée with an immersion blender, add the sour cream and purée again until smooth. Taste for salt and pepper and adjust to taste. Serve hot. Heirloom Tomato & Herb Salad  Prep time: 20 minutes Cook time: 10 minutes Servings: 4 Ingredients Fried Chickpeas & Capers 6 tablespoons grapeseed oil (or another high heat oil) divided 3 tablespoons brine packed capers, drained and patted dry 1/2 cup chickpeas (if from the can drained and patted dry) pinch of smoked paprika pinch of fine sea salt Salad 2 tablespoons red-wine vinegar 1 tablespoon Dijon mustard 1 teaspoon honey 2 tablespoons minced dill + additional sprigs for garnish 2 tablespoons minced basil, + full leaves for garnish 1 tablespoon minced parsley + additional sprigs for garnish 1/4 cup extra virgin olive oil 1/4 teaspoon kosher salt freshly ground black pepper 2 1/2 pounds assorted heirloom tomatoes, sliced 1 pint cherry tomatoes, sliced in half crumbled feta cheese for serving (optional) Instructions Heat 3 tablespoons of the grapeseed oil in a skillet over medium-high heat. Add the capers and cook, stirring occasionally, until they begin to brown and burst open, about 3 minutes. Use a slotted spoon to remove them to a paper towel lined plate to drain. Carefully add the additional oil to the pan along with the chickpeas. Cook, stirring occasionally, until the chickpeas begin to brown and crisp up. About 5-7 minutes. Remove from the heat to a paper towel lined plate to drain. Sprinkle the chickpeas with a pinch of smoked paprika and sea salt. Whisk together the vinegar, mustard, honey, dill, basil, and parsley. Drizzle in the olive oil and continue to whisk together until smooth. Stir in the salt and pepper and set aside. Arrange the sliced tomatoes on a large platter. Drizzle with the dressing and top with the fried capers, chickpeas and sprinkle with crumbled feta cheese. Pasta with Grilled Eggplant, Smoky Tomato Sauce, and Basil Walnut Pistou Prep: 20 minutes  Cook: 45 minutes  Servings: 4 Ingredients 1 package gluten free lasagna noodles Smoky Tomato Sauce ½ eggplant, cut into rounds ¼” thick. 3 tablespoons olive oil kosher salt Basil Walnut Pistou 2 cloves garlic 2 cups packed fresh basil leaves ¼ cup walnuts ¼ cup fresh lemon juice 1/3 cup olive oil kosher salt Instructions For the Eggplant, preheat a grill to medium-low. Drizzle the eggplant slices with the olive oil and sprinkle them lightly with kosher salt. Place them on the grill with the largest pieces over the hottest part of the grill. Watch them carefully so they don’t burn, flipping them just as they start to soften and get good char marks on them, about 2 minutes depending on the size of the slices. Continue to cook them until they have the marks on the other side as well. When they are cooked to tender on both sides, remove them from the grill and set them aside. Bring a large pot of salted water to a boil and cook the gluten free lasagna noodles to al dente according to manufacturer’s directions. While the pasta is cooking, make the basil walnut pistou. Combine all of the ingredients in a food processor and pulse until well combined. Season to taste with kosher salt. After you drain the pasta, toss it with a generous amount of the smoky tomato sauce and the eggplant. Drizzle the top of the pasta with the basil walnut pistou and serve immediately. (Recipe via heatherchristo.com) Mushroom and Leek Quiche with Gruyere  Prep Time: 25 minutes Cook Time: 1 hour 15 minutes Servings: 8   Ingredients 1 deep dish 9 inch pie crust 3 Tablespoons butter, divided 3 leeks, white and light green parts only 12 ounces sliced mushrooms 8 eggs 1 cup whole milk 1 cup heavy cream 1 teaspoon salt 1/4 cup flour (optional) 2 cups shredded gruyere cheese, divided 1/4 cup Parmesan cheese Instructions Preheat the oven to 350 degrees. In a large skillet, melt 2 Tablespoons of the butter over medium heat. Add the mushrooms and cook, undisturbed, for a few minutes, or until the bottom side is golden. Flip and continue to cook until mushrooms are golden on both sides. Season with salt. Remove to plate. In the same skillet, melt the remaining butter. Add the leeks and sauté until softened, about 5-7 minutes. Remove the leeks to a plate. In a large bowl, whisk together the eggs, milk, cream, salt, and flour. Sprinkle some of the gruyere cheese on the bottom of the pie crust. Pour half the egg mixture in followed by half of the gruyere cheese and half of the mushrooms and leeks. Pour the remaining egg mixture on top along with the rest of the mushrooms, leeks, cheese, and gruyere. Top with Parmesan cheese. Bake the quiche in the preheated oven for 60-80 minutes or until very golden brown and set in the center. If the pie crust gets too brown, shield