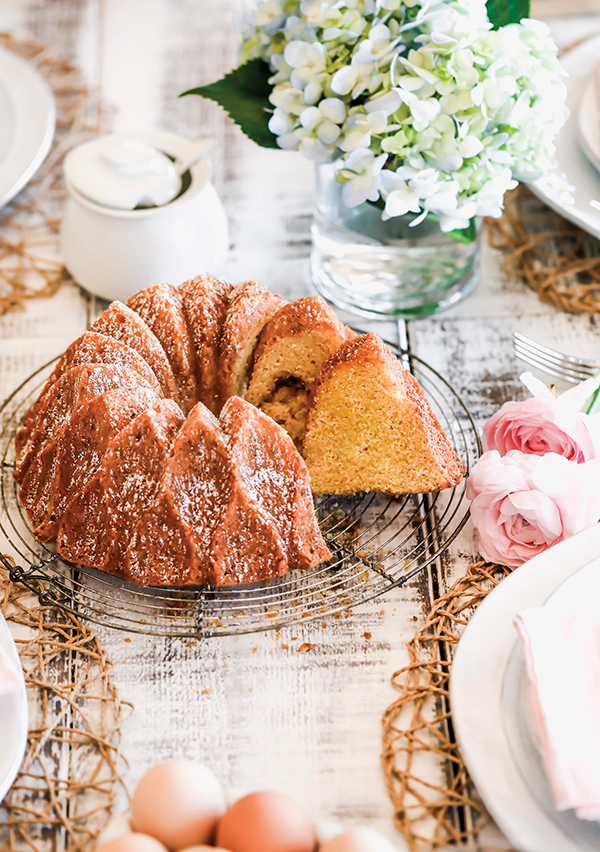
Home

Delicious Christmas Leftover Recipes

Get creative with Christmas dinner leftovers. Transform your leftover turkey and all the other holidays’ trimmings into a whole range of delicious dishes. From casseroles to pizza, these recipes are full of festive flavor. Leftovers can be great, just make sure you make the most of them and follow food safety practices. What to Do With Leftover Ham Ham Pizza Try making your pizza using your fridge full of leftover ham.  To make it a Hawaiian style pizza you can even add pineapple to it if that’s your favorite combo. Ingredients 2 cups of chopped, leftover ham 1 store-bought pizza dough OR 1 batch of homemade pizza dough 1 jar of store-bought or batch of home-made herb pizza sauce  1 (240 g) ball of mozzarella cheese, sliced 1 large onion, sliced Instructions Preheat oven to 475 degrees. Lightly dust your counter-top in flour. Using a rolling pin, roll out your pizza dough until desired size and thickness is reached. Carefully transfer to pizza pan and adjust accordingly. Spread your sauce to about 1-inch from the edge of the pizza dough. That uncovered part will be your crust. Evenly spread out the ham and onion. Finish off with mozzarella cheese. Place into oven and bake for 15-17 minutes, or until mozzarella cheese is nicely browned and crust is golden. Allow cooling slightly before cutting! Baked Ham and Cheese Sliders  After all the holiday cooking you might want to take it easy, these sliders are a simple and satisfying dish to whip up. Ingredients 24 slices of  ham 6 Slices of Swiss cheese, cut into fourths 1/3 cup mayonnaise 1 tablespoon poppy seeds 1 1/2 tablespoons Dijon mustard 1/2 cup butter melted 1 tablespoon Onion Powder 1/2 teaspoon Worcestershire sauce 2 packages (12 count) Hawaiian Sweet Dinner Rolls Directions  Cut rolls in half and spread mayo onto 1 side of the rolls. Place a slice or two of ham and slice of Swiss cheese in the roll. Replace the top of the rolls and bunch them closely together into a baking dish. In a medium bowl, whisk together poppy seeds, Dijon mustard, melted butter, onion powder, and Worcestershire sauce. Pour sauce over the rolls, just covering the tops. Cover with foil and let sit for 10 minutes. Bake at 350 degrees for 10 minutes or until cheese is melted. Uncover and cook for an additional 2 minutes until tops are slightly browned and crisp. Serve warm. Ham and Cheese Breakfast Casserole It’s the day after Christmas and you’re still feeling festive, and need to make breakfast to feed a large group, this casserole is a perfect option. Ingredients  10 large eggs 1 1/2 cup milk 2 tsp. Dijon mustard 2 tsp. fresh thyme leaves, plus more for garnish 1 tsp. garlic powder Kosher salt Freshly ground black pepper 4 cups cubed French bread or baguette 1/2 lb. ham, chopped 1 1/2 cups shredded white cheddar Directions Preheat oven to 350 degrees. In a large bowl, whisk together eggs, milk, mustard, thyme, and garlic powder and season generously with salt and pepper. Butter a large baking dish. Add bread and top with ham and cheddar. Pour over egg mixture. Bake until eggs are cooked through and ham is golden, 45 to 55 minutes. (To make ahead, cover the baking dish with aluminum foil and refrigerate at least 4 hours and up to overnight, then bake as directed.) Garnish with more thyme and serve. What to Do With Leftover Turkey Turkey Enchiladas We all love Mexican food, and this recipe is the perfect comfort dish to use up that leftover turkey.  Ingredients 2 cups cooked shredded turkey 2 teaspoons cumin 1 can black beans, drained and rinsed 2 cups shredded Mexican style cheese 12 tortillas (enchilada size/fajita size – about 8-10 inches) 2 cups enchilada sauce chopped cilantro Directions Preheat oven to 375 degrees and lightly grease a casserole/baking dish. Lay tortillas out on a clean flat surface. Distribute black beans and shredded turkey between each tortilla and lay it out in a strip right down the middle of each tortilla. Sprinkle cumin over black beans and turkey. Divide one cup of cheese between each tortilla, sprinkle the cheese right on top of the black beans and turkey. Spread 1 cup of enchilada sauce in the bottom of a prepared baking dish. Roll up each tortilla and place side by side in the dish. Sprinkle  remaining enchilada sauce over the enchiladas, and remaining cheese. Bake for 15-20 minutes until cheese has melted and tortillas start to brown a little bit. Garnish with cilantro and serve warm. Turkey Panini These grilled Italian sandwiches are a real treat! The cranberry sauce and thyme give it that extra holiday touch. Ingredients 3 ounces sourdough bread 2 slices sliced about ½ inch thick 1 tablespoon mayonnaise 3 ounces turkey breast 2 tablespoons cranberry sauce 1 slice provolone cheese 1 tablespoon fresh thyme leaves Directions Heat a panini press or skillet to medium-high heat. Spread the mayo on both sides of the bread. Lay the slices down on a clean work surface. Place the sliced turkey meat on top of one slice of bread. Add the fresh thyme leaves, then the cranberry sauce and finally the provolone cheese. Cover the sandwich with the other slice of bread. Transfer the sandwich to a panini press or hot skillet. Press together gently to help the whole sandwich stick together. Cook it until the bread is crisp and golden and the cheese is melted about 3-4 minutes. Turkey Spaghetti Bake A pasta dish big enough to feed a crowd and delicious enough to keep them coming back for more. Ingredients 1/2 pound spaghetti 2 tablespoons olive oil 1 yellow onion finely chopped 3 cloves garlic finely chopped 1 1/2 cups leftover shredded turkey or chicken 1/2 cup heavy cream 1 28- ounce can crushed tomatoes salt and pepper to taste 1/2 teaspoon Italian seasoning 1/2 cup grated parmesan cheese 1 cup shredded mozzarella ½ cup small fresh mozzarella balls Fresh basil to garnish Directions Preheat

Real Life Microwave Hacks

It’s not just for reheating leftover pizza- the microwave has some pretty nifty hacks that you can use to make your life easier. Here is a list of the best hacks we found.  Peeling Garlic Got Easier  Peeling garlic is daunting, however, you can put the garlic in the microwave and heat it up for 15 seconds. The heat will release the moisture from the garlic clove which gets trapped between the skins and loosens it. Once you take it out, the skin just slide off. Get More Juice from Your Citrus Fruits If you need help getting the most juice out of a lemon, lime or other citrus fruit throw it into the microwave for about 10-20 seconds so that the pulp inside becomes soft and you can juice it with ease. Tear-free Onion Chopping Save your eyes from the horrible stinging sensation you get when chopping onions. Ever wondered why that happens? Well, when an onion is cut with a knife, its cells release volatile sulfur compounds that cause tearing. The trick is to trim off the ends with a knife and heat the onion for about 30 seconds before chopping away. Bring Stale Bread Back to Life When your bread or bagels stale simply wrap in a moist paper towel (not soaking) and pop in the microwave for 20-second increments. The moisture from the towel will soak into the bread to make it taste fresh again. Preserve Fresh Herbs If you want to preserve herbs well, wrap them in a paper towel and heat them in the microwave for about 30 seconds allowing them to dry out. This may make them last longer in the refrigerator. To completely dry the herbs continue to microwave in 15-30 second increments until the herbs. Soak Lentils or Beans Overnight All you need to do is place your uncooked beans or lentils in a bowl filled with water, add a pinch of baking soda and microwave them for about 10 minutes. Allow them to rest for 30-40 minutes, after which they are ready to be cooked. Make Frothy Milk for Your Coffee The next time you’re craving a fancy frothy café au lait just make it yourself. A microwave and a mason jar are all you need. Fill the mason jar with as much skim or 2% milk as you’d normally use in your coffee, cover and shake it vigorously to get the frothing process started, then pop it uncovered in the microwave for 30 seconds. Then voila! Silky, frothy warm milk. A DIY Heating Pad for those Cold Nights Make your heating pad at home in two minutes! Pour rice into a sock then tie a knot at the top of the sock. Put it in the microwave for 1-2 minutes. Reheat as needed. Steam Clean the Microwave We’re sure with these hacks your microwave will be working overtime.  So while you’re at it, steam clean it with some lemon water. Place a bowl of water with freshly squeezed lemon juice into the microwave and set the timer for 5 minutes or until the water boils, let it sit in the microwave for 3 minutes so the steam can loosen any food stains. Remove the bowl then wipe your microwave clean.

Quick Cleaning Tips for Your Kitchen Appliances

Clean your kitchen appliances faster with these quick cleaning tips for your kitchen appliances, show your appliances a little cleaning love, and they’ll look and work as good as new. Clean Your Refrigerator The space behind your refrigerator is notoriously filthy. Dirt, pet hair, and a host of other stuff can build up beneath and behind the refrigerator. This can block the appliance’s motor and coils and restrict airflow. To clean, pull out the refrigerator and mop up whatever you find. Part of my spring cleaning ritual. Is to vacuum the refrigerator coils behind the fridge, which will put less stress on the motor and prolong its life. Here’s how to clean the inside of a refrigerator the easy way. A little soapy water or an equal parts water and white vinegar solution will clean and shine the inside of your fridge. Wipe down shelves and crispers weekly, or whenever you spot a spill. Remove fingerprints on stainless steel exteriors with a damp cloth.  Clean Your Dishwasher  You wouldn’t think of cleaning a dishwasher since its job is to clean but it also needs a good cleaning; In fact, as often as your shower or sink. Sanitizing the dishwasher can be done quickly. To eliminate mold and bacteria run the dishwasher on the hottest, and longest cycle with white vinegar. This will sanitize and loosen food and soap scum. You should wipe around the edges of the door, around the gasket and check the drainage area as well.  Clean Your Microwave Sauce and food splatter inside the microwave constantly and all that buildup is unsightly and gross to cook with. Fortunately, there is a simple solution, the best way to clean microwave messes is to fill a microwave-safe container with water, microwave it until the water boils, and let it sit for a few minutes while steam loosens any caked-on food. Then simply wipe it clean.  Clean Your Kitchen Stove and Oven   Stove-tops are hot spots for oil splatters and food spills, so it’s best to clean it often. The key to cleaning your stove-top is to be quick. Before the bits of food cook onto the surface wipe them away immediately, careful not to burn yourself. If splatters sit for a few days soak with an equal parts mix of vinegar and water or use dish soap and water for built-up grease. Now that the stove-top is clean, you can take care of your oven and it’s quite simple nowadays because most ovens have self-cleaning options. While this feature does a good job of by itself there are a few spots it doesn’t reach. You can wipe them up built-up grime with vinegar or soapy water around door hinges and frames and the space between double ovens.

Thanksgiving: Make-Ahead Recipes

How many times have you heard someone say they’ve slaved away in the kitchen all day? It’s safe to say too many times. Stress in the kitchen can easily arise for a variety of reasons, especially when you’re strapped for time and have a never-ending to-do list. Holiday feasts call for delicious dishes to please a crowd, but making preparation as simple as possible is as time-honored a tradition as the turkey itself. To decrease the stress and make your hosting experience more enjoyable, cook as much of your Thanksgiving meal ahead of time, also consider these simple pro-tips: Prep Before You Begin Practice the “mise en place” method –Aa French term for having everything in place before cooking. Measure ingredients, chop vegetables and set out utensils to create a steady workflow. Plan Ahead – Like The Pros  Prepare easy appetizers to serve ahead of guests’ arrival and don’t be shy about outsourcing sides to family and friends. You Need the Right Tools A worthwhile investment in the best kitchen appliances and gadgets will get you through your holiday cooking and baking without stressing, by keeping you organized and on track!  Check out our full range of affordable priced luxury kitchen appliances.  To help you plan your menu, we’ve compiled a selection of Thanksgiving recipes that has something for everyone, Thanksgiving side dish recipes, a Thanksgiving dessert recipe and of course Thanksgiving main dish options. So! Instead of letting yourself go crazy this year, try these Thanksgiving make-ahead recipes: Sausage and Cornbread Stuffing This classic turkey sidekick can be assembled and tucked away in the fridge up to a day before hitting the oven on the holiday. Prep time: 15 minutes Cook time: 20-25 minutes Servings: 10-12 Ingredients package cornbread pound sweet Italian sausage, ground ½ cup carrots, peeled and diced 1/2 cup celery with leaves, diced 1/2 cup yellow onion, peeled and diced 1/4 cup dried blueberries 1/2 cup dried apples teaspoon fresh garlic, crushed ½ tsp. each dried sage leaves and black pepper 1-2 cups low-sodium chicken stock nonstick cooking spray Directions Cook cornbread according to package instructions; allow to cool. Leave uncovered and let dry 1 day. Break into medium pieces. Preheat oven to 375 degrees F. and lightly coat a medium-sized baking dish with cooking spray. Heat medium skillet and add sausage. Cook until half done and fat is rendered. Add carrots, celery, onion, blueberries, apples and garlic, sage and pepper. Sauté until caramelized. Add cornbread pieces and stir to combine. Add chicken stock until slightly wet or pasty; stir well to combine. Transfer stuffing from skillet to pan and bake, uncovered, 20-25 minutes, or until golden brown. Internal temperature should reach 155° F when fully cooked. Cranberry-Sage Rolls These make-ahead rolls can be chilled in the fridge up to 24 hours before baking. Add cranberry and sage for a delightful holiday twist. Prep time: 30 minutes Rise: 30 minutes Bake: 20 minutes at 350°F Yield: 12 rolls Ingredients 1  (16 ounce) loaf frozen white bread dough 2 tablespoons butter, melted ½ cup finely chopped dried cranberries 2 tablespoons chopped crystallized ginger 2 tablespoons snipped fresh sage 1 egg 1 tablespoon water 12 small fresh sage leaves (optional) Directions Thaw dough according to package directions.  Grease a large baking sheet; set aside. On a lightly floured surface, roll dough into a 12×10-inch rectangle. Brush with melted butter; sprinkle with cranberries, crystallized ginger, and snipped sage. Starting from a long side, tightly roll up rectangle into a spiral. Cut into twelve 1-inch slices.  Place rolls on prepared baking sheet, standing rolls upright with seam sides down. Cover and let rise in a warm place until double in size (about 30 minutes). Preheat oven to 350°F. In a small bowl whisk together egg and the water. Brush rolls with egg mixture. If desired, gently press a small sage leaf into the top of each roll; brush leaves with remaining egg mixture. Bake about 20 minutes or until golden brown. Garlic Mashed Potatoes Your search for make-ahead mashed potatoes for Thanksgiving ends here. You can make and chill these mashed potatoes up to two days. Simply reheat gently with a little more dairy and they’ll be as velvety as if you had whipped them only moments ago. Ingredients  2 lbs russet potatoes 1/2 stick (4 tbsp.) butter 1/2 cup softened cream cheese 1/4 cup heavy cream 2 cloves garlic, crushed 1/4 teaspoon seasoned salt 1/4 teaspoon black pepper  Directions Peel and cut potatoes into pieces that are roughly the same size. Bring a medium pot of water to a simmer, and add the potatoes. Raise heat to a boil and cook until fork-tender. Drain the potatoes, then return the pot to the stove on low heat. Begin mashing the potatoes, and slowly add all other ingredients. Mash well, then spread potatoes in a baking dish. At this point, cover and freeze the mashed potatoes for up to 3 days. When you’re ready to reheat, remove the potatoes from the freezer about 2-3 hours before serving. Preheat your oven to 350 degrees.  Dot the tops of the potatoes with a few pats of butter, then cover with aluminum foil. Bake for 20-30 minutes or until warmed through. Green Bean Casserole A completely fresh green bean casserole that can be made-ahead for your Thanksgiving feast (no canned soup required), then freeze and forget it. To serve, just reheat (from frozen) and top with crunchy fried onions. Prep time:  15 minutes Cook time:  30 minutes Total time:  45 minutes  Serves: 10-12 Ingredients ½ cup Panko 2 tablespoons olive oil (or melted butter) ¼ teaspoon table salt ⅛ teaspoon ground black pepper 3 cups canned fried onions (about 6 oz.) 2 lbs green beans, ends trimmed and halved 3 tablespoons unsalted butter 1 lb sliced white button mushrooms 3 medium garlic cloves, minced fresh ground black pepper 3 tablespoons unbleached all-purpose flour 1½ cups low sodium chicken broth 1½ cups heavy cream Directions  Mix panko and fried onions with two tablespoons of olive

Hello Airfying: A Healthier Way to Cook Your Favorite Food

You’ve probably heard about the Air fryer, that cool kitchen gadget people have been raving about since it hit the market.  Are you still wondering what all the hype is about?  Made popular by claims air frying is a healthy alternative for frying food; because it replicates the wonders of deep-frying in a healthier way. So, how does it work? The Air Fryer, uses rapid air technology to fry, bake, roast or grill your food with only a tablespoon or less of oil. Think of it as a hi-tech counter-top convection oven. Something else to consider, is the air fryer is a time-saver when you find yourself short on time to cook. It offers fast cooking, with little to no preheating required. It’s a great companion tool for adventurous cooks with little time to spare. What You Can Make in an Air Fryer AIR FRYER FRENCH FRIES The first thing you can try is a simple and delicious batch of French fries. Fresh or frozen potatoes! Crunchy, easy and healthy! Ready in under 30 minutes.   Ingredients 1 tbsp Flat leaf parsley 1 Garlic powder 1 Salt and pepper 1 tbsp Olive oil, extra virgin 1 pound Yukon Gold or Russet potatoes (peeled and sliced into 1/2-inch thick sticks) Instructions:  Throw your fries into the air fryer basket, and cook in the air fryer at 400°F for 15-20 minutes. While the fries are air-frying, chop the herbs and garlic, and mix with olive oil in a medium-size bowl. Remove the fries from the air fryer and transfer to the bowl with the garlic, rosemary and oil – toss thoroughly, and season with salt.  Serve with ketchup or sriracha mayo — which is 1:1 ratio of sriracha to mayo, Yum! AIR FRYER CHICKEN WINGS Air fryer chicken wings are the crispiest wings you’ve ever had! Cook a whole batch in your air fryer with a few simple ingredients. Ingredients 1 tsp Paprika, smoked 1 Salt and pepper 1 tsp Garlic powder 1 tbsp Olive oil 2 tbsp Barbecue sauce 1 tbsp Olive oil 1 1/2 lbs Chicken wings & drumettes Instructions: Set the air fryer to 375 degrees F. Season chicken wings with salt, pepper, and smoked paprika and place into the air fryer basket Cook the wings for 20 minutes, flipping after 10 minutes When time is up, flip one last time and increase the temperature to 400 degrees F. Cook an additional 8 minutes until skin is crispy and golden Remove wings from air fryer and place in a bowl or serving dish Toss with BBQ sauce  Finally, cook the BBQ sauce coated wings in the Air Fryer for additional 2 minutes and enjoy! SPICY GARLIC CHILI SHRIMP Bursting with flavor, this air fried shrimp recipe is perfect for all occasions it’s heavenly with a flavorful spicy kick. Ingredients 1 pound of shrimp peeled and de-veined 3 Tablespoons olive oil 2 cloves garlic minced 2 teaspoons chili powder ½ teaspoon ground cumin ¼ teaspoon paprika 1/2 teaspoon salt ¼ teaspoon freshly ground black pepper  Sweet Chili Sauce (to taste) Instructions: Set temperature to 400° and timer to 5 minutes for preheating. Rinse Shrimp  with water Apply a thin layer of oil to the shrimp and put into the fry basket evenly, put the fry basket with pot back in the appliance. set time for 5-8 minutes or until they look crunchy and golden. Remove from basket and coat with seasonings to your taste. GRILLED CORN ON COB Air Fryer Corn on the Cob is sweet, and juicy as can be! Make this with fresh corn for a great side dish recipe. No fuss, no mess, all deliciousness. Ingredients Corn Cobs (Sliced) 2 pcs Cooking Oil 1 tsp Instructions: Skewer the corn cobs, sliced to preference Set temperature to 400° and timer to 5 minutes for preheating. Apply a thin layer of olive oil to the corn and put into the fry basket evenly, push the fry basket with pot back in the appliance. Set time for 10 minutes or until baked golden. Add butter, salt, mayonnaise, season salt or whatever you like and enjoy! GRILLED PEACHES AND CREAM Love grilled peaches? – But who wants to heat up the grill for a few little peaches? Now you don’t have to, you can simply pop ’em in the AIR FRYER!!! You’ve got an easy and delicious Dessert in minutes.   Ingredients 2 peaches  1/4 cup graham cracker crumbs 1/4 cup brown sugar 1/4 cup butter, diced into tiny squares Cool Whip or Ice Cream Instructions: Cut peaches into wedges and pull out pits In air fryer, set a piece of parchment paper on top of rack Lay peach wedges, skin side up (on side) on parchment Air fry at 350 degrees for 5 minutes Mix together crumbs, brown sugar and butter Flip peaches skin side down Spoon crumb mixture over top of peaches – try and keep the butter on top of the peaches as best you can Air fry at 350 degrees for another 5 minutes Place peaches onto plates and top with whipped topping Spoon any excess butter/topping mixture from parchment onto whipped topping Want More Recipes? The Cosmo Air fryer comes with a complimentary Recipe Book with these and many more recipes to try.  GET YOURS HERE If you need fast, healthy, convenient and tasty meals, then once again, an air fryer is for you.

Why Are Range Hoods Necessary?

So we get this question a lot, and we’ve got the answers here. This is why Range Hoods are necessary. Range hoods are an important appliance in the kitchen despite being often overlooked. They are designed to remove odors, heat, and smoke that can occur while cooking. Luckily range hoods function to improve air quality by eliminating the products of combustion, odors, and moisture from the air. Few people realize, a range hood is the only appliance in your kitchen that’s truly functions to protect the home. Clear the Air Likely the most important job of the range hood is to improve the air quality of your kitchen by removing odors, smoke, grease and other pollutants that are released into the air while cooking. The right Range hood will quickly neutralize odors, and away toxins. According to the National Institutes of Health, exposure to cooking-related contaminants is associated with a significant increase in pulmonary effects and symptoms of respiratory diseases. Kitchen appliances produce carbon monoxide which can build up and become harmful for you and your family. Fortunately, using a range hood will protect your family and home. Keep Your Kitchen Cool A great benefit of range hoods is that they can provide a pleasant cooking environment by removing excess heat caused by cooking. Let your range hood draw all that hot, stuffy air out of the room for you. Whether the heat is coming from steam or radiating off the cooktop itself, your kitchen stays more comfortable and cooler. Easy Clean-up Grease and excess moisture from cooking can buildup on the walls and kitchen surfaces around your cooktop and it can be difficult to clean. A range hood will help prevent the buildup making it easy to keep your kitchen clean. Proper ventilation also helps to prevent the growth of bacteria and mold, a definite plus for anyone with allergies or asthma. With these benefits you can cut your cleaning time in half. Enhanced Kitchen Lighting In the world of cooking, it’s important for cooks to see the food their preparing for best results. An overhead range hood offers additional lighting to ensure cooks can see well. The extra lighting also makes clean-up easier and ensures the removal of all that hard to see grease and grime. A Stylish Upgrade Range hoods are not only practical they are a stylish addition to your kitchen. An updated kitchen will increase your property value if you’re selling your home. Newer appliances ensure home buyers find your property more appealing. Range hoods come in a variety of style options, and the more efficient and higher quality a range hood is, the more value it can provide. Shop around to find the perfect fit for your budget, kitchen space, and personal style to complete your dream kitchen.

Identify Your Ideal Kitchen Design Style

While you may see kitchens in a variety of styles and find them all beautiful in their own way, finding inspiration for your dream kitchen often requires sorting through many different considerations. From transitional to modern and every style in-between, these ideas can help you decide what suits your home while also fitting your personal tastes. Transitional Transitional style is a mix of traditional and modern furnishing. Blending the comfort and warmth of traditional design with the clean profiles and understated colors of the contemporary look. The result is often elegant, sleek spaces that radiate harmony. Taking advantage of this style offers creative freedom when looking to decorate your home with ease. Transitional styling is perfect when you like some characteristics of traditional style but enjoy the simplicity of contemporary. Why We Love This Style? Transitional style encompasses the best of both worlds and fits the style of many homes because of its versatile traits. Modern Modern design emphasizes clean lines and efficiency– with elements of contemporary, modern and industrial influences. Sleek is a collective term to describe modern design. Every element exudes crispness in shape, simplistic décor in generally muted color and fundamentals in materials such as glass, metals, and wood. Open and airy modern kitchens. Colors are explored in soft tones with an accent or two taking center stage. Why We Love This Style? The modern style embraces simplicity, clean lines, technology and the bare minimum required to appropriately handle functional and aesthetic demands. Industrial With its raw, utilitarian appeal, an industrial design style can give modern homes a sophisticated edge. The main feature of industrial styling is the unfinished look that focuses on combining bare and rough surfaces with a clean and flat finish. Industrial style delights in the drama of opposing materials such as wrought iron accents, glass doors, and exposed brick. One of the most obvious traits of an industrial kitchen is open space and high ceilings. Why We Love This Style? Industrial kitchens edgy and elegant and make a huge statement when planned and executed properly. Mediterranean Rustic and warm – but with an edge – the Mediterranean design style blends harmoniously with an exotic feel. Mediterranean styling is characterized by wrought iron, exposed wood beams, multi-colored cabinetry and a mix of metals providing its unique flare. To tie it all together it calls for pleasant, cozy and comfortable earthy shades and natural wood and stone hues. Color palettes may vary from darker shades of brown to whitewashed tones of neutral colors. Common accent colors of teal blues and greens reflect the spectacular colors of the Mediterranean waters. The décor typically features hand-crafted, salvaged or repurposed items made of wood, leather, natural fibers, wicker, and wrought iron. Why We Love This Style? Mediterranean Kitchen style is warm, inviting and a stress free design. Whether your preferences fit perfectly into one category or a combination of several, the goal of creating your dream kitchen is to listen to what style speaks to you.

Quick and Easy Summer Dinner Meal Recipes

When cooking for the family, don’t sacrifice flavor in order to create a quick meal. Mouthwatering recipes can be at your fingertips with easy, tasty twists on family faves for the dinner table. For a truly fast, family-friendly dinner idea consider Chicken Soft Tacos with Pickled Beet Salsa. This simple, healthy (antioxidant rich) and tasty dish will have hungry mouths watering. Chicken Soft Tacos with Pickled Beet Salsa Prep time: 25 minutes Servings: 4 Pickled Beet Salsa: 1 Canned Baby Whole Pickled Beets 2 tablespoons chopped red onion 2 tablespoons coarsely chopped fresh cilantro leaves 1 tablespoon fresh lime juice 1/4 teaspoon salt 1/4 teaspoon ground black pepper 1/3 cup sour cream 1 tablespoon jalapeno mustard 4 soft flour tortillas (6 inches) 2 cups fresh arugula 2 cups chopped cooked rotisserie chicken (hot or cold) 1/4 cup crumbled queso fresco cheese To make Pickled Beet Salsa: Drain beets; chop. In medium bowl, combine beets, onion, cilantro, lime juice, salt and pepper. In small bowl, stir together sour cream and mustard; set aside. On one half of each tortilla, place equal amounts Pickled Beet Salsa, arugula, chicken and cheese. Top with dollops of mustard-sour cream. Fold over. 3 Bean and Steak Salad Prep time: 20 minutes Cook time: 8 minutes Servings: 2 1 can 3 Bean Salad 1 ribeye or top sirloin steak (about 8 ounces) teaspoon vegetable oil 1/4 teaspoon salt 2 cups arugula 1/2 cup chopped herbs, such as parsley, thyme, dill, basil, chives or tarragon Dressing: 2 tablespoons olive oil 1 tablespoon plain fat-free yogurt 1 tablespoon fresh lemon juice 1 teaspoon prepared horseradish 1/8 teaspoon salt 1/4 teaspoon freshly ground black pepper Drain bean salad. Reserve half of liquid. Place beans and reserved liquid in large bowl. Heat cast-iron skillet or other heavy skillet over medium-high heat. Lightly brush both sides of steak with oil. Sprinkle evenly with salt. In skillet, cook steak 4 minutes on each side, or to desired doneness. Remove from pan. Allow steak to rest 10 minutes, covered lightly with aluminum foil; slice. In bowl, combine arugula and herbs with bean salad. Toss gently to combine. To make dressing: In small bowl, whisk oil, yogurt, lemon juice, horseradish, salt and pepper. Set aside. Whisk again before serving. Divide salad between two plates. Top evenly with steak slices. Drizzle dressing over salads.

Product News: Cosmo’s Fresh New Luxury Dual Fuel Range

Attention all forward-thinking home chefs who are passionate about cooking and appreciate Luxurious appliances that are also affordable. Our newest addition will help make life easier and more convenient. Refine your culinary skills when you cook with the Cosmo COS-305DFSC free-standing dual fuel range with an electric oven and gas cooktop. This Range features 5 Italian made burners. The 18,000 BTU burner delivers high heat to speed up preparation with a fast boil or sizzle. Switching to the 3,500 BTU burner adjusts to gentler heat, ideal for simmering delicate sauces or melting chocolate like an expert. Bigger and Bolder 5 cu. ft. freestanding single oven dual fuel range stove with Turbo True European convection and 7 oven functions including a 4 in. digital display, delay start, Sabbath mode functions and temperature probe. Unparalleled Cooking Performance This Range features 5 Italian made burners. The 18,000 BTU burner delivers high heat to speed up preparation with a fast boil or sizzle. Switching to the 3,500 BTU burner adjusts to gentler heat, ideal for simmering delicate sauces or melting chocolate like an expert. Quality Beyond Compare High grade Stainless Steel cooktop surface with heavy duty metal knobs and Flat Cast-iron cooking Grates. Convenient maintenance with an easy to clean blue porcelain interior and Self-clean oven feature. It’s safe to say this Range is well-equipped to fulfill the needs of any Home, It’s the pride of Cosmo to present a Range fully engineered and designed to make cooking a pleasurable experience. I WANT THIS RANGE

Easy Strawberry Shortcake Recipe (Video Tutorial)

Enjoy your summer with fresh fruit like strawberries in this easy Strawberry Shortcake recipe. Watch video to see how to make this simple yet ridiculously yummy recipe! https://www.youtube.com/watch?v=1N3GIaRFc0s Easy Strawberry Shortcake Recipe 1  can (5-8) Canned flaky buttermilk biscuits 2 tablespoons butter, melted 1/4 cup sugar Strawberry mixture: 3 cups fresh strawberries, sliced 1/3 cup sugar Whipped cream: 1/2 cup whipping cream 2 tablespoons sugar 1/4 teaspoon vanilla Heat oven to 375° F. Separate biscuits. Dip tops and sides of biscuits in melted butter. Dip biscuits, covering tops and sides, in sugar. Place sugar-side up on ungreased baking sheet. Bake 13-17 minutes, or until golden brown. To make strawberry mixture: In medium bowl, mix strawberries and sugar. Set aside. To make whipped cream: In small bowl, beat whipping cream and sugar until soft peaks form. Add vanilla and beat into mixture. On plate, split biscuits and put dollop of whipped cream mixture on bottom half of biscuit. Add strawberry mixture. Replace biscuit top and dollop with whipping cream.