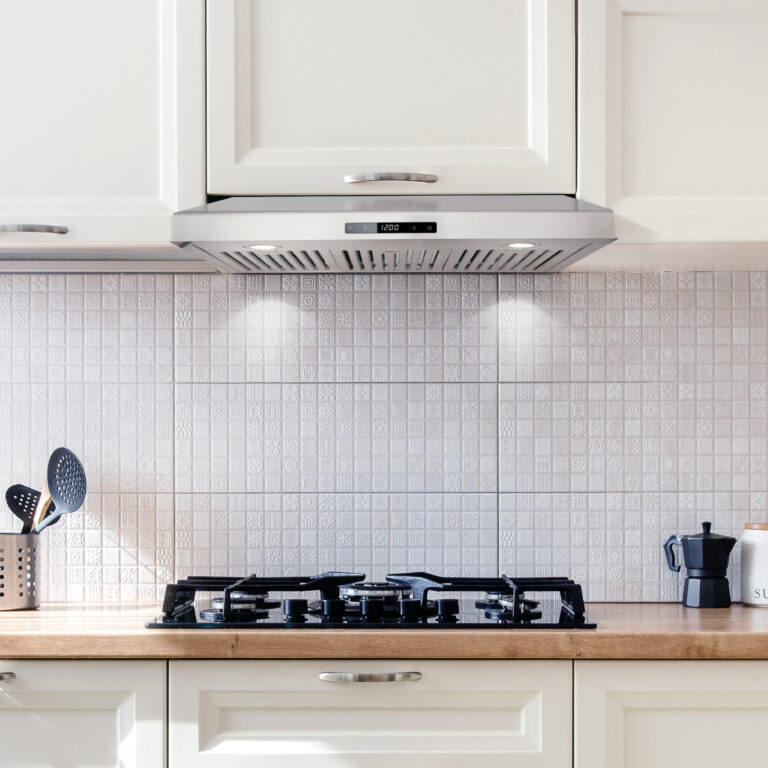
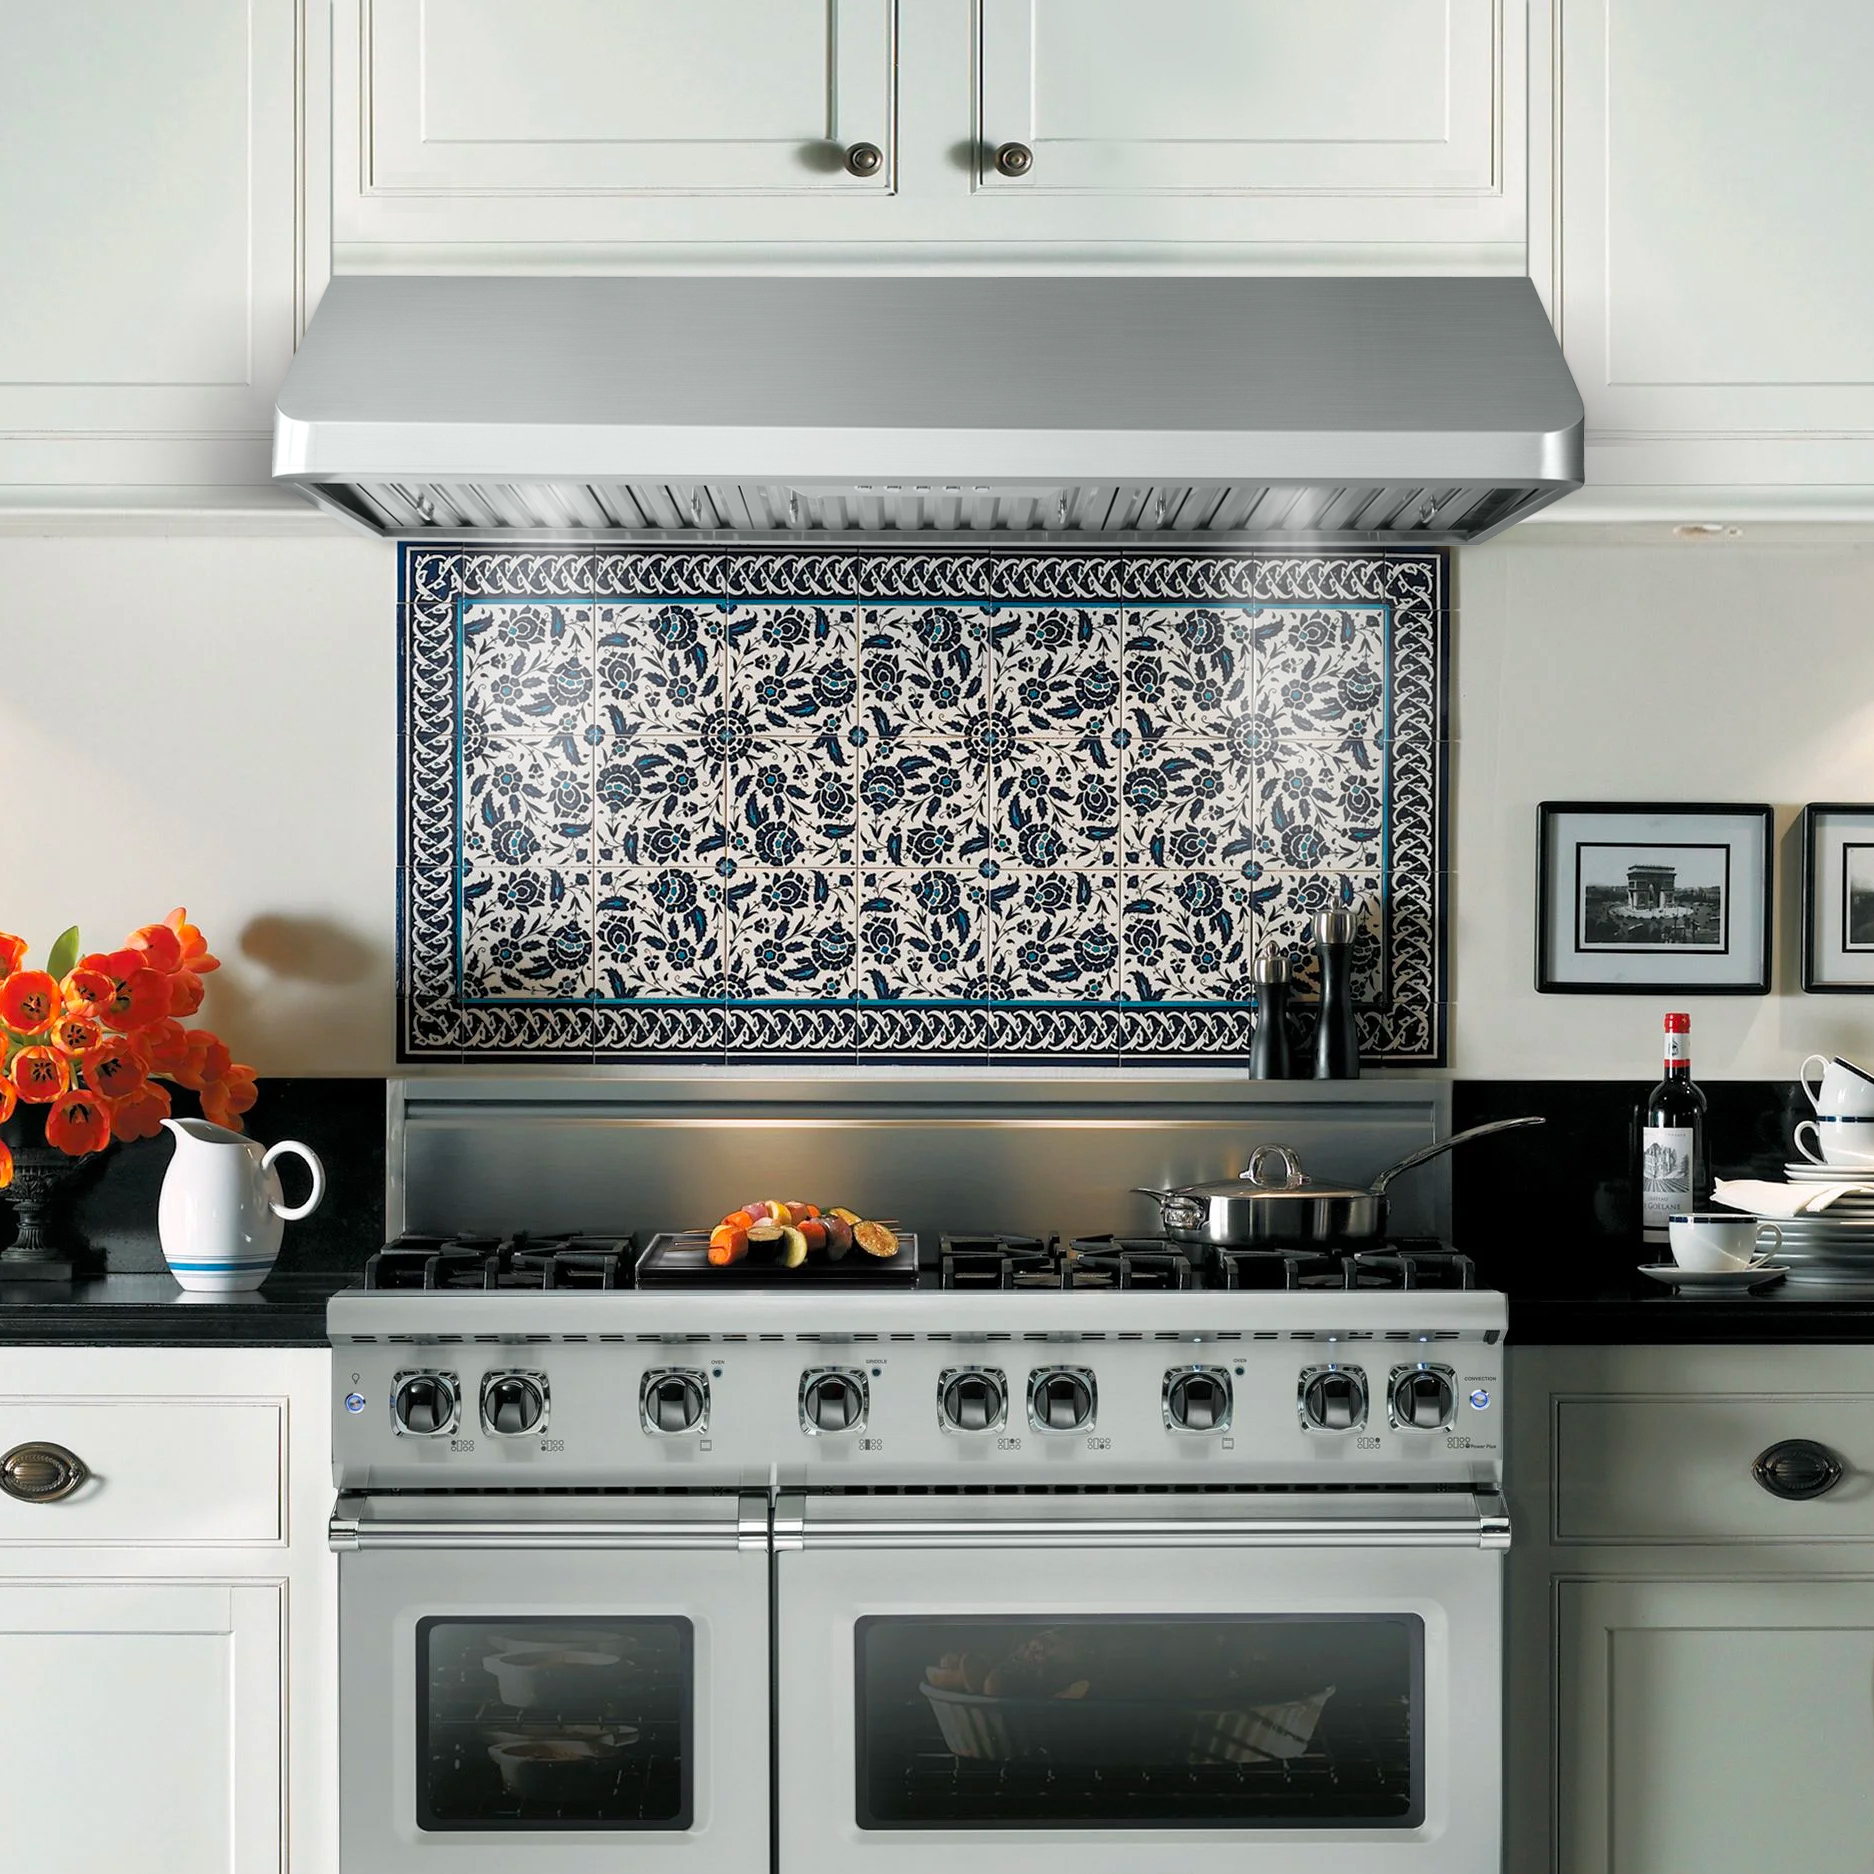
Cleaning

How to Safely Handle and Store Raw Meat at Home

Handling and storing raw meat properly is crucial for maintaining food safety and preventing foodborne illnesses. Raw meat can harbor harmful bacteria, such as Salmonella, E. coli, and Listeria, which can contaminate your kitchen and make you sick if not handled correctly. By following best practices for storage, handling, and preparation, you can ensure that your kitchen remains safe and your meals are healthy. In this blog post, we’ll guide you through the essential steps for safely handling and storing raw meat at home. Purchasing Raw Meat Storing Raw Meat Proper storage is essential to keep raw meat safe and fresh: Handling Raw Meat in the Kitchen Safe handling practices can prevent the spread of bacteria in your kitchen: Cooking Raw Meat Safely Proper cooking is essential to kill harmful bacteria: Storing Leftover Cooked Meat Proper storage of cooked meat is just as important: Disposing of Raw Meat Waste Safe disposal of raw meat waste helps maintain a clean kitchen environment: By following these guidelines for handling, storing, and cooking raw meat, you can significantly reduce the risk of foodborne illness in your home. Remember to prioritize cleanliness, prevent cross-contamination, and cook meat to the appropriate temperatures to ensure your meals are safe and delicious. Safe meat handling is a critical part of maintaining a healthy kitchen, and by implementing these practices, you can enjoy your meals with peace of mind.

How to Remove Sticky Residue from Kitchen Surfaces

Sticky residue on kitchen surfaces can be frustrating to deal with, especially when it seems impossible to remove. Whether it’s from spilled food, adhesive labels, or leftover grime from cooking, sticky residue can make your kitchen look unclean and attract more dirt over time. Fortunately, with the right techniques and tools, you can effectively remove sticky residue from various kitchen surfaces without damaging them. In this blog post, we’ll explore different methods to tackle sticky residue and restore your kitchen surfaces to their original condition. Identifying the Type of Surface Before you begin removing sticky residue, it’s important to identify the type of surface you’re dealing with. Different surfaces require different cleaning methods to avoid damage: General Cleaning Tips for Sticky Residue For most kitchen surfaces, these general tips will help remove sticky residue effectively: Methods for Removing Sticky Residue a. Soap and Warm Water For most surfaces, a mixture of mild dish soap and warm water is a safe and effective first step: b. Baking Soda Paste Baking soda is a gentle abrasive that works well on stubborn sticky residue: c. White Vinegar White vinegar is an effective natural cleaner that can dissolve sticky residue: d. Rubbing Alcohol or Vodka Rubbing alcohol or vodka can effectively dissolve adhesive residue on most surfaces: e. Cooking Oil or Coconut Oil For surfaces that are sensitive to harsh chemicals, cooking oil or coconut oil can help loosen sticky residue: f. Commercial Adhesive Removers For stubborn sticky residue, you may need to use a commercial adhesive remover. These products are specifically designed to break down adhesives: Special Considerations for Different Surfaces Preventing Sticky Residue in the Future To keep your kitchen surfaces clean and free from sticky residue: Sticky residue can be a nuisance, but with the right approach, it’s easy to remove from your kitchen surfaces. By using gentle cleaning methods and being mindful of the type of surface you’re working with, you can effectively clean and maintain a sparkling kitchen. Keep these tips in mind to ensure your kitchen remains free of sticky residue and looking its best.

How to Clean and Maintain a Toaster Oven

Toaster ovens are versatile kitchen appliances that can do everything from toasting bread to baking small batches of cookies. However, like any other appliance, they require regular cleaning and maintenance to keep them working efficiently and safely. In this blog post, we’ll guide you through the steps to clean and maintain your toaster oven, ensuring it stays in top condition for years to come. Why Regular Cleaning and Maintenance Matter Regular cleaning and maintenance are essential for several reasons: How to Clean Your Toaster Oven Step 1: Unplug and Cool Down Before you start cleaning, make sure your toaster oven is unplugged and completely cooled down. This is important for both your safety and the effectiveness of the cleaning process. Step 2: Remove and Clean the Removable Parts Step 3: Clean the Interior Step 4: Clean the Exterior Step 5: Reassemble and Test Once everything is clean and dry, reassemble your toaster oven. Plug it in and run it on a low heat setting for a few minutes to make sure everything is working properly. Maintaining Your Toaster Oven 1. Regularly Empty the Crumb Tray The crumb tray should be emptied and cleaned regularly to prevent crumbs from burning and causing smoke or fire hazards. 2. Avoid Overfilling Avoid overloading your toaster oven with food, as this can cause spills and make cleaning more difficult. Follow the manufacturer’s guidelines for food capacity. 3. Use the Right Cookware Only use cookware that is safe for toaster ovens. Avoid using plastic or other materials that could melt or warp under high heat. 4. Check the Door Seal Periodically check the door seal to ensure it’s intact and sealing properly. A good seal helps maintain even cooking temperatures and prevents heat from escaping. 5. Schedule Deep Cleans In addition to regular cleaning, schedule a deep clean of your toaster oven every few months. This will help prevent buildup and keep your appliance in good condition. Troubleshooting Common Issues 1. Uneven Heating If your toaster oven is cooking unevenly, it might be due to grease buildup on the heating elements or improper rack placement. Clean the heating elements carefully and make sure the racks are positioned correctly. 2. Burning Smell A burning smell is often a sign of leftover food particles or grease in the toaster oven. Unplug the appliance and give it a thorough cleaning to remove any residue. 3. Door Not Closing Properly If the door isn’t closing properly, check for obstructions or misaligned parts. If the door seal is damaged, it may need to be replaced. Cleaning and maintaining your toaster oven is simple, yet essential for ensuring its longevity and safe operation. By following these steps, you can keep your toaster oven in top shape, ready to deliver delicious meals and snacks whenever you need them. Make regular cleaning a habit, and enjoy the benefits of a well-maintained kitchen appliance!

How to Clean Kitchen Appliances with Baking Soda and Vinegar

Keeping your kitchen appliances clean is essential for maintaining a healthy, efficient, and well-functioning kitchen. While there are many commercial cleaning products available, you don’t need harsh chemicals to get the job done. Baking soda and vinegar, two common household items, are powerful natural cleaners that can tackle grease, grime, and stains on a variety of kitchen appliances. In this blog post, we’ll explore how to use baking soda and vinegar to clean some of the most commonly used kitchen appliances. Why Use Baking Soda and Vinegar? Together, baking soda and vinegar form a dynamic cleaning duo that’s safe, eco-friendly, and cost-effective. Cleaning Your Kitchen Appliances 1. Oven Ingredients: Procedure: 2. Microwave Ingredients: Procedure: 3. Refrigerator Ingredients: Procedure: 4. Dishwasher Ingredients: Procedure: 5. Coffee Maker Ingredients: Procedure: Baking soda and vinegar are powerful, natural cleaning agents that can effectively clean and maintain your kitchen appliances. By using these eco-friendly ingredients, you can keep your appliances in top shape without relying on harsh chemicals. Regular cleaning not only prolongs the life of your appliances but also ensures that your kitchen stays hygienic and pleasant. Give these tips a try and enjoy a cleaner, more efficient kitchen!

How to Clean and Polish Silverware: A Comprehensive Guide

Silverware adds a touch of elegance to any dining experience, but over time, it can tarnish and lose its luster. Regular cleaning and polishing can keep your silverware looking its best and extend its lifespan. Here’s a comprehensive guide to help you clean and polish silverware effectively, using both traditional and natural methods. Understanding Tarnish Tarnish is a common issue with silverware and occurs when silver reacts with sulfur compounds in the air. This reaction forms a layer of tarnish that can dull the shine of your silverware. Regular cleaning and proper storage can help prevent or minimize tarnish. Gather Your Supplies Before you start cleaning, gather the following supplies: Basic Cleaning Steps Polishing Silverware Traditional Silver Polish: Natural Silver Polish: Storage Tips Proper storage can help prevent tarnish and keep your silverware in pristine condition: Regular Maintenance To keep your silverware looking its best, incorporate regular maintenance into your cleaning routine: Professional Help For heavily tarnished or antique silverware, consider seeking professional cleaning services. Professionals have specialized tools and techniques to restore silverware to its original shine without causing damage. With the right techniques and regular maintenance, your silverware can remain a beautiful and functional part of your dining collection for years to come. Whether you choose traditional or natural cleaning methods, keeping your silverware clean and polished enhances its appearance and preserves its value. Follow these tips to ensure your silverware remains as stunning as the day you first acquired it.

How to Clean Kitchen Light Fixtures and Ceiling Fans: A Step-by-Step Guide

Keeping your kitchen light fixtures and ceiling fans clean is essential not only for maintaining their appearance but also for ensuring they operate efficiently. Dust, grease, and grime can accumulate quickly in these areas, affecting the quality of light and airflow. Here’s a comprehensive guide to help you clean your kitchen light fixtures and ceiling fans effectively. Cleaning Light Fixtures 1. Safety First Before starting any cleaning, ensure safety: 2. Gather Your Supplies You’ll need: 3. Dust and Remove Debris 4. Clean the Fixture 5. Reassemble and Test Cleaning Ceiling Fans 1. Safety Precautions Before cleaning your ceiling fan: 2. Gather Your Supplies You’ll need: 3. Dust the Blades 4. Clean the Fan’s Housing 5. Reassemble and Test Additional Tips Cleaning your kitchen light fixtures and ceiling fans may seem like a daunting task, but with the right techniques and tools, it can be straightforward and effective. Regular cleaning not only enhances the look of your kitchen but also ensures that your fixtures and fans operate efficiently. By following these steps, you can maintain a clean, bright, and well-ventilated kitchen environment.

Best Practices for Cleaning and Sanitizing Your Kitchen: A Comprehensive Guide

A clean kitchen is the cornerstone of a healthy home. Regular cleaning and sanitizing not only keep your kitchen looking its best but also ensure that it’s free from harmful bacteria and germs. Whether you’re cooking daily meals or preparing for special events, maintaining a hygienic kitchen is essential. In this post, we’ll explore the best practices for cleaning and sanitizing your kitchen to create a safe and pleasant cooking environment. Develop a Cleaning Routine Establishing a consistent cleaning routine is crucial for maintaining kitchen hygiene. Aim to clean and sanitize your kitchen daily to prevent the buildup of grime and bacteria. Break down your cleaning tasks into daily, weekly, and monthly routines to ensure comprehensive maintenance. Daily Tasks: Weekly Tasks: Monthly Tasks: Focus on High-Touch Areas High-touch areas in the kitchen are prone to contamination and require special attention. These include handles, knobs, and faucets. To effectively clean and sanitize these areas: Use the Right Cleaning Products Choosing the right cleaning products is essential for effective sanitation. Opt for: Prioritize Food Safety Proper food handling and storage are key to preventing foodborne illnesses. Follow these food safety practices: Clean Kitchen Tools and Equipment Kitchen tools and equipment can harbor bacteria if not cleaned properly. Follow these practices: Maintain a Clean Sink The kitchen sink can be a breeding ground for bacteria. Keep it clean by: Keep Air Vents and Filters Clean Air vents and filters help maintain air quality in the kitchen. Regular maintenance includes: A clean and sanitized kitchen is vital for both health and efficiency. By following these best practices, you can create a safe and enjoyable cooking environment. Develop a regular cleaning routine, focus on high-touch areas, prioritize food safety, and use appropriate cleaning products to maintain a hygienic kitchen. With consistent effort and attention to detail, you’ll ensure that your kitchen remains a clean and welcoming space for all your culinary adventures.

How to Keep Your Kitchen Smelling Fresh

A fresh-smelling kitchen is essential for maintaining a pleasant and inviting home environment. Cooking, garbage, and even lingering odors from past meals can contribute to unpleasant smells that can quickly take over the space. Fortunately, with a few simple tips and tricks, you can keep your kitchen smelling fresh all day long. In this blog post, we’ll explore effective strategies for preventing and eliminating kitchen odors, ensuring your kitchen remains a welcoming space for cooking and gathering. Regularly Clean and Empty the Trash One of the most common sources of kitchen odors is the trash can. Food scraps, packaging, and other waste can quickly produce unpleasant smells, especially in warm weather. Here’s how to manage it: Clean Your Sink and Drain Food particles and grease can accumulate in your sink and drain, leading to bad odors over time. Keeping these areas clean is key: Ventilate Your Kitchen Proper ventilation is crucial for preventing cooking odors from lingering in your kitchen. Here are a few ways to improve airflow: Eliminate Odors with Natural Deodorizers Instead of relying on synthetic air fresheners, try these natural solutions to keep your kitchen smelling fresh: Clean Appliances Regularly Your kitchen appliances can harbor odors if not cleaned regularly. Here’s how to keep them fresh: Prevent Odors from Developing Proactive measures can help prevent odors from developing in the first place: Maintaining a fresh-smelling kitchen is all about consistency and a few simple habits. By regularly cleaning your appliances, properly ventilating your space, and using natural deodorizers, you can keep your kitchen smelling clean and inviting. Whether you’re cooking up a feast or just enjoying a quiet cup of tea, these tips will help ensure that your kitchen remains a pleasant place to be.

The Role of Range Hoods in Air Quality: Keeping Your Kitchen Healthy

When we think about maintaining a healthy home, the kitchen is often at the top of the list. It’s the heart of the home, where meals are prepared, conversations flow, and delicious aromas fill the air. However, the kitchen can also be a source of pollutants, especially from cooking activities. Whether you’re sautéing vegetables, grilling meat, or simmering soup, your cooking can release smoke, steam, and airborne particles into the air. This is where range hoods play a crucial role. Why Range Hoods Are Essential for Kitchen Air Quality A range hood, often mounted above the stove or cooktop, helps to improve air quality by removing airborne contaminants. These contaminants include grease particles, smoke, odors, and excess moisture. Without a range hood, these substances can linger in your kitchen, eventually spreading to other areas of your home. Over time, this can lead to poor indoor air quality, which can cause respiratory issues, allergies, and unpleasant odors. How Range Hoods Work Range hoods come equipped with fans and filters that trap and remove airborne particles. Depending on the type of hood, they may either vent the air outside (ducted) or recirculate filtered air back into the kitchen (ductless). Here’s how each type works: The Health Benefits of Using a Range Hood Maintaining Your Range Hood for Maximum Efficiency To keep your range hood working effectively, regular maintenance is essential: Choosing the Right Range Hood for Your Kitchen When selecting a range hood, consider factors like your kitchen size, the type of stove you have, and the amount of cooking you typically do. For heavy cooking, a high-powered, ducted range hood will provide superior air quality and ventilation. If your kitchen doesn’t allow for ducting, a ductless option can still provide significant benefits, especially if equipped with a high-quality filter. In addition to adding a sleek, modern touch to your kitchen, range hoods are a key component in maintaining good indoor air quality. Whether you’re cooking up a storm or just preparing a simple meal, using a range hood ensures that you’re removing harmful pollutants and keeping your home environment healthy. Regular maintenance will ensure your range hood continues to function at its best, giving you peace of mind that your kitchen remains a safe and pleasant space for your family to enjoy.

Cleaning Your Wall Oven: Best Practices for a Spotless Appliance

Your wall oven is a vital part of your kitchen, but keeping it clean can be challenging with regular cooking and baking. A spotless oven not only looks great but also ensures better performance and longevity. Here’s a guide to cleaning your wall oven using effective practices that will make the task much easier! Regular Maintenance: Wipe Spills Immediately One of the easiest ways to keep your wall oven clean is by tackling spills as soon as they happen. After each use, allow the oven to cool down slightly and use a damp cloth to wipe away grease, food splatters, or spills before they harden. This prevents buildup and makes deep cleaning less daunting. Deep Cleaning with Natural Solutions For deep cleaning, you can skip harsh chemicals and use a homemade baking soda and vinegar solution: This method is safe, effective, and environmentally friendly. Self-Cleaning Function: How and When to Use It If your wall oven has a self-cleaning feature, it’s a great tool for removing grime. Here’s how to use it safely: Only use the self-cleaning function occasionally, as frequent use can wear down oven components. Cleaning the Oven Door The glass door of your oven often collects grease and fingerprints. Here’s a quick method to clean it: For baked-on grease, you can apply a baking soda paste and let it sit for 15 minutes before wiping it off. Don’t Forget the Racks Your oven racks can also accumulate grease over time. To clean them: Inspect the Gasket The rubber gasket around the oven door helps maintain the oven’s temperature. If it becomes dirty or damaged, it can lead to heat loss. Gently wipe the gasket with a damp cloth and inspect it regularly for any wear or tears. Preventing Future Buildup To keep your wall oven cleaner for longer, consider these tips: Regular cleaning and maintenance will not only keep your wall oven looking spotless but will also enhance its efficiency and extend its life. By following these best practices, you’ll save time and avoid heavy-duty scrubbing down the road. Whether it’s quick wipe-downs or deep cleaning with natural solutions, a little effort goes a long way in ensuring your wall oven continues to perform its best!