cooking

How to Make Your Own Pickles: A Simple Guide to Pickling

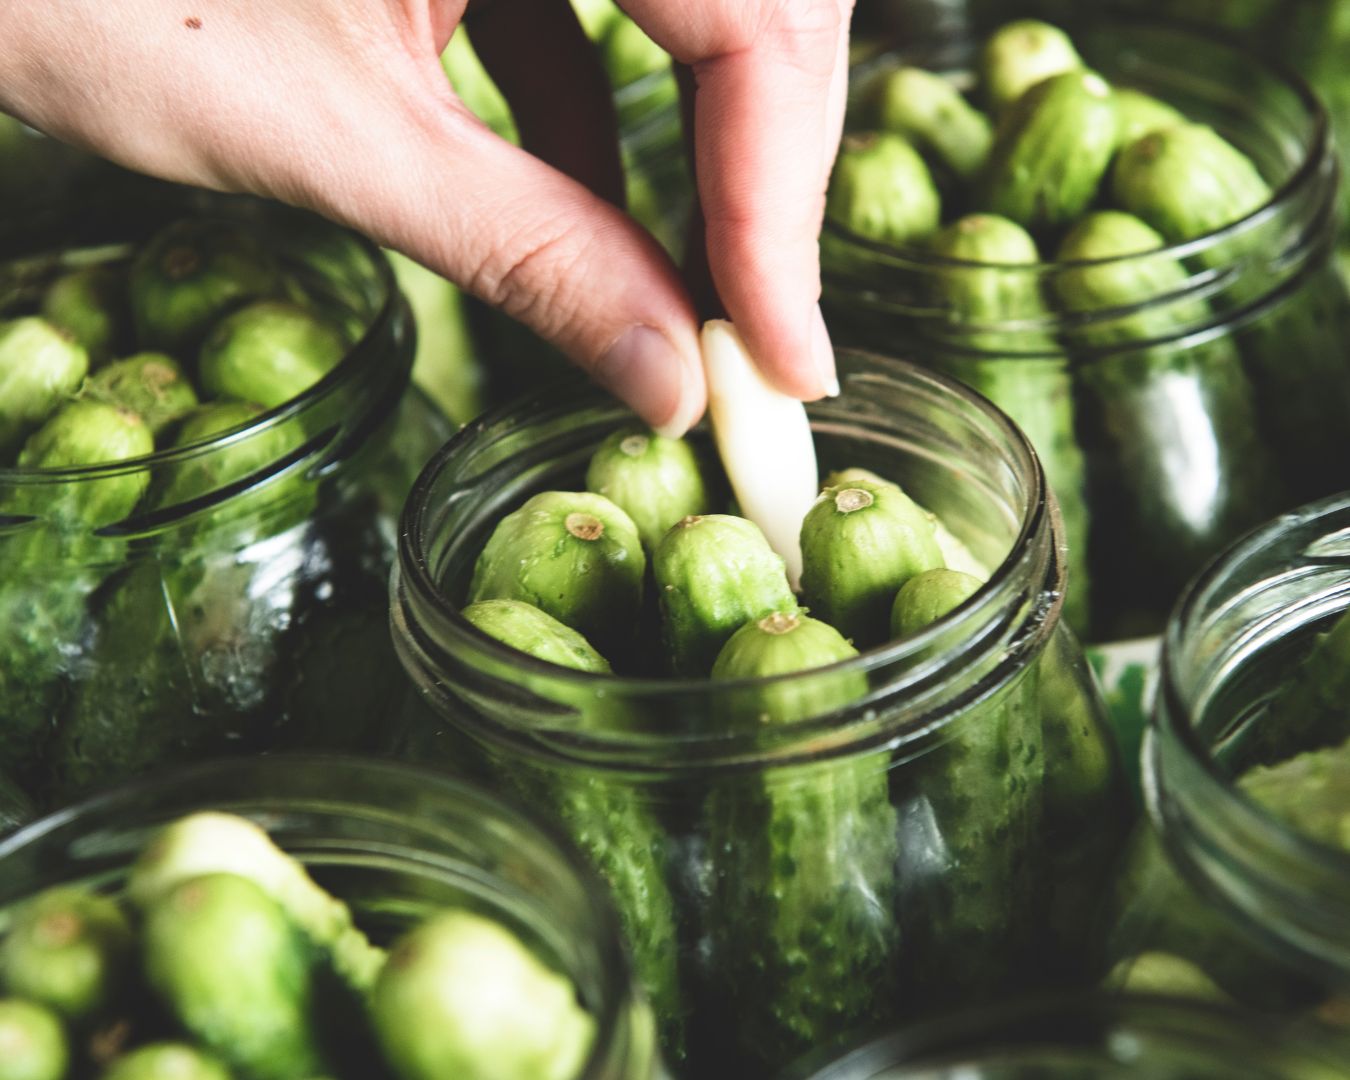
Pickling is an ancient culinary art that not only preserves the bounty of your garden but also enhances the flavors of your produce. Whether you’re a seasoned cook or a kitchen novice, making your own pickles is a fun and rewarding process. Here’s a simple guide to help you get started on your pickling adventure. Before you begin, gather the following ingredients and supplies: Step-by-Step Guide to Pickling 1. Prepare the Cucumbers Start by selecting fresh, firm cucumbers. Wash them thoroughly to remove any dirt or debris. Depending on your preference, you can slice the cucumbers into rounds, spears, or leave them whole. If using whole cucumbers, it’s a good idea to trim the ends to ensure even pickling. 2. Sterilize Your Jars To prevent contamination, sterilize your pickling jars and lids by boiling them in water for about 10 minutes. Carefully remove them with tongs and let them air dry on a clean towel. 3. Make the Brine In a large pot, combine the following ingredients to create your pickling brine: Bring the mixture to a boil, stirring until the salt and sugar are fully dissolved. You can adjust the ratios based on the quantity of pickles you plan to make. 4. Pack the Jars While the brine is heating, pack your sterilized jars with cucumbers, garlic cloves, dill, peppercorns, and bay leaves. You can also add other spices or herbs to customize the flavor, such as mustard seeds, coriander seeds, or red pepper flakes. 5. Add the Brine Once the brine has come to a boil, carefully pour it over the cucumbers in the jars, leaving about 1/2 inch of headspace at the top. Use a funnel if necessary to avoid spills. Make sure the cucumbers are fully submerged in the brine. 6. Seal the Jars Wipe the rims of the jars with a clean, damp cloth to ensure a good seal. Place the lids on the jars and screw on the bands until they are fingertip tight. 7. Process the Jars To extend the shelf life of your pickles, you can process the jars in a water bath. Place the sealed jars in a large pot of boiling water, ensuring they are fully submerged. Process for 10-15 minutes, then carefully remove the jars and let them cool on a towel. You should hear a popping sound as the jars seal. 8. Store and Enjoy Once the jars have cooled completely, check the seals by pressing the center of each lid. If it doesn’t pop back, the jar is properly sealed. Store your pickles in a cool, dark place for at least a week to allow the flavors to develop. Once opened, keep them refrigerated. Tips for Perfect Pickles Making your own pickles is a delightful and straightforward process that allows you to preserve the flavors of the season. With this simple guide, you can enjoy delicious homemade pickles that are perfect for snacking, adding to sandwiches, or gifting to friends and family.

The Power of Six Burners: Maximizing Cooking Space with the COS-GRP366 36″ Gas Range

When it comes to professional-style cooking at home, having ample burner space can be a game changer. The COS-GRP366 36″ Professional Style Gas Range is designed to elevate your culinary experience with its six high-performance burners, providing the versatility and efficiency you need to cook multiple dishes simultaneously. Unleash the Potential of Six Burners The COS-GRP366 features six sealed burners, each offering varying heat outputs to accommodate different cooking techniques: This range allows you to cook a full-course meal with ease—from appetizers to entrees to sides—all at once. Maximizing Cooking Space Efficiently Professional Performance at Home Tips for Getting the Most Out of Your Six Burners Why Choose the COS-GRP366? If you love cooking or entertain frequently, the COS-GRP366 offers unmatched power, space, and versatility. With six burners at your disposal, you’ll enjoy a professional cooking experience that allows for creativity and efficiency in the kitchen.Elevate your culinary game with the COS-GRP366 36″ Professional Style Gas Range and discover the true power of six burners.

Childproofing Your Kitchen: A Comprehensive Guide

The kitchen is one of the busiest rooms in the house, filled with potential hazards for young children. Ensuring your kitchen is safe requires careful planning and ongoing vigilance. This comprehensive guide provides essential tips to help you childproof your kitchen effectively. Securing Cabinets and Drawers Cabinets and drawers often contain sharp objects, cleaning supplies, and other dangerous items. Here’s how to secure them: 1. Cabinet Locks Install childproof locks on all lower cabinets and drawers. Magnetic locks are effective and can be installed on the inside, keeping them hidden from view while still providing security. 2. Drawer Stoppers Use drawer stoppers to prevent drawers from being pulled out entirely. This helps avoid injuries and keeps dangerous items out of reach. 3. High Storage Store hazardous materials, such as cleaning supplies, knives, and small appliances, in high cabinets that are out of reach of children. Even with locks, it’s best to keep these items completely inaccessible. Covering Electrical Outlets and Cords Electrical outlets and cords can be particularly dangerous in the kitchen. Here’s how to make them safer: 1. Outlet Covers Use plastic outlet covers to prevent children from inserting objects into the sockets. Choose covers that are difficult for small hands to remove. 2. Sliding Plate Covers Consider installing sliding plate covers, which automatically close when the outlet is not in use. These are more secure and convenient than traditional plug covers. 3. Hide Cords Keep electrical cords out of reach by using cord organizers or hiding them behind appliances and furniture. This prevents children from pulling on them and potentially causing appliances to fall. Installing Safety Gates Safety gates can keep children out of the kitchen when you’re not able to supervise them directly. 1. Gate Placement Install gates at the entrance to the kitchen to block access. This is especially useful during meal preparation when there are many potential hazards. 2. Hardware-Mounted Gates Choose hardware-mounted gates for a more secure and stable installation. These are less likely to be knocked over or moved by children. 3. Flexible Options Consider using gates that can be easily moved and adjusted as needed. This allows for flexibility in creating safe spaces within your home. Keeping Appliances Safe Kitchen appliances can pose serious risks to children. Here’s how to manage them: 1. Stove Safety 2. Oven Locks Install an oven lock to prevent children from opening the oven door. This reduces the risk of burns and other injuries. 3. Microwave Safety Place the microwave out of reach, either on a high shelf or built into the cabinetry. Ensure that hot food and liquids are not easily accessible. Choosing Safe and Age-Appropriate Items Toys and utensils in the kitchen can be both entertaining and dangerous. Here’s how to manage them: 1. Age-Appropriate Utensils Provide your children with safe, age-appropriate utensils if they like to help in the kitchen. Silicone and plastic utensils are good options for young children. 2. Avoid Small Parts Avoid toys and utensils with small parts that could be a choking hazard. Ensure that any kitchen-related toys are large enough to be safe. 3. Non-Toxic Materials Choose non-toxic materials for any items your children may handle or put in their mouths. Look for BPA-free, lead-free, and phthalate-free labels. Additional Childproofing Tips for the Kitchen 1. Anchor Furniture Secure heavy furniture and appliances, such as refrigerators and freestanding shelves, to the wall to prevent tipping. 2. Lock the Trash Can Use a childproof lock on the trash can to prevent children from accessing potentially dangerous items. 3. Corner Protectors Use corner protectors on countertops and tables to prevent injuries from falls or bumps. 4. Sharp Object Storage Store knives and other sharp objects in a locked drawer or a high, out-of-reach location. Consider using a magnetic knife strip mounted high on the wall. 5. Secure Dishwasher Install a lock on the dishwasher to prevent children from opening it and accessing sharp utensils or cleaning chemicals. 6. Avoid Tablecloths Avoid using tablecloths that can be easily pulled off, potentially causing heavy or hot items to fall. 7. Keep Floors Clean Regularly clean the floors to remove any small objects or spills that could cause slips or choking hazards. Childproofing your kitchen is an essential step in creating a safe environment for your children. By following these comprehensive tips, you can minimize the risks and allow your little ones to explore and learn safely. Always stay vigilant and regularly reassess your kitchen for potential hazards to ensure your child’s safety.

Exploring the Low Carb Diet: Benefits, Tips, and Delicious Recipes

The low carb diet has gained popularity for its potential health benefits and effectiveness in weight management. By reducing carbohydrate intake and focusing on protein and healthy fats, this diet can help improve blood sugar levels, boost energy, and promote weight loss. Let’s dive into the basics of the low carb diet, its benefits, tips for getting started, and some delicious recipes to try. What is a Low Carb Diet? A low carb diet limits the intake of carbohydrates, which are found in foods like grains, starchy vegetables, and sugary items. Instead, it emphasizes proteins, healthy fats, and non-starchy vegetables. Common types of low carb diets include the ketogenic (keto) diet, Atkins diet, and the paleo diet. Benefits of a Low Carb Diet Getting Started with a Low Carb Diet Low Carb Food List Delicious Low Carb Recipes 1. Cauliflower Rice Stir-Fry Ingredients: Instructions: 2. Zucchini Noodles with Pesto Ingredients: Instructions: 3. Avocado Egg Salad Ingredients: Instructions: Adopting a low carb diet can offer numerous health benefits, from weight loss to improved blood sugar control. By focusing on whole foods and incorporating delicious low carb recipes, you can enjoy a variety of tasty meals while maintaining your health goals. Start your low carb journey today and experience the positive changes it can bring to your life.

Energy Efficiency Benefits of Cooking with Gas on the COS-GRP304

The COS-GRP304 Gas Range is a versatile and powerful appliance designed to meet the demands of modern kitchens. Beyond its sleek design and high performance, it offers significant energy efficiency benefits. This article explores how cooking with gas on the COS-GRP304 can help you save energy, reduce costs, and enhance your culinary experience. Why Choose Gas for Energy Efficiency? Key Energy Efficiency Benefits of the COS-GRP304 1. Faster Cooking Times 2. Reduced Energy Waste 3. Lower Operating Costs 4. Eco-Friendly Cooking 5. Durability and Longevity Tips for Maximizing Energy Efficiency with the COS-GRP304 Safety Considerations The COS-GRP304 Gas Range is not only a top-tier cooking appliance but also an energy-efficient choice that benefits both your wallet and the environment. With its precise heat control, faster cooking times, and eco-friendly operation, it’s an excellent investment for energy-conscious homeowners. By following simple efficiency tips, you can further enhance its performance and enjoy cost-effective, sustainable cooking.

Health Benefits of Homemade Sauces Over Store-Bought

When it comes to enhancing the flavor of your meals, sauces are a key ingredient. While store-bought sauces offer convenience, making your own sauces at home can provide numerous health benefits that make the extra effort worthwhile. In this blog post, we’ll explore the advantages of homemade sauces over their store-bought counterparts and share some tips to get you started on your homemade sauce journey.  Control Over Ingredients Homemade Sauces: Store-Bought Sauces:   Reduced Sodium and Sugar Homemade Sauces: Store-Bought Sauces: Healthier Fats Homemade Sauces: Store-Bought Sauces: Freshness and Flavor Homemade Sauces: Store-Bought Sauces: Reduced Risk of Allergens and Sensitivities Homemade Sauces: Store-Bought Sauces: Tips for Making Homemade Sauces Making sauces at home can provide numerous health benefits, from reducing sodium and sugar intake to using healthier fats and avoiding allergens. By taking control of the ingredients and preparation methods, you can enjoy fresher, more flavorful, and nutritious sauces that elevate your meals. So, next time you reach for a jar of store-bought sauce, consider whipping up a homemade version instead. Your taste buds and your health will thank you!

How to Clean and Maintain the COS-640STX-E Drop-In Cooktop Surface

Your COS-640STX-E 24” drop-in cooktop is not just a kitchen appliance—it’s an essential tool for cooking up delicious meals. To ensure it continues to perform at its best and maintain its sleek appearance, proper cleaning and maintenance are key. Here’s a guide on how to clean and maintain your COS-640STX-E cooktop surface, so it stays in top condition for years to come. 1. Turn Off the Cooktop and Allow it to Cool Before cleaning your cooktop, always make sure it is turned off and completely cooled down. This is especially important to avoid burns and to prevent any cleaning solutions from reacting with hot surfaces. 2. Wipe Down Daily A simple wipe-down after every use can keep your cooktop looking pristine. Use a soft, damp cloth or sponge to remove any food spills, splatters, or grease. If food residue has hardened, use a mild soap solution. Be sure to wipe with the grain of the stainless steel surface to avoid scratches. 3. Use a Cooktop Cleaner for Stubborn Stains If you encounter stubborn stains, such as grease marks or burnt-on food, use a cooktop cleaner specifically designed for stainless steel surfaces. Apply a small amount of the cleaner to a soft cloth and gently scrub the affected area. Avoid using abrasive pads or harsh chemicals that can damage the surface. 4. Clean the Burners The burners of your COS-640STX-E cooktop may collect grease and food debris. Regularly wipe them down with a damp cloth. For more thorough cleaning, remove the burner grates (if applicable) and wash them with warm soapy water. Use a soft brush to clean any hard-to-reach areas. 5. Use a Stainless Steel Cleaner For a high-gloss finish, apply a stainless steel cleaner designed for kitchen appliances. This will not only keep your cooktop shiny but also help maintain its resistance to smudges and fingerprints. Always follow the manufacturer’s instructions for best results. 6. Deep Clean Periodically Every few weeks or as needed, perform a more thorough cleaning of your cooktop. Remove all the burner components and clean them individually. Use a non-abrasive cleaner to remove any stains from the cooktop surface. After cleaning, dry the surface completely to prevent water spots. 7. Check for Scratches and Repair If you notice minor scratches or scuff marks on the surface, you can often buff them out with a stainless steel cleaner or a specialized scratch remover. For deeper scratches, it may be worth consulting the manufacturer for repair options. 8. Maintain the Cooktop’s Functionality 9. Avoid Heavy Scrubbing While it’s important to keep the surface clean, it’s equally important not to use excessive force when scrubbing. Always opt for soft cloths or sponges, and avoid anything rough, like steel wool or harsh abrasives, which can damage the surface. 10. Routine Maintenance To keep the cooktop in great working condition, consider scheduling periodic professional maintenance to ensure that all components are functioning properly and safely. Regular servicing can also prevent larger issues down the road. By following these simple steps, you can extend the lifespan of your COS-640STX-E cooktop and keep it performing optimally. With just a little care and attention, your cooktop will continue to look and perform like new, enhancing your cooking experience every time.

How to Select and Store Fresh Produce

Selecting and storing fresh produce is essential to ensure that your fruits and vegetables stay as fresh, flavorful, and nutritious as possible. With a few simple tips, you can make the most out of your grocery store or farmer’s market visits, reducing waste and enjoying the best that each season has to offer. Here’s how to choose and store fresh produce effectively. Selecting Fresh Produce 1. Choose Seasonal Produce: 2. Inspect for Freshness: 3. Check Ripeness: 4. Buy in Small Quantities: Storing Fresh Produce 1. Refrigerate Appropriately: 2. Room Temperature Storage: 3. Special Cases: 4. Extend Shelf Life: Additional Tips Selecting and storing fresh produce properly can make a significant difference in the quality and longevity of your fruits and vegetables. By following these tips, you can enjoy fresh, nutritious produce, reduce food waste, and save money. Happy shopping and enjoy the bounty of fresh, delicious produce in your meals!

Nutritional Comparison of Different Meats: Chicken, Beef, and Pork

When it comes to choosing the right meat for your meals, understanding the nutritional differences can help you make healthier choices that fit your dietary needs and preferences. Chicken, beef, and pork are three of the most commonly consumed meats worldwide, each offering unique nutritional profiles. In this blog post, we’ll break down the nutritional benefits and considerations of each type of meat to help you make informed decisions at the grocery store and in the kitchen. Chicken: Lean and Versatile Nutritional Highlights: Health Considerations: Beef: Rich in Iron and Zinc Nutritional Highlights: Health Considerations: Pork: Nutrient-Dense and Flavorful Nutritional Highlights: Health Considerations: When deciding which meat to incorporate into your diet, consider the following tips: Each type of meat—chicken, beef, and pork—offers its own set of nutritional benefits and considerations. By understanding these differences, you can make informed choices that align with your health goals and dietary preferences. Whether you’re looking to boost your protein intake, increase iron and zinc levels, or enjoy a nutrient-dense meal, there’s a meat option to suit your needs. Enjoy exploring the culinary possibilities and nourishing your body with these versatile protein sources!

Noise Control in the Kitchen: How the COS-QS90 36″ Under Cabinet Range Hood Stays Quiet Yet Efficient

When it comes to maintaining a peaceful kitchen environment, noise control is often overlooked. The clatter of pots, the hum of appliances, and the roar of traditional range hoods can disrupt the calm of your cooking space. Enter the COS-QS90 36″ Under Cabinet Stainless Steel Range Hood, designed to deliver exceptional ventilation power without overwhelming your kitchen with noise. Whisper-Quiet Performance with an Efficient Punch The COS-QS90 is engineered to strike the perfect balance between performance and noise control. Equipped with a soft touch controls and motors, it offers an impressive 500 CFM (cubic feet per minute) airflow capacity. This means it effectively eliminates smoke, grease, and odors even during intense cooking sessions—all while operating at a remarkably low noise level. Advanced Noise Reduction Technology What sets the COS-QS90 apart is its innovative noise reduction design: Functional Features That Enhance Quiet Operation Why Choose the COS-QS90 for Your Kitchen? If you’re seeking a range hood that complements both the aesthetics and tranquility of your kitchen, the COS-QS90 is an excellent choice. It combines: Experience the perfect blend of quiet efficiency and efficient performance with the COS-QS90 36″ Under Cabinet Range Hood. Transform your kitchen into a space where you can cook, converse, and unwind—without the background noise.