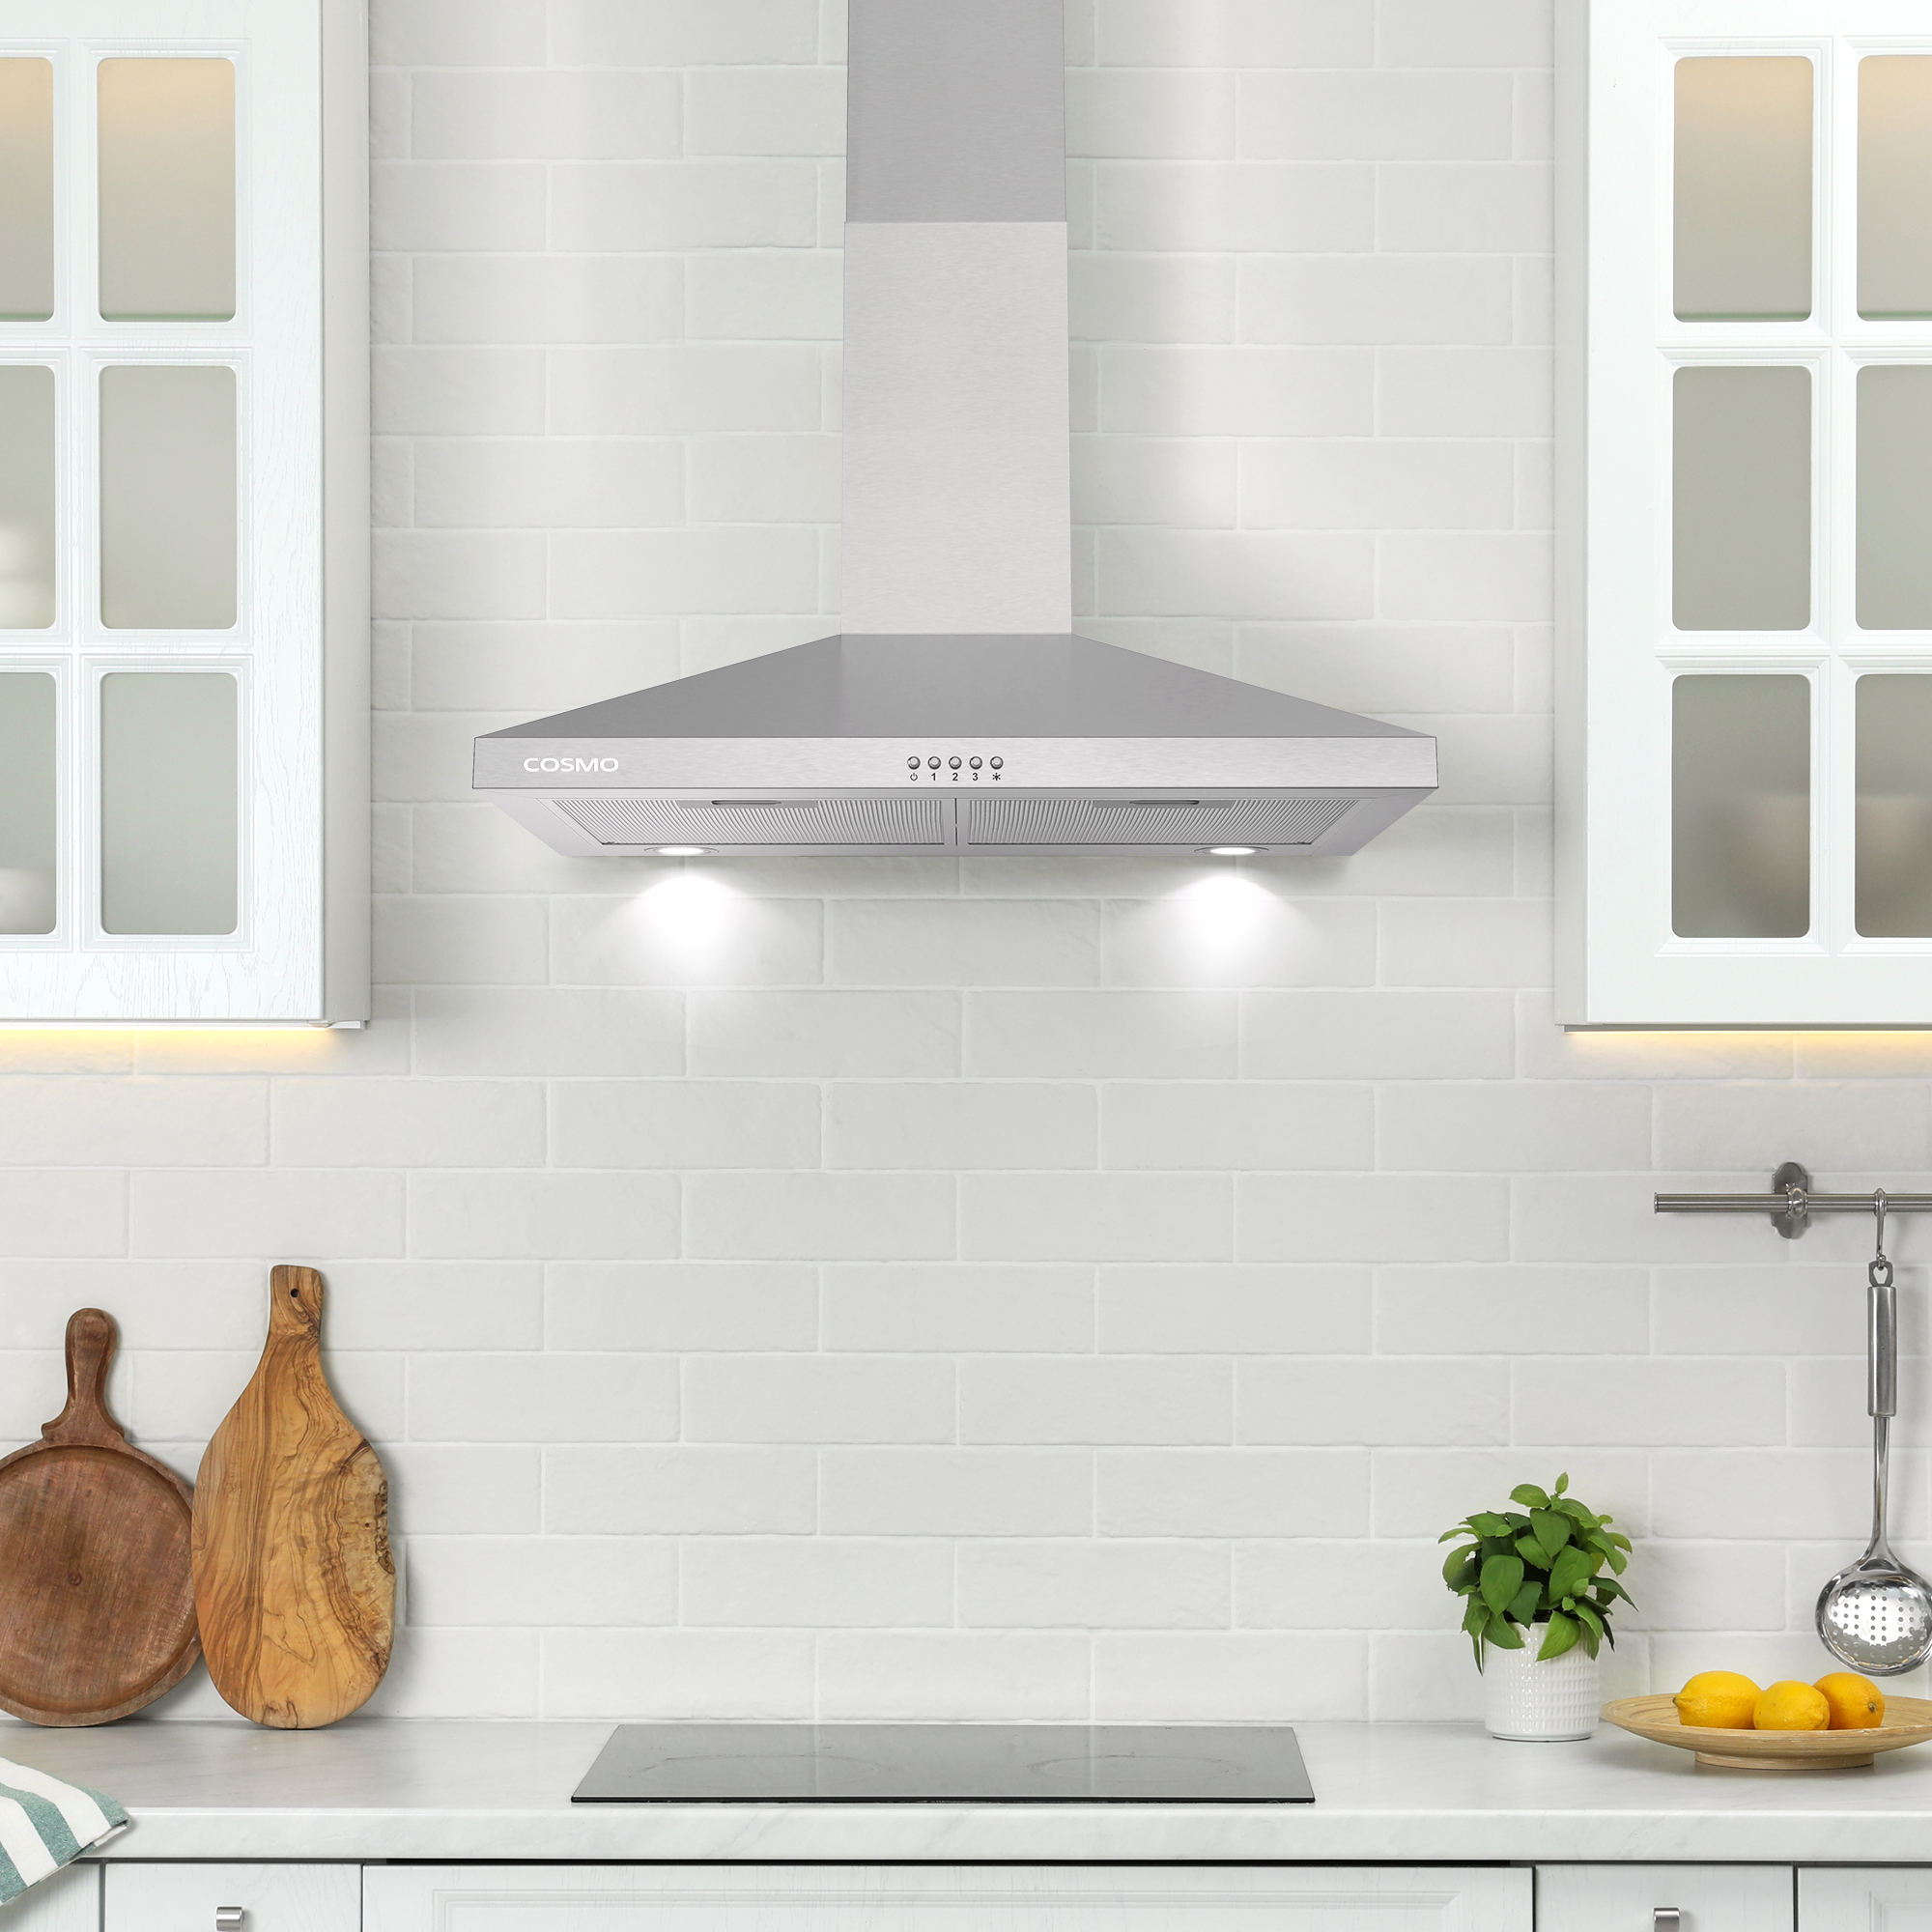
kitchen appliances

Taking Care of Your Stainless Steel Appliances

Stainless steel is one of the sleekest modern finishes any appliance can have. As a matter of fact, it’s the most popular among dishwashers, ranges, and refrigerators sales. But as you may soon learn, stainless steel attracts fingerprints, smudges and streaks. There are many stainless steel cleaners on the market to bring the shine back to your appliances. But we’ve compiled some tricks if you’re looking for other cost saving alternatives. It’s always a good idea to refer to your product’s user manual on any cleaning recommendations. Always avoid scouring powders, steel wool, bleach, or ammonia as these can damage your appliance’s finish. Dish Soap. You can actually mix a mild soap detergent and warm water to help clean your stainless steel. Use a microfiber cloth and rub the solution into any marks, going with the grain of the stainless steel. Rinse with cold water and dry immediately with a clean cloth after. Mineral Oil. Apply a light coating of mineral oil and buff with a cloth to avoid any tacky buildup. Steer clear of any food-based oils such as vegetable or olive oil. These kinds of oils can turn rancid. Glass Cleaner. Spray a soft, dry cloth with a glass cleaner that is ammonia and vinegar-free to buff out any pesky fingerprints that may persist. Wipe the surface clean after. Baking Soda. Create a paste of baking soda and warm water, then apply to a soft cloth or sponge. Always remember to go with the grain of your appliance. Wipe with a clean wet cloth and dry with a towel. For any remaining scratches or stains you can utilize a stainless steel cleaner to the area. Sources: Good HouseKeeping , Consumer Reports Looking to learn more? Follow us on our Facebook and Instagram. 

Ducted and Ductless Range Hoods–What’s the Difference?

All range hoods are not created equal. It’s important to know the differences when deciding which range hood would work best for your kitchen. Searching through the options, you may come across some terms you’re unfamiliar with: ducted and ductless. To better understand these functions, let’s establish the main function of a range hood: moving odors, smoke or fumes away from your kitchen when cooking meals. Ducted Range Hoods Ducted range hoods require a duct inside a kitchen that connects to the outside. The range hood pulls the air up through the duct and away from the kitchen. The main restriction here is the location of the duct, and how the kitchen is built. If you’d like to have your range hood in another location where there is no duct available, then a ducted range hood may not work for you. Humidity is a key difference here. Since the air is being moved outside, you would have a dryer air quality than a ductless option. Ductless Range Hood Ductless range hoods recirculate air back into the kitchen. They require an additional filter, usually carbon activated. One of the biggest advantages of ductless use is that they can be placed anywhere in the kitchen. Ductless range hoods can contribute to higher humidity and heat levels in kitchens since the same air is remaining in the area. Filters do have to be replaced, usually once or twice a year, which can lead to additional costs. Ductless range hoods often require more power to recirculate the air, which may create higher noise levels. At Cosmo, we offer both ducted and ductless options in our range hoods so you have the option in deciding what’s best for your needs– without sacrificing aesthetics. Check out all our range hoods here. Looking to learn more? Follow us on our Facebook and Instagram.

Father’s Day Gifts for the Man Who Loves to Cook

Hey Family, Father’s Day is coming up. Yey! Sure, typical Father’s Day gifts generally get the job done – think golf clubs, tool set and even a stylish tie – but what about the dad who enjoys spending time making magic in the kitchen. Don’t forget him. Give him the tools he needs to succeed, whether he’s baking for the big game, preparing a meal for the family, trying out a new recipe or seeking to master the perfect steak. Reaching one’s fullest potential in the kitchen requires the right equipment, so put the best gear in his hands (or on his counter) and up his culinary experience with these ideas from Cosmo Appliances. From a Portable Induction Cooktop Burner to an Airfryer turn his Kitchen countertop into a versatile powerhouse, give your food-savvy dad what he needs to up his culinary game. For more Father’s Day gift inspiration visit cosmoappliances.com. A Super Range for a Super Dad Dad deserves tools as bold and innovative as his culinary creations. Featuring Gas or Dual Fuel Ranges that combine modern styling with high-performance cooking technology. Dad will appreciate the authentic professional appearance with a robust profile. With high performance sealed burners that deliver exhilarating precision while the convection oven provides consistent heat for perfect roasting, baking, and broiling. These one-of-a-kind Ranges are sure to take his culinary prowess to a whole new level. Previous Next BUY THIS RANGE Chef on the Go For those warm summer weekends, camping is a fantastic activity that provides hours of enjoyment and a welcome opportunity to connect with loved ones and nature. After a day full of outdoor activities, Dad will want to prepare something easy, simple and very fast. Upgrade your camping cuisine with a portable Induction cooktop. Thanks to induction technology, electromagnetic currents generate heat from within the metal in the cookware for extremely fast and even heating. Boasting impressive safety features unlike burners with flammable and combustible vapors, our system remains cool to touch until cookware is placed on it. It’s sleek, compact design allows him to enjoy cooking anywhere he goes. BUY THIS COOKTOP Guilt-Free Crispy Fried Food  Made popular by claims air frying is a healthy alternative for frying food; because it replicates the wonders of deep-frying in a healthier way so Dad can still indulge in his fave fried foods like French fries. The Air Fryer, uses rapid air technology to fry, bake, roast or grill your food with only a tablespoon or less of oil. Think of it as a hi-tech counter-top convection oven. For recipe ideas click here BUY THIS AIR FRYER Bonus Gift for Dad who Loves Wine For those wine enthusiasts that insist on professional grade wine refrigeration, for at home use Cosmo has combined advanced technology and our signature sleek appearance for you to enjoy quick access to cold drinks and your favorite wine. Our 24 inch wine cooler delivers exactly the right temperature, with a single zone temperature that can be set at an ideal temperature to allow your wine to mature properly. BUY THIS WINE COOLER

Laundry Day- A “Do’s and Don’ts” Guide

Like with most kitchen appliances, there are a few tricks to washing clothes in a washing machine. Having a machine to do those seemingly endless loads of clothing is convenient. And you may think you know how to use it effectively but it’s not as straight forward as you would imagine.  To ensure your clothes always come out clean and fresh it’s important you know exactly how to use a washing machine, for example you want to know the proper ways to wash your delicates or load the dryer, you’ll want to follow this guide on the right ways to do your laundry.    DOs – For best results 1.  DO separate colors and pre-treat stains Divide your weekly washes into four piles: whites, lights, darks, and delicates to prevent any color run disasters. Once you’ve got enough of one pile to put it in the machine, check the garments for stains. Pre-treat these items before placing in the washer to avoid having to re-wash later. Clothes should be sorted by: Fabric: separate delicate fabrics that require a gentle cycle from heavier items. Color: Keep whites separate from colors and group lighter colors from darker ones.  Soil: Soil travels from one garment to garment so try to wash heavily soiled garments separately.  2. DO check garment care labels Before popping your clothes in the washing machine, check the care labels for washing guidelines for instructions on the appropriate wash cycle and temperature to set.  3. DO use laundry bags for delicates Delicate items like underwear, silks, lingerie and white items that are really precious to you should be placed in laundry bags to protect them from snagging. If you don’t have a laundry bag, use a pillowcase! 4. DO use the right amount of detergent  Always read the packaging of your detergent to learn how to measure and use that specific product: Measure liquid detergents using the measuring cap   Measure washing powders using the scoop provided and pour into the correct compartment of the detergent drawer (check your owner manual for this). Add washing tablets to the detergent drawer or the washing machine drum before your clothes, according to the instructions for your machine. Just like washing machine tablets, how to use laundry capsules is easy and straightforward. Pop one at the back of the drum before your clothes and go!  Fill the machine with water, detergent and then add your clothes, this procedure will help detergent, fabric softener to properly dissolve in the water. 5. DO leave your washing machine door open after use This will allow it to air out and help prevent mold and mildew from growing. 6. DO prevent shrinking by using cold or warm water Cotton, denim, and various other fabrics can shrink if you wash them in hot water, so always use cold or warm water while washing woolen, cotton outfits. 7. DO clean your washing machine Regular cleaning is an important part of knowing how to use a washing machine. Set the washing machine to a hot cycle and add a cup of white vinegar to sanitize the machine and help remove smells.  DON’T’s – Avoid these common mistakes 1. DON’T overload your machine Clothes crammed into the washing machine won’t be able to move around enough to get a proper clean so you could end up needing to wash them again! Likewise, do not wash small loads using a large load cycle – this will use an unnecessary amount of water and energy.  2. DON’T leave anything in pockets Check all pockets for things like tissues or plastic toys, before placing in the washing machine. A stray tissue could leave your entire load covered in white fluff!  3. DON’T put fabric softener directly on top of laundry Fabric softener should never come in direct contact with clothes as it could stain them. Consult your washing machine manual and find the correct compartment in the detergent drawer for the conditioner to be placed in – it’s usually marked with a flower. 4. DON’T use too much detergent An excessive amount of laundry detergent could leave residue on your clothing and doesn’t result in cleaner clothes.  5. DON’T leave wet clothes in for a long time Moisture from wet clothes could result in a build-up of mold in your washing machine drum, or even on your clothes. Remove clothes from the washer as soon as possible after the rinse cycle is finished and dry naturally, outside, where you can.  Happy washing!  With the basic dos and don’ts of how to use your washing machine covered, doing the laundry should now be a lot simpler.   

The Magic of Cooking with A Portable Induction Cooktop

Curious about induction cooking? There’s a lot to love about induction cooking and cooking with a portable cooktop has some real advantages. These fancy, futuristic looking and almost magical appliances offer sleek designs, with a smooth glass surface. Loved by chefs and food stylist, the portable induction cooktop is changing the cooking game- with its many time-and money-saving benefits. Portable induction cooktops are an excellent option for cooks looking to add extra cooking surfaces, when there are extra mouths to feed during the holidays, parties and when catering for other large gatherings.  If you have a small kitchen and need to maximize your space, you can easily tuck it away in a cabinet when you’re not using it making it the perfect space saving appliance for dorms, boats, patios, and RVs.  Unlike stovetops that rely on a gas burning flame to provide heat, an induction burner contains an electric coil that produces a magnetic field when turned on to directly and quickly heat the pan. The induction burner will only heat induction compatible cookware.  Induction cooktops use about 10 percent less energy because only the metal of the pan will heat up so all the energy goes directly into the cookware. Therefore, induction cooking is more energy efficient than cooking with a standard gas or electric cooktop.  Unlike stovetops that rely on a gas burning flame to provide heat, an induction burner contains an electric coil that produces a magnetic field when turned on to directly and quickly heat the pan. The induction burner will only heat induction compatible cookware.  Induction cooktops use about 10 percent less energy because only the metal of the pan will heat up so all the energy goes directly into the cookware. Therefore, induction cooking is more energy efficient than cooking with a standard gas or electric cooktop.  Another reason for its efficiency is the induction burners’ ability to reach precise temperature quickly. The heat created is instantaneous. It heats a pan to temperature in under a minute, and will boil water right before your eyes!  Induction cooktop burners offers a rapid response to cooking that offers almost 30% quicker heating time. Not only is it powerful, its scientifically precise temperature control means everything cooks perfectly. We are fans of the portable induction cooktop when safety is concerned- especially with kids and pets in the home.  The lack of an open flame and the fact the burner almost immediately cools down ensures its safety factor. Induction cooking is inherently safer than other methods because the burners don’t get hot, only the pan does. Plus, induction cooktops have several safety features like child-safety lock, pan detection and auto-shut off increasing their safety. Another great perk of the portable induction cooktop is its sleek surface that is easy to clean.  Because it generates little heat, there’s less cooking splatters and food doesn’t bake into the surface. Plus, with zero nooks to scrub, cleaning is simply a breeze.  Last but not least, its incredible function is matched by its aesthetic. The induction cooktop is an attractive addition to any kitchen.   While this form of cooking is more popular in Europe, its popularity is growing in the U.S. and justifiably so. Induction cooking is faster, safer, cleaner and more efficient. Considering adding a portable induction cooktop to your kitchen? Click here for more information and product features. 

Four Worthwhile Kitchen Gadgets in 2020

With all the focus on Marie Kondo, it can be tempting to cut down on the number of non-essential items in your kitchen. While we agree that your spaces should spark joy, we’ve also got a few opinions on four kitchen gadgets that are worth the space you’ll spend to keep them.  Air Fryer From crisping frozen french fries to roasting a chicken, the air fryer is a trendy, but versatile addition to any kitchen. Choose one with the capacity to suit your needs, and enjoy delicious, crisply fried foods without the grease.  Food Processor The humble food processor is an amazing utility tool- from mincing mirepoix to blending a can of tomatoes down to an easy pizza sauce, having a food processor in your kitchen can really improve your life.  Did you know that a food processor isn’t just for vegetables? You can combine butter or lard with flour for a quick and easy pie crust, with very little mess. Kitchen Scale No, it’s not just for watching your waistline. The kitchen scale can also be used to help make more complex recipes with precision, and is a must for the home baker or pastry chef. Mandoline Slicer While it can seem a little scary at first, a good mandolin makes slicing, dicing and grating vegetables easy and quick, all while ensuring uniform cuts and slices, for pretty plating and presentation. For more great recipes, tips and appliance news, follow us on Facebook or Instagram.

Mistakes You Might Be Making with Your Air Fryer

Have you been using your Air fryer a lot more lately? Then you know it’s an easy and more convenient way to get delicious meals on the table quickly.  Cooking with this miracle kitchen gadget is a game-changing experience. The possibilities are endless when you cook with an Air fryer – so to make the most of this amazingly versatile kitchen tool, we’ve put a list of common mistakes people make with their Airfryer.  Mistake # 1 Not Preheating the Air Fryer  Like your oven the air fryer needs to be hot in order to properly cook the food.  Placing food in the air fryer while it’s still cold might not yield the best results for your recipes. Even if the recipe doesn’t mention it, we recommend to turn the air fryer on 5-10 minutes before you add your food. It heats up pretty fast so it won’t take long for it to reach the perfect temperature.  Mistake # 2 Too Much Food in the Basket  It can be tempting to over crowd the basket since most air fryers are small but don’t. Your air fryer needs space for air to flow around it. There’s enough room to comfortably fit two- four servings of food depending on the size of the machine. Rather cook in smaller batches for faster, better results.  Mistake # 3 Not Using the Right Amount of Oil  The name air fryer might be misleading because you do actually need more than just air to cook in the air fryer. You don’t want too much or too little oil though. Using just enough oil will help your food crisp up.   1-2 teaspoons of oil is all you need for most items. Even if you’re avoiding added fats in your diet, you can spritz the food with some non-stick cooking spray to coat your food ( but don’t spray the basket directly). Check recipe instructions for more exact measurements.  Mistake # 4 Cutting vegetables too small Beware of small pieces of food falling through the basket holes and then burning. To avoid this from happening it’s best to cut ¼ inches wide to ensure they remain in the basket. Mistake # 5 Using wet batters A lot of deep-friend foods we love have a moist batter that don’t work well in the air fryer because there isn’t enough hot oil to set the batter like  in a vat of hot oil. To avoid a sloppy mess when wet batter sinks through the basket holes adapt your recipes or use recipes that require a thick coating instead. Mistake # 6 You don’t clean it often A number of problems can arise from not cleaning your air fryer after each use.  You’re risking food contamination, crumbs left behind or leftover oil residue can burn and cause smoke, posing a fire hazard.   Be diligent about hand washing the air fryer basket, bottom tray and drawer with warm soapy water after every use. Mistake # 7 You don’t flip your food You can’t set it and forget it- the air fryer does require some attending.  To make sure your food cooks to your desired perfection make sure to check on it. Flip your proteins halfway through while they’re still cooking to ensure the dish is evenly cooked. You will also want to move your veggies around periodically when cooking them in the air fryer.

Bakers Edition: How to Create a Better Kitchen

Whether you’re whipping up a big batch of extra fudgy brownies for a school bake-sale or crafting a delicate three-tier Orange Cardamom Cake with Rose Buttercream for a special occasion, we have practical tips and advice for the ultimate kitchen layout, tools, and equipment so you can turn your kitchen into a bakers dream. Do you love to bake? Here are some great ways to make your kitchen work for you. Custom Counter Heights  Different tasks call for different countertop heights. Home cooks serious about baking may want to consider custom countertop heights to achieve the most comfortable height. A counter-height surface works fine when mixing or assembling recipes. For kneading or rolling out dough, most bakers prefer a lower surface to get the right amount of leverage. To achieve this, you can Install countertops at a custom height or lower a section of an island so it’s the right height.  For a simpler solution, stand on a step stool and use a counter or use a kitchen table to achieve the most comfortable height. Previous Next Turn to Your Pantry  Baking often requires lots of ingredients and bulky countertop equipment, so pantry organization is the key to maintain a pristine kitchen. Install pull-out and horizontal pantry drawers that help you easily access your baking supplies. If you have enough space, consider putting your baking station inside your pantry. Also consider extra shelving for mixer storage. Organizing the pantry into specific sections and using bins with airtight lids allow for easier access when you need the basics – flour, sugar, brown sugar, chocolate chips, etc. Previous Next The Right Work Station  Granite and marble stay cool, making pastry dough easy to roll and clean up easily. Other baker-friendly countertops that can accommodate rolling, cutting and direct heat with no fuss are Quartz and Corian. If you can’t afford to install a whole slab, purchase a small marble section specifically for baking, or place marble on the kitchen island. Previous Next Double Ovens If what you are looking for is more baking and less waiting, double ovens are a bakers dream. They’re Spacious and versatile enough to accommodate your needs and allow a baker to cook two dishes at different temperatures at the same time. The double ovens, with convection are a must as the Convection ovens work with fans that recirculate heat, which evenly bake cookies and crusts. Even baked goods such as croissants develop a crispy, even texture with convection heat. An oven with a warming drawer or built-in Proof mode create the perfect oven environment for proving dough, you can also cook a variety of dishes in the warming drawer like meringues or melt chocolate. Extra Deep Sink  The sink is an essential element to keep the kitchen clean. Clean-up will be a whole lot easier with a deep, wide more functional kitchen sink since baking often involves using odd-shaped pans, oversized cookie sheets and large mixing bowls – many of which can’t go in the dishwasher. Previous Next Stand Mixer Serious bakers have more than one, and double or triple up on the bowl attachments so they don’t have to stop to wash them before moving on to the next phase of a baking project. Previous Next Baking Supply Cart It’s easy to run low on countertop space and having your supplies within reach is essential when baking. With a rolling cart you can move around your kitchen more easily and have your baking essentials wherever you’re working. Tech Corner There are thousands of recipes and how-to videos online to access these you can wire in a TV, desktop or laptop computer or an iPad in a small corner next to your countertop. A kitchen desk area works well for multi-tasking bakers so you can monitor the oven when working or catching up on emails and social media.

Real Life Microwave Hacks

It’s not just for reheating leftover pizza- the microwave has some pretty nifty hacks that you can use to make your life easier. Here is a list of the best hacks we found.  Peeling Garlic Got Easier  Peeling garlic is daunting, however, you can put the garlic in the microwave and heat it up for 15 seconds. The heat will release the moisture from the garlic clove which gets trapped between the skins and loosens it. Once you take it out, the skin just slide off. Get More Juice from Your Citrus Fruits If you need help getting the most juice out of a lemon, lime or other citrus fruit throw it into the microwave for about 10-20 seconds so that the pulp inside becomes soft and you can juice it with ease. Tear-free Onion Chopping Save your eyes from the horrible stinging sensation you get when chopping onions. Ever wondered why that happens? Well, when an onion is cut with a knife, its cells release volatile sulfur compounds that cause tearing. The trick is to trim off the ends with a knife and heat the onion for about 30 seconds before chopping away. Bring Stale Bread Back to Life When your bread or bagels stale simply wrap in a moist paper towel (not soaking) and pop in the microwave for 20-second increments. The moisture from the towel will soak into the bread to make it taste fresh again. Preserve Fresh Herbs If you want to preserve herbs well, wrap them in a paper towel and heat them in the microwave for about 30 seconds allowing them to dry out. This may make them last longer in the refrigerator. To completely dry the herbs continue to microwave in 15-30 second increments until the herbs. Soak Lentils or Beans Overnight All you need to do is place your uncooked beans or lentils in a bowl filled with water, add a pinch of baking soda and microwave them for about 10 minutes. Allow them to rest for 30-40 minutes, after which they are ready to be cooked. Make Frothy Milk for Your Coffee The next time you’re craving a fancy frothy café au lait just make it yourself. A microwave and a mason jar are all you need. Fill the mason jar with as much skim or 2% milk as you’d normally use in your coffee, cover and shake it vigorously to get the frothing process started, then pop it uncovered in the microwave for 30 seconds. Then voila! Silky, frothy warm milk. A DIY Heating Pad for those Cold Nights Make your heating pad at home in two minutes! Pour rice into a sock then tie a knot at the top of the sock. Put it in the microwave for 1-2 minutes. Reheat as needed. Steam Clean the Microwave We’re sure with these hacks your microwave will be working overtime.  So while you’re at it, steam clean it with some lemon water. Place a bowl of water with freshly squeezed lemon juice into the microwave and set the timer for 5 minutes or until the water boils, let it sit in the microwave for 3 minutes so the steam can loosen any food stains. Remove the bowl then wipe your microwave clean.

Quick Cleaning Tips for Your Kitchen Appliances

Clean your kitchen appliances faster with these quick cleaning tips for your kitchen appliances, show your appliances a little cleaning love, and they’ll look and work as good as new. Clean Your Refrigerator The space behind your refrigerator is notoriously filthy. Dirt, pet hair, and a host of other stuff can build up beneath and behind the refrigerator. This can block the appliance’s motor and coils and restrict airflow. To clean, pull out the refrigerator and mop up whatever you find. Part of my spring cleaning ritual. Is to vacuum the refrigerator coils behind the fridge, which will put less stress on the motor and prolong its life. Here’s how to clean the inside of a refrigerator the easy way. A little soapy water or an equal parts water and white vinegar solution will clean and shine the inside of your fridge. Wipe down shelves and crispers weekly, or whenever you spot a spill. Remove fingerprints on stainless steel exteriors with a damp cloth.  Clean Your Dishwasher  You wouldn’t think of cleaning a dishwasher since its job is to clean but it also needs a good cleaning; In fact, as often as your shower or sink. Sanitizing the dishwasher can be done quickly. To eliminate mold and bacteria run the dishwasher on the hottest, and longest cycle with white vinegar. This will sanitize and loosen food and soap scum. You should wipe around the edges of the door, around the gasket and check the drainage area as well.  Clean Your Microwave Sauce and food splatter inside the microwave constantly and all that buildup is unsightly and gross to cook with. Fortunately, there is a simple solution, the best way to clean microwave messes is to fill a microwave-safe container with water, microwave it until the water boils, and let it sit for a few minutes while steam loosens any caked-on food. Then simply wipe it clean.  Clean Your Kitchen Stove and Oven   Stove-tops are hot spots for oil splatters and food spills, so it’s best to clean it often. The key to cleaning your stove-top is to be quick. Before the bits of food cook onto the surface wipe them away immediately, careful not to burn yourself. If splatters sit for a few days soak with an equal parts mix of vinegar and water or use dish soap and water for built-up grease. Now that the stove-top is clean, you can take care of your oven and it’s quite simple nowadays because most ovens have self-cleaning options. While this feature does a good job of by itself there are a few spots it doesn’t reach. You can wipe them up built-up grime with vinegar or soapy water around door hinges and frames and the space between double ovens.