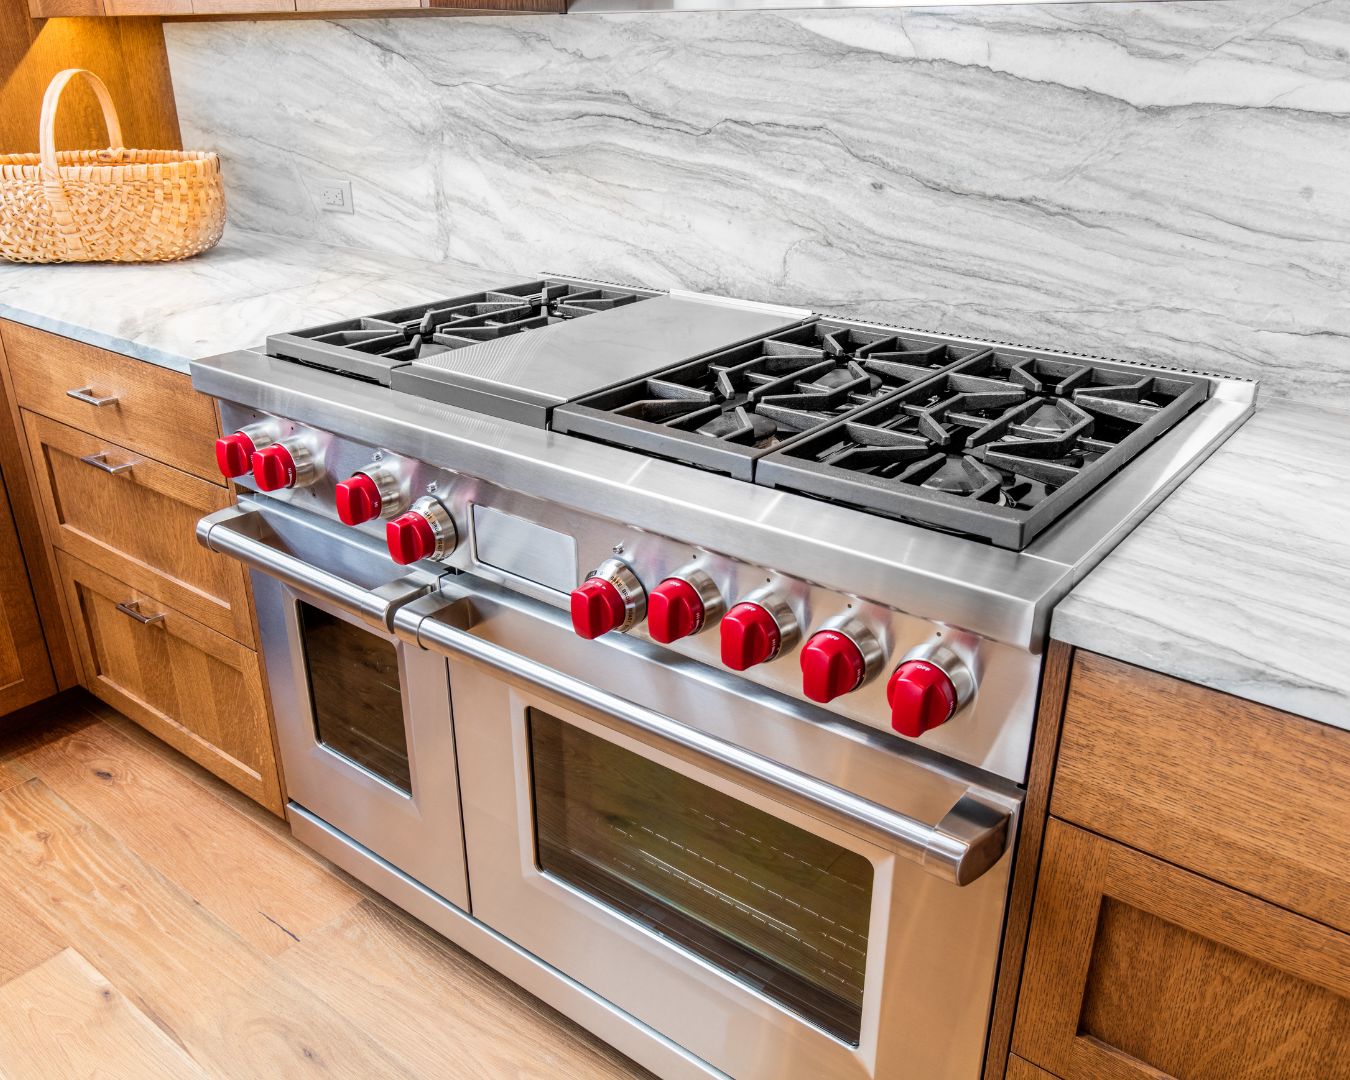
Appliances 101

Installing Cosmo Recirculating Filters for Ductless Range Hoods

Select Cosmo Range Hoods can be used in one of two ways, ducted or ductless. A ducted range hood will carry the ventilated air through ductwork and ultimately outdoors. On the other hand, a ductless range hood will filter the air and recirculate it back into the kitchen. In order for a Cosmo ductless range hood to operate, it will need a charcoal carbon filter to effectively clean the air. Before beginning, check your range hood model and serial number to correctly match the appropriate charcoal filter kit. Installation will slightly differ depending on the model. Here is how to install the CFK1-TM filter kit to convert to ductless operation. How to Install CFK1-TM Filters: Remove the ARC-FLOW Baffle Filters Locate the motor and align one of the filters with the right side of the motor Twist and lock the filter into place Repeat Steps 2-3 on the left side of the motor Reinstall the ARC-FLOW Baffle Filters back into place NOTE: For wall mounted hoods, chimney vent holes must be open and visible for the filtered air to recirculate. Download Quick Start Guide PDF

Breaking Down Dishwasher Detergent Compartments

You may be looking at your dishwasher, more specifically the detergent compartments and asking yourself what all those mean. Let your dishwasher take the load of the work by utilizing these compartments to their maximum potential. Your owner’s manual will be the most useful for model-specific practices. You can also find many manuals online in their PDF formats. If you’re still looking for a guide to fill the gaps, look no further! Here’s what dishwasher compartments mean, and how you should use them. (From left to right as pictured above) Main Wash Compartment. This is the main compartment where you’ll always be using when running the dishwasher. Many kinds of detergents can go here such as powder, gel and pods. Even if you use a pod, it should go into this compartment and not be tossed into the dishwasher as this will make it dissolve too quickly. Be sure to follow the recommended detergent amount, often times people use too much! Pre-Rinse Compartment. The smaller compartment usually located with the main wash compartment is there for a reason, even if most people don’t use it. The pre-rinse cup is meant to hold extra detergent if you feel the load will require some extra power on greasy pots and pans. It’ll add a bonus cleaning action to the pre-wash cycle of your dishwasher. Rinse Aid Compartment. Not often used, but should be! The Rinse aid helps break the surface tension of the water that rests on your dishes after they’re washed. The water will in turn slide off easily. It’ll help dishes dry faster and prevent water spots on your dishes. This compartment will hold more product than you actually need for a single cycle. Fill it up and refill once it runs out. There is usually an indicator to let you know it’s getting low. Source: the Kitchn

How to Clean a Juicer

Juicers have come a long way, and are best to extract juice from firmer fruits and vegetables. There are three basic types of modern juicers– centrifugal force, masticating or cold press, and triturating. A centrifugal force juicer contains blades in a spinning container. These are the fastest, loudest and least expensive types. A masticating or cold press uses a single spiral auger to masticate the produce. It will mimic the action of chewing. It’s much slower but extracts more juice. The triturating is a professional type that uses two augers to grind the fruit and vegetables into small particles. Cleaning is essential for any kind of juicer, regardless of the type. Without regular upkeep, small bits of pulp can get trapped in the components and decay leading to bacterial and mold growth. Many of these components are dishwasher-safe and can be kept clean with just a few items. Every juicer should be cleaned after every use. Bits that are trapped can harden quickly, making them more difficult to remove later. If the juicer is being used daily, make sure to give it a deeper cleaning weekly. What You’ll Need: 1 Non-abrasive sponge 1 Soft-bristled bottle brush 1 Toothbrush 1 Spatula 1 Microfiber cloth 1 Dishwasher 1 Dishwashing liquid 1 Dishwasher detergent 1 Baking soda 1 Distilled white vinegar Directions: Before you begin the cleaning process, turn off and unplug the juicer from the wall outlet. Remove the juice and pulp collection containers. Disassemble the juicer to access the grinding mechanism, strainer, lid, and plunger. Use a spatula to scrape out the pulp container. The pulp can be used in some recipes, composted, or placed in a trashcan. Fill a sink with hot water and add a few drops of dishwashing liquid. Place the components in the sink and let them soak for two or three minutes. Use a non-abrasive sponge to wash the plastic containers. Use a soft-bristled bottle brush or toothbrush to clean the strainer and around the grinding components. Rinse the clean pieces well with hot water and allow to air-dry or dry with a microfiber cloth to help prevent water spots.Even if you plan to place the parts in the dishwasher, give them a quick rinse to flush out the pulp particles. This is particularly important for the fine mesh of the strainer. Dampen a non-abrasive sponge with water and wipe down the base of the juicer. Never submerge the base that contains the motors in water! Dry with a microfiber towel. Once every component is clean and dry, reassemble the juicer and you’re ready for the next use. Weekly Deep Cleaning: If pulp has been allowed to dry and harden in the juicer components, fill a sink with hot water and a few drops of dishwashing liquid, add the components and allow them to soak for 15 minutes.Dip a toothbrush or bottle brush in dry baking soda and gently scrub the components. The baking soda will act as a gentle abrasive. Rinse the components often and continue scrubbing until they are clean. If the containers have streaks and water spots, fill them with distilled white vinegar and allow them to soak for 15 minutes. Pour out the vinegar and wipe them down with a non-abrasive sponge. Rinse well and dry with a microfiber cloth. Source: the Spruce

The Pros and Cons to Black Kitchen Appliances

Black stainless steel appliances have been on trend for quite some time now. It has a timeless appeal that holds up well with various different kitchens. Like any other trend, there are pros and cons for this kitchen design choice. Here’s what you should know before you invest in one. Pros Black is a universal color that works well with many different styles. It’s nearly trend-proof as it can be the prominent statement color or a background color. Black matches with all other shades and works especially well with warm and cool neutrals. It fits with gray, brown, white beige and navy. A black appliance is nearly smudge-proof thanks to its color. A matte sheen can hide most fingerprints and even smoke damage. A metallic-finish stainless steel requires special cleaners. Since black appliances are coated, they can be cleaned with warm water and a soft rag or non-abrasive cleaners. Cons Not all appliances are the same black. Different manufactures use different shades or sheens which can cause a clash in a kitchen. Two differing appliance shades can be more noticeable than a completely different color. A stainless steel appliance is a solid surface, meaning a scratch will reveal the same material underneath. Since black stainless steel is coated, a scratch will show the material underneath. This will be very obvious since the surface underneath will be a shiny steel. A lighter colored smudge or mark will easily show against the dark surface, meaning regular maintenance is necessary. Source: the Spruce

An Intro to Gas Ovens

A gas oven can be a bit tricky if you’ve only used electric ones. All gas ovens have a main burner at the bottom of the oven compartment which is usually shielded by a sheet of metal with vents on the sides. This provides intense radiant heat upwards into the main oven compartment. However, the temperature can fluctuate more widely and the overall heating can be less even. If you’re wondering why some muffins aren’t browning on top or a cake is baking unevenly, try these helpful tips. Rotate trays. It’s important to rotate trays once or twice during cooking to ensure that everything bakes as evenly as possible. If you’re baking multiple trays of pastries, try swapping the top and bottom trays as well as rotating them. If you’re baking cakes, breads or muffins try rotating them 90 degrees midway through. Move trays upwards to brown. Gas ovens can retain more ambient moisture which can result in foods taking longer to brown on top. Place the tray at the top of the oven or place a second tray directly above it so the heat will bounce off and help brown your foods more quickly. If a broiler is built into your oven you can also run it under that for a minute or two. Increase the temperature to crisp. If you’re looking to achieve a crispy crust, try turning up the oven heat by 25 degrees F. This will affect the cooking time slightly so be attentive to visual and aromatic cues that your food is done. Avoid dark metal cookware. Since heat in a gas oven is radiating from the main burner, the bottoms of your bakeware absorb more heat and speeds up cooking. This can result in the bottom of your food burning while the top isn’t done. Light colored metals, glass and silicone are great choices for baking in gas ovens to reduce the risk that bottoms burn. Cosmo Appliances are built with a variety of fuel types to match whichever needs you may have. Our line of Electric Ovens can be built into cabinetry for a seamless look. If you prefer a Cosmo Gas Range or Dual Fuel Range, check out our available models here. A better home starts with Cosmo. Source: the Kitchn

How to Clean a Toaster

Often the perfect appliance for a quick breakfast snack, the toaster is no exception to collecting dirt and food bits over time. Maintaining your toaster will ensure tasty and safer toast. Cleaning a toaster weekly is your best bet to remove crumbs and any leftover residue that can cause a burnt taste or even a fire. If you’re placing other foods into the toaster you may need to clean it after every use. Here’s how. What You’ll Need: Pastry brush Sponge Microfiber cloth Dishwashing liquid with a degreaser Melamine sponge Start by unplugging your toaster. Move it over a trash can or sink and use a pastry brush to remove crumbs. Turn it upside down and shake out the crumbs from the slots. In a sink or dishpan, mix a solution of warm water and dishwashing liquid. If your toaster has a removable crumb tray, remove and submerge it in the soapy water and wash it with a sponge or dishcloth. Rinse and dry with an absorbent cloth. Now that the tray is removed, use a pastry brush to reach any crumbs left inside the toaster. Don’t place your fingers inside the components. Then clean the exterior with a sponge or dishcloth that has been dipped in the soapy water. Make sure it is only damp, wring out the majority of the water before wiping the toaster down. Wipe with another sponge that has only clean water to remove any soapy residue. Dry with a microfiber cloth. Replace the crumb tray and reset dials to your desired settings. Plug in the toaster. Source: the Spruce Are you looking to check out other Cosmo Appliances? Follow our Instagram and Facebook!

Cast Iron and Glass Top Stoves: Do They Work Together?

Using cast iron cookware on a brand new glass cooktop can be scary, the last thing you want is to scratch or crack it. If you heed to certain guides and pay attention to a few reminders, you can actually use that favorite cast iron skillet of yours on an electric stovetop. Don’t Slide Your Cast Iron Always exercise a certain amount of caution with heavy cookware on a glass cooktop. Be careful not to drop it or slide it across the surface. Be extra gentle with cookware that is chipped or has rough edges as this may increase the chance of scratches. Wash Your Cast Iron Oil and other residues can carbonize on the bottom of your cast iron cookware, leaving a black mark on a glass stove top. Always wash your cookware immediately after using it and thoroughly clean the interior and exterior after every use. Cast Iron Heats Slower An electric cooktop differs from gas in that it takes more time to warm up. A cast iron dish may take a bit longer to heat up. Take this into consideration when calculating recipes. If you’re using cast iron, it may take longer to cook the same meal. Try heating the cookware on low and gradually bringing the heat up for a consistent and even heat distribution. Source: the Kitchn

Air Fryer Hacks You’re Missing

Your air fryer is capable of so much more than just frying. It’s faster than an oven and healthier than a deep fryer. Here are a few things you may not be aware your air fryer can do. Bake bread. Your air fryer can make delicious mini loaves. You’ll still need small enough pans and allow time for the dough to rise, but your air fryer can get the job done. Perfect for Cookies. If you’re looking to cut down on the number of cookies your oven usually puts out, try it in an air fryer. You’ll be able to make them quicker and with less mess in no time. Oil Shouldn’t Be Forgotten. While air fryers are usually branded as healthier alternatives, it doesn’t mean you should skip oil altogether. You should use a bit of oil on most food to ensure they crisp perfectly. Apply it either with a spray or mist. Cleanup is Necessary. Food debris can accumulate in your air fryer basket. Don’t let the season of one dish lead to another. Luckily most air fryers have nonstick baskets so soap and warm water can get them back in top shape. Hard-Boiled Eggs. No more waiting around for water to boil, pop your eggs into your air fryer and let it do the work for you. You don’t even need the water with some recipes! Looking to upgrade your kitchen with a new air fryer? Check out our available models here. Source: the Kitchn

Organizing Appliances 101

If your kitchen is cluttered and disorganized, there are three steps to manage your kitchen space. This will vary depending on the type of cook you are and what you eat. A pressure cooker front in center may be more optimal for a vegan, while a blender could be more useful for a raw food lover. Group Your Appliances. Sort out your appliances by their frequency of use. Split every appliance into one of the following categories: frequently used, rarely used and never used. Consider appliances that can have multiple purposes. A high-quality blender can double as a food processor, leaving you more kitchen space. Rid the Never-Used Appliances. This may be obvious, but do away with the appliances you aren’t using. Think about those rice cookers, juicers and egg poachers. Your kitchen space is valuable and should be reserved for appliances you’ll be using constantly. If you’re having trouble getting rid of an appliance, allocate 30 days to consistently use it. If it becomes a habit, keep it. Organize Cabinet Spaces. Now that you’ve cut back on appliances, it’s time to organize what you have. Take time to wrap cords around appliances before storing them. This will decrease clutter and look more organized. Cut back on paper clutter by accessing manuals online or saving them to your computer. Gather all the smaller parts in your kitchen, such as appliance attachments, and organize them in bags with the proper labels. Store Less Used Appliances. The appliances you use infrequently like a waffle maker or slow cooker, should be stored in harder to reach places. Reserve optimal cabinet space for the appliances you use the most. You can also swap these around if your needs change over time. For example, an ice cream maker can be moved down from the top shelf when it’s summertime. Source: the Spruce

6 Tips for a Cleaner Refrigerator

There’s no need to dread cleaning out your fridge. Follow with these 10 easy tips to get your appliance back in top shape. Create an all purpose cleaner by combining 1 cup clear ammonia, ½-cup vinegar and ¼-cup baking soda into a gallon of hot water. Pour the solution into a bottle. This will act as a degreaser and prevent any mold or mildew. Wipe everything down with this solution, including your shelves and drawers. Clean out the dust from below your fridge by removing the grill and clearing out everything underneath. Check the pan of water under the unit which can contain unpleasant-smelling water. To fix odors, sprinkle vanilla extract on cotton balls and place in a shallow dish in your refrigerator. Orange extract also works. Check the insulating seam around the door for any cracks. This will help to pinpoint any leaks. You can test this by placing a flashlight inside your fridge and closing the door. Turn the lights off in the room and see if any light escapes through the seams. If your refrigerator is ever empty, place a large bottle of at least one gallon of water inside. It helps keep the refrigerator cool and running efficiently. Keep your refrigerator at 37 degrees. Looking for more ways to connect with us? Follow our Facebook and Instagram for more updates! Source: HGTV