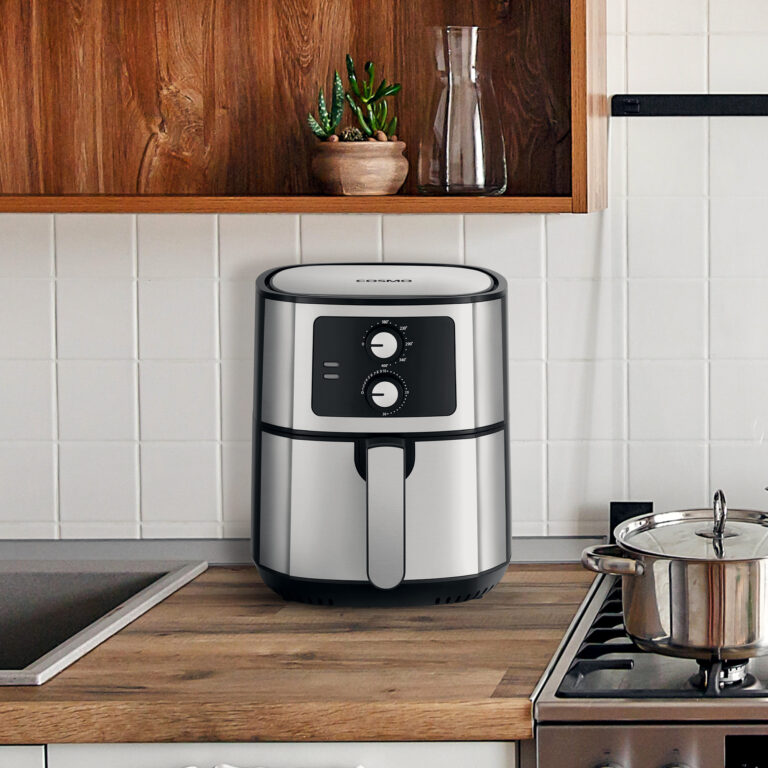
easy recipes

How to Encourage Healthy Eating Habits Through Cooking

Cooking at home offers more than just a way to prepare meals; it’s an opportunity to foster healthy eating habits and make nutritious choices. By integrating certain practices into your cooking routine, you can promote a healthier lifestyle for yourself and your family. In this blog post, we’ll explore effective strategies to encourage healthy eating habits through cooking. Plan Balanced Meals Meal planning is a cornerstone of healthy eating. By planning your meals in advance, you can ensure that your diet is balanced and includes a variety of nutrients. Aim to include: Tip: Use a meal planning app or a simple calendar to organize your weekly meals and make grocery shopping more efficient. Cook from Scratch Preparing meals from scratch allows you to control the ingredients and avoid added sugars, unhealthy fats, and excessive sodium found in processed foods. Cooking from scratch also gives you the chance to experiment with fresh ingredients and healthier cooking methods. Tip: Start with simple recipes and gradually incorporate more complex dishes as you become more comfortable. Homemade soups, salads, and stir-fries are great starting points. Use Healthy Cooking Methods The way you cook your food can impact its nutritional value. Favor healthy cooking methods that preserve nutrients and reduce the need for excessive fats. Some methods include: Tip: Invest in non-stick cookware to minimize the amount of oil needed and experiment with herbs and spices for added flavor without extra calories. Incorporate Superfoods Superfoods are nutrient-dense foods that offer a variety of health benefits. Integrate these into your cooking to enhance the nutritional profile of your meals: Tip: Add berries to your breakfast cereal, toss leafy greens into salads or smoothies, and use nuts and seeds as toppings for yogurt or oatmeal. Involve the Whole Family Involving family members in meal preparation can make healthy eating more enjoyable and educational. Children who participate in cooking are more likely to try new foods and develop a positive attitude towards healthy eating. Tip: Assign age-appropriate tasks such as washing vegetables, stirring ingredients, or setting the table. Make cooking a fun and collaborative activity. Create Healthy Substitutions Make small, manageable changes to traditional recipes to improve their nutritional content. Some healthy substitutions include: Tip: Experiment with different substitutions and flavors to find what works best for your family’s taste preferences. Practice Portion Control Portion control is key to maintaining a balanced diet. By serving appropriate portions, you can enjoy a variety of foods without overeating. Tip: Use smaller plates and bowls to help manage portion sizes and avoid second servings. Pay attention to hunger cues and eat slowly to recognize when you’re satisfied. Focus on Mindful Eating Mindful eating involves paying attention to the sensory experience of eating and savoring each bite. It helps you become more aware of your body’s hunger and fullness signals, leading to healthier eating habits. Tip: Sit down for meals without distractions, chew your food thoroughly, and appreciate the flavors and textures of your dishes. Practice gratitude for the food you have and the effort put into preparing it. Make Healthy Snacks Available Healthy snacks can keep you satisfied between meals and prevent unhealthy cravings. Stock your kitchen with nutritious options: Tip: Prepare snack-sized portions in advance and keep them readily available to avoid reaching for unhealthy options. Educate Yourself and Others Knowledge is a powerful tool for encouraging healthy eating habits. Educate yourself about nutrition and share what you learn with your family and friends. Tip: Read nutrition labels, follow reputable health blogs, and consider consulting a registered dietitian for personalized advice. Cooking is a powerful way to promote healthy eating habits and support a nutritious lifestyle. By planning balanced meals, cooking from scratch, using healthy cooking methods, and involving your family, you can create an environment that fosters good eating habits. Remember, small changes can make a big difference, so start incorporating these practices into your cooking routine and enjoy the benefits of a healthier, more satisfying diet.

How to Prepare and Cook with Seafood Alternatives

As more people explore plant-based and sustainable options, seafood alternatives have emerged as a popular and environmentally friendly substitute for traditional fish and shellfish. These alternatives not only mimic the texture and flavor of seafood but also offer nutritional benefits while supporting a more sustainable food system. Whether you’re vegan, vegetarian, or simply looking to reduce your seafood consumption, these plant-based and lab-grown options can be incorporated into your meals with ease. In this guide, we’ll explore different types of seafood alternatives, how to prepare them, and tips for cooking them in a variety of delicious dishes. Why Choose Seafood Alternatives? There are several reasons why you might opt for seafood alternatives over conventional seafood: Popular Seafood Alternatives Here are some of the most common seafood alternatives available today: How to Prepare Seafood Alternatives Preparing seafood alternatives is generally straightforward, but it’s essential to follow a few key steps to ensure the best flavor and texture: Delicious Recipes to Try Here are some tasty ways to incorporate seafood alternatives into your cooking: Cooking Tips for Seafood Alternatives With seafood alternatives, you can enjoy the flavors and textures of the ocean while supporting sustainable food practices. Whether you’re experimenting with plant-based products, using mushrooms or hearts of palm, or exploring seaweed-rich dishes, there are endless possibilities for creating delicious seafood-inspired meals. By following these preparation tips and trying out new recipes, you’ll discover that seafood alternatives can be just as satisfying as the real thing!

How to Open and Prepare Fresh Coconuts in the Kitchen

Fresh coconuts are a tropical delight, offering rich, creamy coconut water and tender, flavorful meat that can be used in a variety of dishes. However, opening and preparing a fresh coconut can seem daunting if you’ve never done it before. In this guide, we’ll walk you through the process step by step, from selecting the right coconut to cracking it open and preparing it for your favorite recipes. Whether you’re making coconut milk, coconut flakes, or just enjoying the fresh meat, this post will help you make the most of this versatile ingredient. Step 1: Selecting the Right Coconut Before you start, it’s important to choose a good-quality coconut. Here’s what to look for: Step 2: Draining the Coconut Water Before you crack open the coconut, you’ll need to drain the coconut water. Here’s how: Step 3: Opening the Coconut With the water drained, it’s time to crack open the coconut: Step 4: Extracting the Coconut Meat Now that the coconut is open, you can extract the meat: Step 5: Preparing Coconut for Use Now that you have fresh coconut meat, you can prepare it in several ways: Opening and preparing fresh coconuts may seem challenging, but with the right tools and techniques, it’s a simple and rewarding process. Whether you’re making coconut milk, flakes, or just enjoying the fresh meat, you’ll appreciate the rich, natural flavors that fresh coconut brings to your kitchen. So next time you see fresh coconuts at the store, don’t hesitate to pick one up and try these steps yourself!

How to Incorporate Leafy Greens into Your Meals: A Guide to Delicious and Nutritious Dishes

Leafy greens are packed with essential vitamins, minerals, and antioxidants, making them a valuable addition to any diet. From boosting your nutrient intake to adding vibrant flavors and textures, there are countless ways to incorporate leafy greens into your meals. In this blog post, we’ll explore creative and tasty methods to enjoy leafy greens in your daily cooking. Add Them to Smoothies Leafy greens are a fantastic addition to smoothies. They blend seamlessly with fruits and other ingredients, providing a nutrient boost without overpowering the flavor. Suggestions: Tip: Start with a small amount of greens if you’re new to adding them to smoothies. As you get used to the flavor, you can gradually increase the quantity. Toss Them into Salads Leafy greens form the base of many delicious salads. Mixing different types can add variety and texture to your salads. Suggestions: Tip: For extra flavor, add a variety of toppings like roasted nuts, fruit, or a protein source such as grilled chicken or chickpeas. Incorporate Them into Soups and Stews Leafy greens can enhance the flavor and nutritional profile of soups and stews. They add a subtle earthiness and a burst of color. Suggestions: Tip: Add greens towards the end of cooking to preserve their color and texture. They only need a few minutes to wilt and integrate into the dish. Use Them in Stir-Fries Leafy greens can be a great addition to stir-fries, adding both flavor and nutrients to your dish. Suggestions: Tip: Cook leafy greens quickly over high heat to maintain their vibrant color and crisp texture. Make Green Pesto Pesto doesn’t have to be made with just basil. You can use leafy greens to create a flavorful and versatile pesto. Suggestions: Tip: Use pesto as a sauce for pasta, a spread for sandwiches, or a topping for roasted vegetables. Incorporate into Baked Goods Leafy greens can also be added to baked goods for a hidden nutritional boost. Suggestions: Tip: For baked goods, finely chop or blend the greens to ensure they incorporate well into the batter. Create Leafy Green Wraps Leafy greens can be used as a low-carb, gluten-free alternative to traditional wraps or tortillas. Suggestions: Tip: Blanch the collard greens briefly to make them more pliable and easier to fold. Include in Breakfast Dishes Leafy greens can add a nutritious punch to your breakfast dishes, making them a great way to start the day. Suggestions: Tip: Sauté the greens briefly before adding them to scrambled eggs or an omelette to reduce their volume and enhance their flavor. Incorporating leafy greens into your meals is a delicious and nutritious way to boost your diet. From smoothies and salads to soups and baked goods, there are endless ways to enjoy these versatile vegetables. Experiment with different types of leafy greens and cooking methods to find your favorite combinations and make them a regular part of your culinary repertoire. Your taste buds and your body will thank you!

How to Properly Store and Cook Seafood: Ensuring Freshness and Flavor

Seafood is a delicious and nutritious source of protein, but it’s also highly perishable. Whether you’re working with fish, shrimp, scallops, or shellfish, it’s important to handle and store seafood correctly to maintain its freshness and ensure it’s safe to eat. In this blog post, we’ll explore the best practices for storing seafood and how to cook it to bring out its best flavor and texture. Why Proper Seafood Storage Matters Seafood spoils quickly due to its high water content and delicate proteins. Improper storage can lead to spoilage, loss of flavor, and even foodborne illnesses. Therefore, maintaining the right temperature and conditions is key to keeping your seafood fresh and safe to eat. How to Store Seafood Properly 1. Buy Fresh Seafood The journey to properly storing seafood starts at the market. When buying fresh seafood, look for the following indicators: 2. Keep Seafood Cold Seafood should be kept cold at all times to prevent bacterial growth. Once you bring seafood home, store it in the coldest part of your refrigerator at 32°F (0°C). Most home refrigerators are set between 35°F to 40°F, so to achieve optimal coldness, place seafood on a bed of ice in a shallow pan and cover it with a lid or plastic wrap. Replenish the ice as it melts. 3. Refrigerating Fresh Seafood 4. Freezing Seafood If you’re not planning to use your seafood within a day or two, freezing is the best option for long-term storage. Proper freezing techniques ensure that seafood retains its quality and flavor. Seafood can generally be frozen for up to 3-6 months. Thaw frozen seafood by transferring it to the refrigerator the night before you plan to use it, allowing it to defrost slowly. Best Practices for Cooking Seafood Once your seafood is properly stored, it’s time to cook it to perfection. Different types of seafood require different cooking methods, but the following tips will help you get the best results. 1. Thaw Seafood Properly If cooking frozen seafood, it’s important to thaw it properly to avoid affecting the texture and taste. The safest method is to thaw seafood overnight in the refrigerator. For faster thawing, place the seafood in a sealed plastic bag and submerge it in cold water, changing the water every 30 minutes until it’s thawed. 2. Avoid Overcooking Seafood cooks quickly, and overcooking can lead to dry, rubbery textures. Use the “10-minute rule” as a guide: cook fish fillets for 10 minutes per inch of thickness at a temperature of around 400°F (200°C). Shellfish and shrimp are done when they turn opaque and firm to the touch. 3. Check for Doneness 4. Use the Right Cooking Methods Here are a few popular cooking methods for different types of seafood: Storing Cooked Seafood Once cooked, seafood should be refrigerated within two hours to prevent bacteria growth. Store cooked seafood in an airtight container in the refrigerator for up to 3 days. If you have a large batch, freeze it for longer storage, but keep in mind that freezing may slightly alter the texture of cooked seafood. Handling seafood with care from purchase to plate ensures that you enjoy the freshest and safest meals possible. Proper storage, whether refrigerating or freezing, is crucial to maintaining the quality of seafood, while cooking it to the right temperature brings out the best flavor and texture. By following these best practices for storing and cooking seafood, you can savor the full experience of this delicious and healthy protein, all while keeping your kitchen safe and your meals full of flavor.

The Best Practices for Washing and Drying Fresh Berries to Prevent Mold

Fresh berries are a delicious and nutritious addition to any meal, whether sprinkled over yogurt, added to salads, or eaten straight from the carton. However, they are also highly perishable and can quickly develop mold if not handled properly. By using the right techniques for washing and drying berries, you can extend their freshness and prevent mold from ruining your precious fruit. In this blog post, we’ll walk you through the best practices for cleaning and storing berries so you can enjoy them for longer. Why Berries Are Prone to Mold Berries such as strawberries, blueberries, raspberries, and blackberries have high moisture content and delicate skin, making them susceptible to mold growth. If stored improperly, the moisture can encourage mold spores to develop, shortening the lifespan of your berries. Mold can spread rapidly, so it’s essential to handle berries with care from the moment you bring them home. Here’s how you can preserve your fresh berries and reduce the risk of mold development. Step-by-Step Guide: How to Wash and Dry Fresh Berries 1. Wash Just Before Eating or Using One of the most important rules for preventing mold on berries is to avoid washing them until you’re ready to eat or use them. Washing berries and then storing them while damp can trap moisture, creating the perfect environment for mold to grow. If you must wash berries ahead of time, make sure to dry them thoroughly before storing them. 2. Use a Vinegar and Water Solution A simple and effective way to clean berries is by using a vinegar and water solution. The vinegar helps kill mold spores and bacteria on the surface of the berries, significantly reducing the chances of mold formation. Here’s how to do it: The vinegar will not affect the taste of the berries, but if you’re concerned, you can give them a quick rinse with fresh water after the vinegar soak. 3. Rinse Carefully in Cold Water After the vinegar soak, carefully rinse your berries in cold water. This helps wash away any vinegar residue and ensures that your berries are clean and ready to eat. Be gentle when rinsing delicate berries like raspberries and blackberries to avoid crushing them. Use a colander to rinse the berries under cold running water. Avoid letting the berries sit in water for too long, as this can cause them to become soggy and more prone to mold. 4. Dry the Berries Thoroughly Once your berries are clean, it’s crucial to dry them thoroughly before storage. Excess moisture is the primary cause of mold development, so removing as much water as possible is key to prolonging their freshness. Here’s how to dry your berries properly: For especially delicate berries like raspberries and blackberries, use a soft cloth or paper towel to blot them dry instead of rubbing, as their skins are easily damaged. 5. Store Berries in a Well-Ventilated Container Once your berries are completely dry, it’s time to store them properly. To prevent mold, berries need airflow. Store them in a well-ventilated container that allows air circulation, rather than in a tightly sealed bag or container where moisture can accumulate. Here’s what works best for storing berries: 6. Check for Mold Regularly Even with proper washing, drying, and storage techniques, it’s essential to check your berries regularly for any signs of mold. Mold can spread quickly from one berry to another, so if you spot any berries with mold, remove them immediately to prevent the spread. If you notice any mushy or overripe berries, it’s a good idea to remove them as well, as they can accelerate the spoilage of the other berries in the container. Extra Tips for Extending the Life of Your Berries Berries are a delicious and nutritious snack, but they can quickly go bad if not stored properly. By following these best practices for washing, drying, and storing your berries, you can significantly extend their freshness and prevent mold from developing. Remember to wash berries just before eating, dry them thoroughly, and store them in a well-ventilated container in the fridge. With these simple steps, you’ll enjoy fresh, juicy berries for days without the worry of mold spoiling your produce.

The Role of Vinegar in Food Preservation: A Kitchen Staple for Longer-Lasting Foods

Vinegar has long been a trusted kitchen ingredient for food preservation, dating back centuries to when our ancestors used it to extend the shelf life of fruits, vegetables, and even meats. Today, vinegar remains one of the most effective and natural methods of preserving food while enhancing its flavor. This versatile liquid, which comes in various forms like apple cider, white, and wine vinegar, not only adds tangy zest to recipes but also plays a vital role in the preservation process. Let’s explore how vinegar works its magic and why it should be a staple in every kitchen. How Vinegar Preserves Food The secret to vinegar’s preserving power lies in its acidity. Vinegar typically contains 4-7% acetic acid, which lowers the pH level of foods, creating an environment that inhibits the growth of harmful bacteria, molds, and yeasts. When foods are submerged in vinegar, the acidic environment slows down the decomposition process, allowing the food to stay fresh for longer periods without refrigeration. This process is commonly used in techniques like pickling, marinades, and fermenting, where vinegar not only preserves the food but also enhances its flavor. Key Methods of Food Preservation with Vinegar 1. Pickling Pickling is perhaps the most well-known method of food preservation using vinegar. In this process, fruits, vegetables, and even some proteins are submerged in a brine made from vinegar, water, salt, and sometimes sugar or spices. The acidity of the vinegar prevents the growth of harmful microorganisms, keeping the food safe to eat for weeks or even months. Examples of popular pickled foods: In addition to preserving, pickling adds a tangy, tart flavor to foods, making them a delicious addition to salads, sandwiches, and charcuterie boards. 2. Canning with Vinegar Vinegar is also used in home canning, particularly with acidic fruits and vegetables. When foods are canned with vinegar, they are sealed in airtight containers, ensuring long-term preservation. The vinegar in the canning liquid prevents bacteria from growing, especially the bacteria responsible for botulism, which can be dangerous in improperly canned foods. Canning examples using vinegar: Using vinegar for canning is a natural, safe method to preserve seasonal produce so you can enjoy it year-round. 3. Marinades and Meat Preservation Vinegar is often used in marinades for meats and fish, not only to tenderize but also to preserve them for a short period. The acidic properties of vinegar slow down the spoiling process and help maintain the freshness of proteins before cooking. For example, meats that are marinated in vinegar-based sauces or dressings can be kept fresher longer. Vinegar also prevents bacterial growth on the surface of meats while adding flavor. 4. Fermentation Fermentation is another method of food preservation that sometimes involves vinegar. Although the fermentation process primarily relies on natural bacteria, vinegar can be added to speed up the acidification of foods. This method is commonly used in making kombucha, a fermented tea, as well as in fermented vegetables like sauerkraut and kimchi. Vinegar not only enhances the tanginess of these fermented products but also contributes to their longer shelf life and nutritional benefits, such as providing probiotics that promote gut health. Benefits of Preserving Food with Vinegar 1. All-Natural and Chemical-Free Vinegar is an all-natural preservative, free from artificial additives or chemicals. Unlike many store-bought preserved foods that use synthetic preservatives, vinegar offers a clean and safe way to keep foods fresh longer. 2. Longer Shelf Life Foods preserved in vinegar can last significantly longer than those stored using other methods. For example, properly pickled vegetables can be stored in the pantry for several months, offering a way to enjoy seasonal produce year-round. 3. Enhanced Flavor One of the added bonuses of preserving food with vinegar is the burst of flavor it imparts. Vinegar adds a tangy, sour note to foods, making them more interesting and complex. Pickled cucumbers, for instance, take on a sharp and refreshing bite, while pickled fruits develop a sweet and tangy complexity that complements both savory and sweet dishes. 4. Low-Cost and Accessible Vinegar is one of the most affordable and widely available food preservation ingredients. It doesn’t require specialized equipment or expensive ingredients, making it accessible for home cooks who want to try their hand at pickling or preserving food at home. 5. Safe and Reliable Vinegar has been trusted for centuries as a reliable method for preserving food safely. Its high acidity makes it a formidable opponent to harmful bacteria, ensuring that your preserved foods remain safe to eat for extended periods. Best Types of Vinegar for Preservation There are several types of vinegar that can be used for preserving food, each bringing a different flavor and acidity level. Here are a few of the best: Vinegar is much more than a kitchen condiment; it’s a powerful and natural preservative that extends the life of your food while adding rich, tangy flavors. From pickling to canning, marinades to fermentation, vinegar offers numerous ways to preserve food and maintain its freshness. Whether you’re looking to enjoy summer’s harvest throughout the winter or enhance your favorite recipes with bold flavors, incorporating vinegar into your food preservation practices is an easy, cost-effective, and healthful choice. So, next time you find yourself with an abundance of fresh produce, consider turning to vinegar as your go-to preservation tool. Your pantry and your taste buds will thank you!

Unique Recipes Featuring Pickled and Fermented Foods: A Tangy Twist for Your Kitchen

Pickled and fermented foods have been enjoyed for centuries, not just for their bold flavors but also for their health benefits. Rich in probiotics, these foods support gut health, aid digestion, and add a zesty touch to any dish. From tangy pickles to spicy kimchi, fermented and pickled ingredients can elevate your meals in surprising ways. Below are some unique recipes that bring out the best in pickled and fermented foods, offering creative twists on everyday dishes. Pickled Beet and Goat Cheese Salad Bright, earthy pickled beets pair beautifully with creamy goat cheese and fresh greens in this vibrant salad. Ingredients: Instructions: Kimchi Fried Rice Kimchi’s spicy, tangy flavor turns a simple bowl of fried rice into a bold, flavor-packed meal. This Korean-inspired dish is perfect for using up leftover rice and vegetables. Ingredients: Instructions: Pickled Red Onion and Avocado Tacos Give your tacos a tangy twist with quick-pickled red onions and creamy avocado. These plant-based tacos are fresh, flavorful, and perfect for a quick meal. Ingredients: Instructions: Fermented Dill Pickle Potato Salad Swap out regular pickles for fermented dill pickles in this refreshing take on a classic potato salad. The fermented pickles add a deeper, tangy flavor to the dish. Ingredients: Instructions: Miso-Marinated Grilled Eggplant Miso, a fermented soybean paste, adds an incredible umami depth to grilled vegetables. In this recipe, eggplant soaks up the savory miso marinade and develops a caramelized finish when grilled. Ingredients: Instructions: Incorporating pickled and fermented foods into your cooking adds layers of complexity and flavor while delivering health benefits. Whether you’re whipping up a simple salad or a hearty fried rice dish, these unique recipes offer creative ways to enjoy tangy, fermented ingredients. Give them a try, and discover how pickled and fermented foods can transform your meals!

Cooking and Baking with Sugar Alternatives: A Guide to Healthier Sweetening

Sugar alternatives can be a game-changer in your kitchen, offering a way to reduce refined sugar intake while still enjoying the sweet flavors you love. Whether you’re baking, cooking, or simply looking to cut back on sugar, exploring these alternatives can lead to healthier and equally delicious results. Here’s a comprehensive guide to cooking and baking with sugar alternatives! Understanding Sugar Alternatives Before diving into recipes, it’s important to understand the various types of sugar alternatives available. They fall into several categories: Choosing the Right Alternative The choice of sweetener depends on the recipe and your personal preferences. Here’s a rundown of popular alternatives and how they work in cooking and baking: Baking with Sugar Alternatives When baking, sugar alternatives can affect texture, color, and taste. Here are some tips for successful baking: Cooking with Sugar Alternatives When cooking with sugar alternatives, the method can vary depending on the sweetener: Health Considerations Recipes to Try Here are a few recipe ideas to get you started with sugar alternatives: Cooking and baking with sugar alternatives can be a fun and rewarding way to enjoy your favorite treats while making healthier choices. Experiment with different sweeteners to find the perfect balance for your recipes and preferences. With these tips and a bit of creativity, you can create delicious, sweet dishes that fit your dietary needs!

Unique Recipes Featuring Exotic Fruits: A Culinary Adventure

Exotic fruits bring a touch of the extraordinary to your kitchen, offering unique flavors, vibrant colors, and nutritional benefits that can transform ordinary dishes into extraordinary ones. From tangy to sweet, these fruits can be used in a variety of recipes to add a new dimension to your meals. If you’re ready to explore the world of exotic fruits, here are some unique recipes that highlight their delightful flavors and textures. Dragon Fruit Smoothie Bowl Dragon fruit, also known as pitaya, is a visually stunning fruit with a mildly sweet taste. Its vibrant pink or white flesh is dotted with tiny black seeds and has a texture similar to kiwi. Ingredients: Instructions: Papaya and Lime Chicken Salad Papaya adds a tropical twist to a classic chicken salad. Its sweetness complements the tangy lime dressing and crunchy vegetables. Ingredients: Instructions: Mango and Avocado Salsa Mango’s sweet and juicy flavor pairs beautifully with creamy avocado, making it a perfect complement to grilled meats or as a standalone dip. Ingredients: Instructions: Starfruit and Ginger Chutney Starfruit, also known as carambola, has a crisp texture and a tangy flavor that works well in a sweet and spicy chutney. It’s an excellent accompaniment to curries or grilled meats. Ingredients: Instructions: Passion Fruit Sorbet Passion fruit’s tangy, aromatic flavor makes it an ideal choice for a refreshing sorbet. This dessert is perfect for hot summer days or as a light finish to a meal. Ingredients: Instructions: Kumquat Marmalade Kumquats are small citrus fruits with a sweet-tart flavor. Their entire peel is edible, making them ideal for marmalade. Ingredients: Instructions: Exploring exotic fruits can add excitement and variety to your cooking. Whether you’re making a refreshing smoothie bowl, a zesty salsa, or a tangy chutney, these fruits offer unique flavors that can elevate your dishes and impress your taste buds. So don’t be afraid to step out of your culinary comfort zone and experiment with these exotic fruits. Your taste buds will thank you! Have you tried cooking with exotic fruits? Share your favorite recipes and experiences in the comments!