Customer Support Hub
-
Ranges
-
-
- COS-244AGC Help Docs Table of Contents
- COS-244AGC LP Conversion
- COS-244AGC LP Conversion Table
- Adjust COS-244AGC Regulator for LP Gas
- Calibrate COS-244AGC Cooktop Burners
- COS-244AGC Gas Cooktop Troubleshooting
- COS-244AGC Gas Oven Troubleshooting
- COS-244AGC Gas Installation Troubleshooting
- COS-244AGC Electrical Installation Troubleshooting - 120V
- COS-244AGC FAQ
-
- COS-965AG Help Docs Table of Contents
- COS-965AG LP Conversion
- Adjust COS-965AG Regulator for LP Gas
- Adjust COS-965AG Oven Burners for LP Gas
- Calibrate COS-965AG Cooktop Burners
- COS-965AG Gas Cooktop Troubleshooting
- COS-965AG Gas Oven Troubleshooting
- COS-965AG Gas Installation Troubleshooting
- COS-965AG Electrical Installation Troubleshooting - 120V
- COS-965AG FAQ
-
- COS-965AGC Help Docs Table of Contents
- COS-965AGC LP Conversion
- COS-965AGC LP Conversion Table
- Adjust COS-965AGC Regulator for LP Gas
- Adjust COS-965AGC Oven Burners for LP Gas
- Calibrate COS-965AGC Cooktop Burners
- COS-965AGC Gas Cooktop Troubleshooting
- COS-965AGC Gas Oven Troubleshooting
- COS-965AGC Gas Installation Troubleshooting
- COS-965AGC Electrical Installation Troubleshooting - 120V
- COS-965AGC FAQ
-
- COS-965AGF Help Docs Table of Contents
- COS-965AGF LP Conversion
- Adjust COS-965AGF Regulator for LP Gas
- Adjust COS-965AGF Oven Burners for LP Gas
- Calibrate COS-965AGF Cooktop Burners
- COS-965AGF Gas Cooktop Troubleshooting
- COS-965AGF Gas Oven Troubleshooting
- COS-965AGF Gas Installation Troubleshooting
- COS-965AGF Electrical Installation Troubleshooting - 120V
- COS-965AGF FAQ
-
- COS-965AGFC Help Docs Table of Contents
- COS-965AGFC LP Conversion
- COS-965AGFC LP Conversion Table
- Adjust COS-965AGFC Regulator for LP Gas
- Adjust COS-965AGFC Oven Burners for LP Gas
- Calibrate COS-965AGFC Cooktop Burners
- COS-965AGFC Gas Cooktop Troubleshooting
- COS-965AGFC Gas Oven Troubleshooting
- COS-965AGFC Gas Installation Troubleshooting
- COS-965AGFC Electrical Installation Troubleshooting - 120V
- COS-965AGFC FAQ
-
- COS-EPGR304 Help Docs Table of Contents
- COS-EPGR304 LP Conversion
- Adjust COS-EPGR304 Regulator for LP Gas
- Calibrate COS-EPGR304 Cooktop Burners
- COS-EPGR304 Gas Cooktop Troubleshooting
- COS-EPGR304 Gas Oven Troubleshooting
- COS-EPGR304 Gas Installation Troubleshooting
- COS-EPGR304 Electrical Installation Troubleshooting - 120V
- COS-EPGR304 FAQ
-
- COS-EPGR366 Help Docs Table of Contents
- COS-EPGR366 LP Conversion
- Adjust COS-EPGR366 Regulator for LP Gas
- Calibrate COS-EPGR366 Cooktop Burners
- COS-EPGR366 Gas Cooktop Troubleshooting
- COS-EPGR366 Gas Oven Troubleshooting
- COS-EPGR366 Gas Installation Troubleshooting
- COS-EPGR366 Electrical Installation Troubleshooting - 120V
- COS-EPGR366 FAQ
-
- COS-EPGR486G Help Docs Table of Contents
- COS-EPGR486G LP Conversion
- Adjust COS-EPGR486G Regulator for LP Gas
- Calibrate COS-EPGR486G Cooktop Burners
- COS-EPGR486G Gas Cooktop Troubleshooting
- COS-EPGR486G Gas Oven Troubleshooting
- COS-EPGR486G Gas Installation Troubleshooting
- COS-EPGR486G Electrical Installation Troubleshooting - 120V
- COS-EPGR486G FAQ
-
- COS-GRP304 Help Docs Table of Contents
- COS-GRP304 LP Conversion
- Adjust COS-GRP304 Regulator for LP Gas
- Calibrate COS-GRP304 Cooktop Burners
- COS-GRP304 Gas Cooktop Troubleshooting
- COS-GRP304 Gas Oven Troubleshooting
- COS-GRP304 Gas Installation Troubleshooting
- COS-GRP304 Electrical Installation Troubleshooting - 120V
- COS-GRP304 FAQ
-
- COS-GRP366 Help Docs Table of Contents
- COS-GRP366 LP Conversion
- Adjust COS-GRP366 Regulator for LP Gas
- Calibrate COS-GRP366 Cooktop Burners
- COS-GRP366 Gas Cooktop Troubleshooting
- COS-GRP366 Gas Oven Troubleshooting
- COS-GRP366 Gas Installation Troubleshooting
- COS-GRP366 Electrical Installation Troubleshooting - 120V
- COS-GRP366 FAQ
-
- COS-GRP486G Help Docs Table of Contents
- COS-GRP486G LP Conversion
- Adjust COS-GRP486G Regulator for LP Gas
- Calibrate COS-GRP486G Cooktop Burners
- COS-GRP486G Gas Cooktop Troubleshooting
- COS-GRP486G Gas Oven Troubleshooting
- COS-GRP486G Gas Installation Troubleshooting
- COS-GRP486G Electrical Installation Troubleshooting - 120V
- COS-GRP486G FAQ
-
-
-
- COS-305DFSC Help Docs Table of Contents
- COS-305DFSC LP Conversion
- Adjust COS-305DFSC Regulator for LP Gas
- Calibrate COS-305DFSC Cooktop Burners
- COS-305DFSC Gas Cooktop Troubleshooting
- COS-305DFSC Oven Troubleshooting
- COS-305DFSC Gas Installation Troubleshooting
- COS-305DFSC Electrical Installation Troubleshooting - 240V
- COS-305DFSC FAQ
-
- COS-DFR304 Help Docs Table of Contents
- COS-DFR304 LP Conversion
- Adjust COS-DFR304 Regulator for LP Gas
- Calibrate COS-DFR304 Cooktop Burners
- COS-DFR304 Gas Cooktop Troubleshooting
- COS-DFR304 Electric Oven Troubleshooting
- COS-DFR304 Gas Installation Troubleshooting
- COS-DFR304 Electrical Installation Troubleshooting - 240V
- COS-DFR304 FAQ
-
- COS-DFR366 Help Docs Table of Contents
- COS-DFR366 LP Conversion
- Adjust COS-DFR366 Regulator for LP Gas
- Calibrate COS-DFR366 Cooktop Burners
- COS-DFR366 Gas Cooktop Troubleshooting
- COS-DFR366 Electric Oven Troubleshooting
- COS-DFR366 Gas Installation Troubleshooting
- COS-DFR366 Electrical Installation Troubleshooting - 240V
- COS-DFR366 FAQ
-
- COS-DFR486G Help Docs Table of Contents
- COS-DFR486G LP Conversion
- Adjust COS-DFR486G Regulator for LP Gas
- Calibrate COS-DFR486G Cooktop Burners
- COS-DFR486G Gas Cooktop Troubleshooting
- COS-DFR486G Electric Oven Troubleshooting
- COS-DFR486G Gas Installation Troubleshooting
- COS-DFR486G Electrical Installation Troubleshooting - 240V
- COS-DFR486G FAQ
-
- COS-F965 Help Docs Table of Contents
- COS-F965 LP Conversion
- Adjust COS-F965 Regulator for LP Gas
- Calibrate COS-F965 Cooktop Burners
- COS-F965 Gas Cooktop Troubleshooting
- COS-F965 Electric Oven Troubleshooting
- COS-F965 Gas Installation Troubleshooting
- COS-F965 Electrical Installation Troubleshooting - 240V
- COS-F965 FAQ
-
- COS-F965NF Help Docs Table of Contents
- COS-F965NF LP Conversion
- Adjust COS-F965NF Regulator for LP Gas
- Calibrate COS-F965NF Cooktop Burners
- COS-F965NF Gas Cooktop Troubleshooting
- COS-F965NF Electric Oven Troubleshooting
- COS-F965NF Gas Installation Troubleshooting
- COS-F965NF Electrical Installation Troubleshooting - 240V
- COS-F965NF FAQ
-
-
-
Range Hoods
-
-
-
- COS-63175 Help Docs Table of Contents
- COS-63175 Quick Start Video Guide
- COS-63175 Installation Video Guide
- COS-63175 Troubleshooting Video Guide
- COS-63175 Motor Troubleshooting
- COS-63175 Controls Troubleshooting
- COS-63175 LED Lights Troubleshooting
- COS-63175 Locate and Replace Circuit Board
- COS-63175 Locate and Replace Motor
- COS-63175 Locate and Replace Control Panel
- COS-63175 FAQ
-
- COS-63175S Help Docs Table of Contents
- COS-63175S Quick Start Video Guide
- COS-63175S Installation Video Guide
- COS-63175S Troubleshooting Video Guide
- COS-63175S Motor Troubleshooting
- COS-63175S Controls Troubleshooting
- COS-63175S LED Lights Troubleshooting
- COS-63175S Locate and Replace Circuit Board
- COS-63175S Locate and Replace Motor
- COS-63175S Locate and Replace Control Panel
- COS-63175S FAQ
-
- COS-63190 Help Docs Table of Contents
- COS-63190 Quick Start Video Guide
- COS-63190 Installation Video Guide
- COS-63190 Troubleshooting Video Guide
- COS-63190 Motor Troubleshooting
- COS-63190 Controls Troubleshooting
- COS-63190 LED Lights Troubleshooting
- COS-63190 Locate and Replace Circuit Board
- COS-63190 Locate and Replace Motor
- COS-63190 Locate and Replace Control Panel
- COS-63190 FAQ
-
- COS-63190S Help Docs Table of Contents
- COS-63190S Quick Start Video Guide
- COS-63190S Installation Video Guide
- COS-63190S Troubleshooting Video Guide
- COS-63190S Motor Troubleshooting
- COS-63190S Controls Troubleshooting
- COS-63190S LED Lights Troubleshooting
- COS-63190S Locate and Replace Circuit Board
- COS-63190S Locate and Replace Motor
- COS-63190S Locate and Replace Control Panel
- COS-63190S FAQ
-
- COS-668A750 Help Docs Table of Contents
- COS-668A750 Quick Start Video Guide
- COS-668A750 Installation Video Guide
- COS-668A750 Troubleshooting Video Guide
- COS-668A750 Motor Troubleshooting
- COS-668A750 Controls Troubleshooting
- COS-668A750 LED Lights Troubleshooting
- COS-668A750 FAQ
- COS-668A750 Locate and Replace Circuit Board
- COS-668A750 Locate and Replace Motor
- COS-668A750 Locate and Replace Control Panel
- COS-668A750 Replacing Glass Visor
-
- COS-668A900 Help Docs Table of Contents
- COS-668A900 Quick Start Video Guide
- COS-668A900 Installation Video Guide
- COS-668A900 Troubleshooting Video Guide
- COS-668A900 Motor Troubleshooting
- COS-668A900 Controls Troubleshooting
- COS-668A900 LED Lights Troubleshooting
- COS-668A900 FAQ
- COS-668A900 Locate and Replace Circuit Board
- COS-668A900 Locate and Replace Motor
- COS-668A900 Locate and Replace Control Panel
- COS-668A900 Replacing Glass Visor
-
- COS-668AS750 Help Docs Table of Contents
- COS-668AS750 Quick Start Video Guide
- COS-668AS750 Installation Video Guide
- COS-668AS750 Troubleshooting Video Guide
- COS-668AS750 Motor Troubleshooting
- COS-668AS750 Controls Troubleshooting
- COS-668AS750 LED Lights Troubleshooting
- COS-668AS750 FAQ
- COS-668AS750 Locate and Replace Circuit Board
- COS-668AS750 Locate and Replace Motor
- COS-668AS750 Locate and Replace Control Panel
- COS-668AS750 Replacing Glass Visor
-
- COS-668AS900 Help Docs Table of Contents
- COS-668AS900 Quick Start Video Guide
- COS-668AS900 Installation Video Guide
- COS-668AS900 Troubleshooting Video Guide
- COS-668AS900 Motor Troubleshooting
- COS-668AS900 Controls Troubleshooting
- COS-668AS900 LED Lights Troubleshooting
- COS-668AS900 FAQ
- COS-668AS900 Locate and Replace Circuit Board
- COS-668AS900 Locate and Replace Motor
- COS-668AS900 Locate and Replace Control Panel
- COS-668AS900 Replacing Glass Visor
-
- COS-668WRC75 Help Docs Table of Contents
- COS-668WRC75 Quick Start Video Guide
- COS-668WRC75 Installation Video Guide
- COS-668WRC75 Troubleshooting Video Guide
- COS-668WRC75 Motor Troubleshooting
- COS-668WRC75 Controls Troubleshooting
- COS-668WRC75 LED Lights Troubleshooting
- COS-668WRC75 FAQ
- COS-668WRC75 Locate and Replace Circuit Board
- COS-668WRC75 Locate and Replace Motor
- COS-668WRC75 Locate and Replace Control Panel
- COS-668WRC75 Replacing Glass Visor
-
- COS-668WRC90 Help Docs Table of Contents
- COS-668WRC90 Quick Start Video Guide
- COS-668WRC90 Installation Video Guide
- COS-668WRC90 Troubleshooting Video Guide
- COS-668WRC90 Motor Troubleshooting
- COS-668WRC90 Controls Troubleshooting
- COS-668WRC90 LED Lights Troubleshooting
- COS-668WRC90 FAQ
- COS-668WRC90 Locate and Replace Circuit Board
- COS-668WRC90 Locate and Replace Motor
- COS-668WRC90 Locate and Replace Control Panel
- COS-668WRC90 Replacing Glass Visor
-
- COS-668WRCS75 Help Docs Table of Contents
- COS-668WRCS75 Quick Start Video Guide
- COS-668WRCS75 Installation Video Guide
- COS-668WRCS75 Troubleshooting Video Guide
- COS-668WRCS75 Motor Troubleshooting
- COS-668WRCS75 Controls Troubleshooting
- COS-668WRCS75 LED Lights Troubleshooting
- COS-668WRCS75 FAQ
- COS-668WRCS75 Locate and Replace Circuit Board
- COS-668WRCS75 Locate and Replace Motor
- COS-668WRCS75 Locate and Replace Control Panel
- COS-668WRCS75 Replacing Glass Visor
-
- COS-668WRCS90 Help Docs Table of Contents
- COS-668WRCS90 Quick Start Video Guide
- COS-668WRCS90 Installation Video Guide
- COS-668WRCS90 Troubleshooting Video Guide
- COS-668WRCS90 Motor Troubleshooting
- COS-668WRCS90 Controls Troubleshooting
- COS-668WRCS90 LED Lights Troubleshooting
- COS-668WRCS90 FAQ
- COS-668WRCS90 Locate and Replace Circuit Board
- COS-668WRCS90 Locate and Replace Motor
- COS-668WRCS90 Locate and Replace Control Panel
- COS-668WRCS90 Replacing Glass Visor
-
-
-
- COS-668ICS750 Help Docs Table of Contents
- COS-668ICS750 Quick Start Video Guide
- COS-668ICS750 Installation Video Guide
- COS-668ICS750 Uninstall Video Guide
- COS-668ICS750 Troubleshooting Video Guide
- COS-668ICS750 Motor Troubleshooting
- COS-668ICS750 Controls Troubleshooting
- COS-668ICS750 LED Lights Troubleshooting
- COS-668ICS750 FAQ
-
- COS-668ICS900 Help Docs Table of Contents
- COS-668ICS900 Quick Start Video Guide
- COS-668ICS900 Installation Video Guide
- COS-668ICS900 Uninstall Video Guide
- COS-668ICS900 Troubleshooting Video Guide
- COS-668ICS900 Motor Troubleshooting
- COS-668ICS900 Controls Troubleshooting
- COS-668ICS900 LED Lights Troubleshooting
- COS-668ICS900 FAQ
-
-
Cooktops
-
-
- COS-640STX-E Help Docs Table of Contents
- COS-640STX-E LP Conversion
- Adjust COS-640STX-E Regulator for LP Gas
- Calibrate COS-640STX-E Cooktop Burners
- COS-640STX-E Gas Cooktop Troubleshooting
- COS-640STX-E Gas Installation Troubleshooting
- COS-640STX-E Electrical Installation Troubleshooting - 120V
- COS-640STX-E FAQ
-
- COS-850SLTX-E Help Docs Table of Contents
- COS-850SLTX-E LP Conversion
- Adjust COS-850SLTX-E Regulator for LP Gas
- Calibrate COS-850SLTX-E Cooktop Burners
- COS-850SLTX-E Gas Cooktop Troubleshooting
- COS-850SLTX-E Gas Installation Troubleshooting
- COS-850SLTX-E Electrical Installation Troubleshooting - 120V
- COS-850SLTX-E FAQ
-
- COS-950SLTX-E Help Docs Table of Contents
- COS-950SLTX-E LP Conversion
- Adjust COS-950SLTX-E Regulator for LP Gas
- Calibrate COS-950SLTX-E Cooktop Burners
- COS-950SLTX-E Gas Cooktop Troubleshooting
- COS-950SLTX-E Gas Installation Troubleshooting
- COS-950SLTX-E Electrical Installation Troubleshooting - 120V
- COS-950SLTX-E FAQ
-
- COS-VA-S950M Help Docs Table of Contents
- COS-VA-S950M LP Conversion
- Adjust COS-VA-S950M Regulator for LP Gas
- Calibrate COS-VA-S950M Cooktop Burners
- COS-VA-S950M Gas Cooktop Troubleshooting
- COS-VA-S950M Gas Installation Troubleshooting
- COS-VA-S950M Electrical Installation Troubleshooting - 120V
- COS-VA-S950M FAQ
-
-
-
-
Wall Ovens
-
Microwaves
-
Refrigeration
-
Dishwasher
-
Countertop Appliances
-
Faucets
-
Support
Adjust COS-EPGR486G Regulator for LP Gas

- Read all instructions carefully before beginning. NOTE: Your regulator may not match the images exactly, but the procedure will remain the same.
- Disconnect all electrical power at the main circuit breaker or fuse box. Shut off the gas supply to the unit by closing the manual shut-off valve.
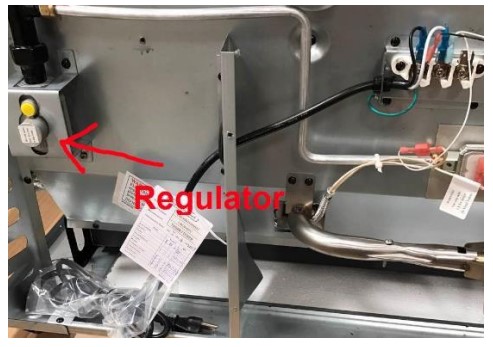
- Locate the regulator installed on the rear of the unit as shown in Figure 1-A.
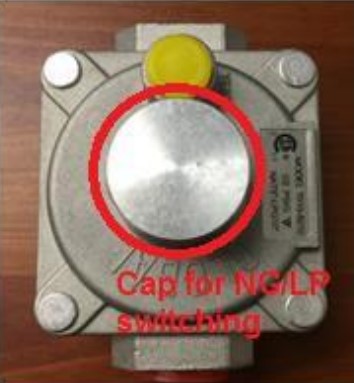
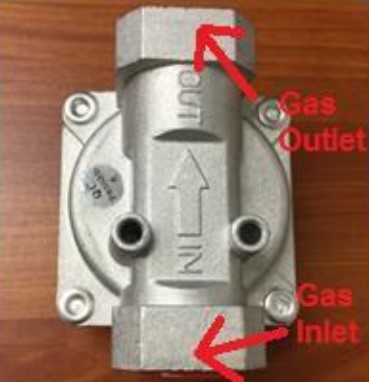
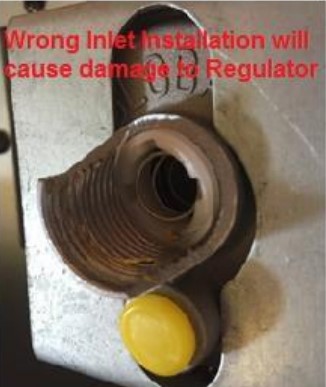
- Unscrew the cap on the regulator using your fingers as shown in Figure 2-A. This is NOT a gas inlet. Gas inlet and outlet are shown in Figure 2-B. Attempting to insert a gas line under the cap of the regulator will damage the product and void the warranty as shown in Figure 2-C.
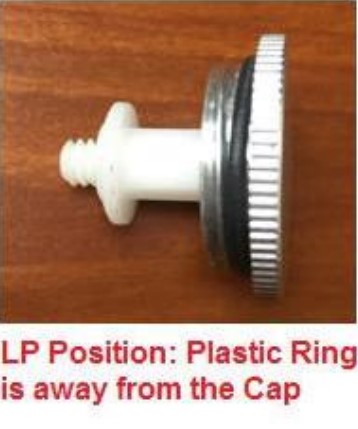
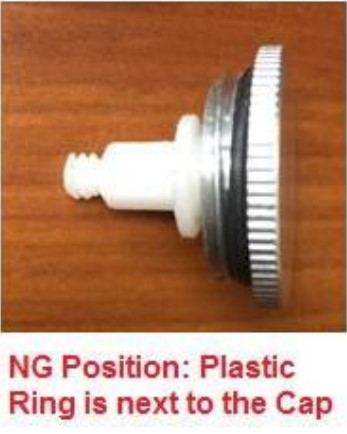
- Unscrew and remove the retainer pin that is in the NG Position as shown in Figure 3-A.
- Pay close attention to the position of the pin inside the cap as shown in Figure 3-A. If necessary, remove the retainer pin and re-insert into the cap in the LP Position as shown in Figure 3-B.
- Replace the regulator cap and tighten using a wrench. Do not overtighten.
- Your regulator is now set up for LP gas.